
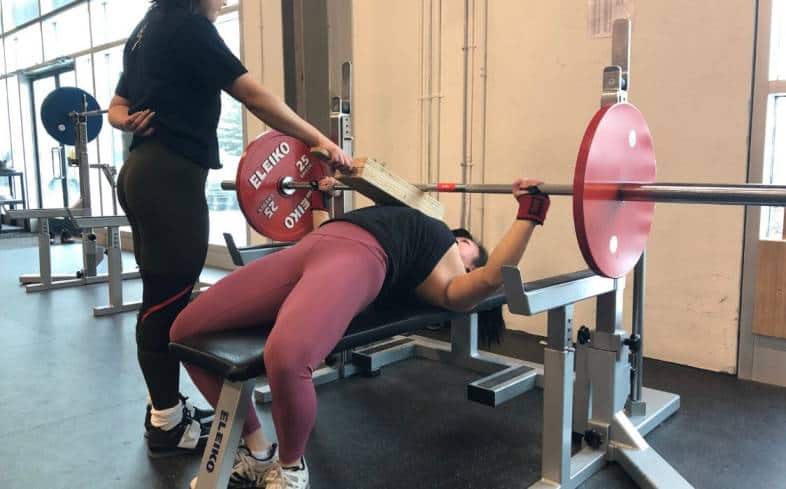
If you are looking to increase your bench press strength, you may want to consider adding the lock out bench press to your routine. This exercise is great for targeting the triceps and helping you increase your upper body strength. In this article, we will discuss how to perform the lock out bench press and the benefits of incorporating it into your workout routine.
What is the Lock Out Bench Press?

The lock out bench press is a variation of the bench press that involves lifting the barbell from a dead stop at the top of the lift, rather than from the bottom. This means that you are only lifting the weight through the top half of the bench press movement, which puts a greater emphasis on the triceps.
How to Perform the Lock Out Bench Press
To perform the lock out bench press, you will need a bench press set up, including a barbell, plates, and a bench. Follow these steps:
- Lie down on the bench and grip the barbell with your hands shoulder-width apart.
- Unrack the bar and lower it to your chest as you would with a regular bench press.
- Press the bar up until your arms are fully extended.
- Let the bar come to a dead stop on your chest.
- Press the bar up again, using only the strength of your triceps.
- Repeat for the desired number of reps.
It is important to keep your elbows close to your body throughout the movement to ensure that you are targeting your triceps effectively.
Benefits of the Lock Out Bench Press

The lock out bench press offers a number of benefits, including:
- Increased tricep strength: The lock out bench press puts a greater emphasis on the triceps, making it an effective exercise for increasing upper body strength.
- Improved lock out strength: By practicing lifting the weight from a dead stop at the top of the lift, you can improve your lock out strength, which is important for other exercises such as the overhead press.
- Reduced risk of injury: By focusing on the top half of the bench press movement, you can reduce the risk of shoulder and chest injuries that can occur when lifting heavy weights through the full range of motion.
How to Incorporate the Lock Out Bench Press into Your Workout

The lock out bench press can be incorporated into your workout routine in a number of ways. Here are some suggestions:
- As a primary lift: If you are looking to improve your bench press strength, you can use the lock out bench press as a primary lift, performing it early in your workout when you are fresh.
- As an accessory lift: If you are looking to target your triceps specifically, you can use the lock out bench press as an accessory lift, performing it after your primary bench press sets.
- As a variation: You can also use the lock out bench press as a variation on your regular bench press, alternating between the two exercises to keep your workouts varied and challenging.
Conclusion
The lock out bench press is a great exercise for targeting the triceps and improving your upper body strength. By practicing this exercise regularly, you can improve your lock out strength, reduce your risk of injury, and take your bench press to the next level. Remember to focus on keeping your elbows close to your body throughout the movement to ensure that you are targeting your triceps effectively.
Related video of Lock Out Bench Press: How to Perform and Benefits
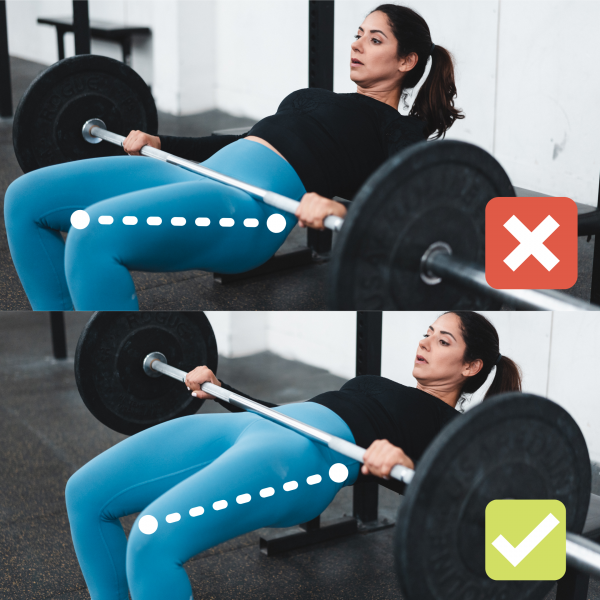
When it comes to glute training, hip thrusts are one of the most effective exercises you can do. They target your glutes, hamstrings, and even your lower back muscles. However, many people perform this exercise incorrectly, which can lead to suboptimal results or even injuries.
Why Proper Form Matters

Performing the hip thrust with proper form is crucial to ensure that you're targeting your glutes and not other muscles. Furthermore, using incorrect form can put unnecessary stress on your lower back, leading to injuries.
The Correct Form

Here's how to perform the hip thrust with the correct form:
- Start by sitting on the ground with your back against a bench and your feet flat on the floor, hip-width apart.
- Place a barbell or a weight plate on your hips.
- Roll the barbell or weight plate up to your thighs and hold it in place with your hands.
- Engage your glutes and drive your hips up towards the ceiling.
- Pause at the top of the movement and squeeze your glutes.
- Lower your hips back down to the starting position.
- Repeat for the desired number of reps.
Common Mistakes to Avoid

Here are some common mistakes that people make when performing hip thrusts:
- Hyperextending their lower back at the top of the movement.
- Rounding their shoulders and upper back, which can cause neck strain.
- Not engaging their glutes and relying on their lower back muscles.
- Placing the weight too high on their hips, which can cause discomfort.
Tips for Improving Your Hip Thrust Form

Here are some tips to help you improve your hip thrust form:
- Start with a light weight and focus on engaging your glutes throughout the movement.
- Place a band around your knees to activate your glute medius muscles.
- Keep your core tight and your shoulders and upper back in a neutral position.
- Experiment with different foot positions to target different parts of your glutes.
- Gradually increase the weight as you get stronger and more comfortable with the movement.
Conclusion
The hip thrust is an excellent exercise for targeting your glutes, but it's important to perform it with proper form to avoid injuries and get the most out of the exercise. By following the correct form and avoiding common mistakes, you can improve your hip thrusts and achieve better results.
Related video of Hip Thrust Correct Form

Single Leg Stiff Deadlift is one of the most effective exercises for developing strong, defined glutes, hamstrings, and lower back muscles. This exercise is highly beneficial for athletes, fitness enthusiasts, and anyone looking to improve their lower body strength and stability.
What is Single Leg Stiff Deadlift?

Single Leg Stiff Deadlift, also known as Single Leg Romanian Deadlift or Single Leg RDL, is a variation of the classic Romanian Deadlift exercise. The movement involves hinging at the hips to lower a weight down towards the ground while keeping one leg lifted off the ground.
This exercise requires a great deal of core stability, balance, and coordination, making it an excellent exercise for those looking to improve their overall athletic performance.
Benefits of Single Leg Stiff Deadlift

Single Leg Stiff Deadlift offers a range of benefits, including:
- Improved lower body strength and power
- Increased core stability and balance
- Reduced risk of injury by strengthening the glutes, hamstrings, and lower back
- Better muscle activation and engagement compared to traditional deadlifts
- Improved posture and spinal alignment
How to Perform Single Leg Stiff Deadlift

Follow these steps to perform Single Leg Stiff Deadlift:
- Stand with your feet hip-width apart and hold a weight in one hand
- Lift one foot off the ground, keeping your knee slightly bent and your core engaged
- Hinge at your hips and lower the weight towards the ground, keeping your back straight and your chest up
- Lower the weight until you feel a stretch in your hamstrings
- Slowly raise the weight back up to the starting position and repeat for the desired number of reps
- Switch sides and repeat the exercise
Tips for Performing Single Leg Stiff Deadlift

Here are some tips to help you perform Single Leg Stiff Deadlift with proper form:
- Keep your core engaged throughout the exercise to maintain balance and stability
- Focus on keeping your back straight and your chest up to avoid rounding your spine
- Start with a light weight and gradually increase the weight as you become more comfortable with the exercise
- Keep your lifted leg slightly bent to help with balance and stability
- Avoid using momentum to lift the weight up, instead focus on using your hamstrings and glutes to lift the weight
Single Leg Stiff Deadlift Variations

Here are some variations of Single Leg Stiff Deadlift:
- Single Leg Stiff Deadlift with Dumbbells
- Single Leg Stiff Deadlift with Kettlebells
- Single Leg Stiff Deadlift with Resistance Bands
- Single Leg Stiff Deadlift with Barbell
- Single Leg Stiff Deadlift with Bodyweight
Final Thoughts

Single Leg Stiff Deadlift is a highly effective exercise for developing lower body strength, stability, and balance. By incorporating this exercise into your workout routine, you can improve your athletic performance, reduce your risk of injury, and achieve a more defined and sculpted lower body.
Related video of Single Leg Stiff Deadlift: A Complete Guide
One arm cable rows, also known as single arm cable rows, are a popular exercise among gym-goers. This exercise is great for targeting the upper back and building strength in the arms and shoulders. In this article, we’ll take a closer look at how to perform one arm cable rows, the benefits of this exercise, and some variations you can try.
How to Perform One Arm Cable Rows

To perform one arm cable rows, you’ll need access to a cable machine. Here’s how to do it:
- Attach a single handle to the cable machine and adjust the pulley to the lowest setting.
- Stand facing the machine and grab the handle with one hand.
- Step back a few feet to create tension in the cable.
- Bend your knees slightly and hinge forward at the hips, keeping your back straight.
- Keep your elbow close to your body and pull the handle towards your waist.
- Squeeze your shoulder blades together at the top of the movement.
- Slowly lower the handle back to the starting position.
- Complete 8-12 reps on one side before switching to the other arm.
The Benefits of One Arm Cable Rows

One arm cable rows offer several benefits, including:
- Targeting the upper back muscles, including the lats, traps, and rhomboids.
- Building strength and muscle in the arms and shoulders.
- Improving posture and reducing the risk of back pain.
- Allowing you to work each side of your body independently, which can help correct muscle imbalances.
Variations of One Arm Cable Rows

There are several variations of one arm cable rows you can try to mix up your workout:
- Reverse Grip One Arm Cable Rows: Hold the handle with an underhand grip to target the biceps and forearms.
- Wide Grip One Arm Cable Rows: Use a wider handle to target the outer back muscles.
- Seated One Arm Cable Rows: Sit on a bench with your feet flat on the ground and perform the exercise with one arm at a time.
Tips for Performing One Arm Cable Rows

To get the most out of one arm cable rows, keep these tips in mind:
- Focus on pulling with your back muscles, not your arms.
- Keep your core engaged and your back straight throughout the movement.
- Use a weight that allows you to complete 8-12 reps with good form.
- Try to squeeze your shoulder blades together at the top of the movement to really engage your upper back muscles.
- Don’t let your elbow flare out to the side; keep it close to your body.
In Conclusion
One arm cable rows are a great exercise for building strength and muscle in the upper back, arms, and shoulders. By following the proper form and incorporating variations into your workout routine, you can take your fitness to the next level.
Related video of One Arm Cable Rows: A Complete Guide
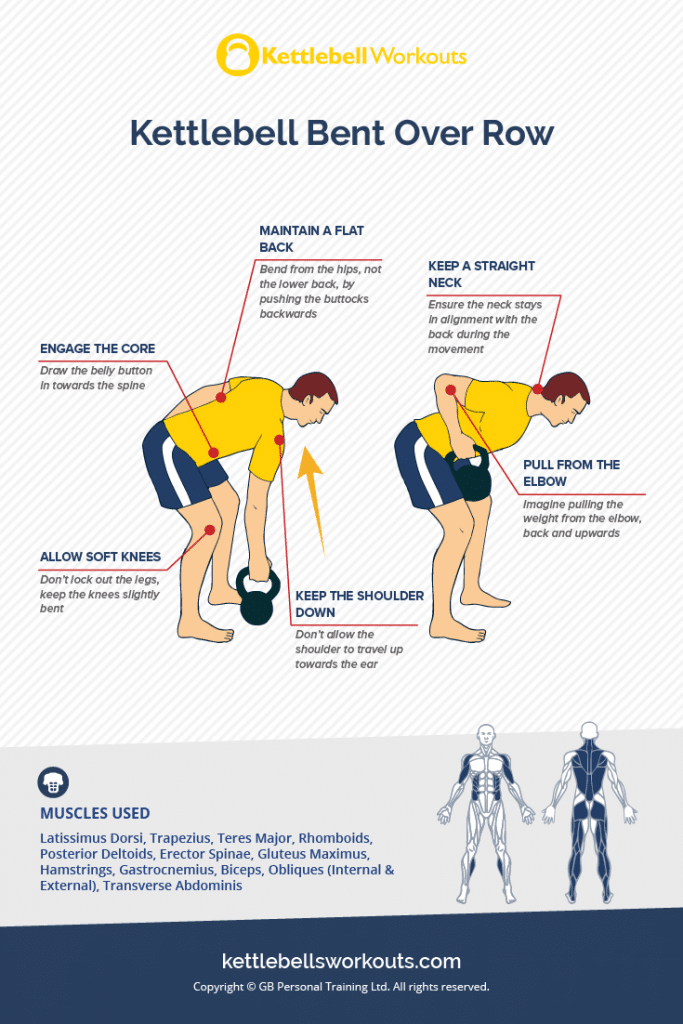
Kettlebell rows are a popular exercise among fitness enthusiasts. This exercise targets several muscle groups in the body, making it an effective full-body workout. In this article, we will discuss the muscles worked during kettlebell rows and how to perform this exercise correctly.
What are Kettlebell Rows?
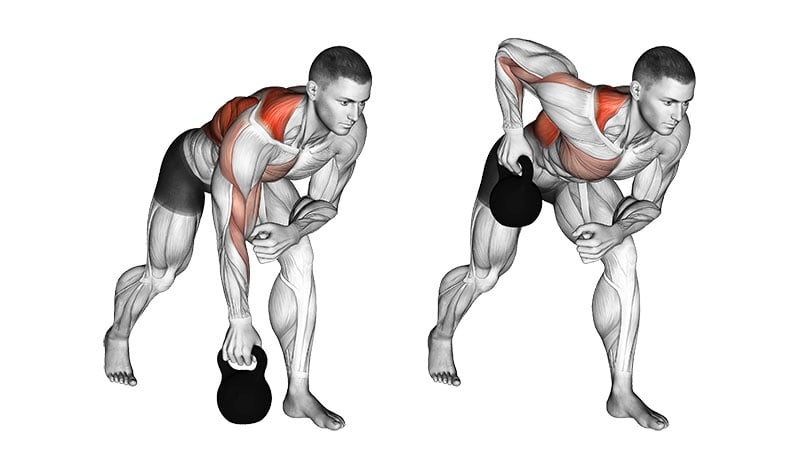
Kettlebell rows are a strength-training exercise that targets the upper back muscles. They are performed by holding a kettlebell in one hand and bending forward at the hips. The arm holding the kettlebell is then raised to the level of the chest, with the elbow bent at a 90-degree angle. The kettlebell is then lowered back down to the starting position, and the exercise is repeated for several reps.
Muscles Worked During Kettlebell Rows
Kettlebell rows target several muscles in the body, including:
- Latissimus Dorsi: This is the largest muscle in the back and is responsible for pulling the arm down and back.
- Trapezius: This muscle is located in the upper back and is responsible for stabilizing the shoulder blades.
- Rhomboid: This muscle is located between the shoulder blades and is responsible for pulling the shoulder blades together.
- Biceps: The biceps are located in the front of the arm and are responsible for bending the elbow.
- Forearms: The muscles in the forearms are responsible for gripping the kettlebell.
By targeting these muscle groups, kettlebell rows can help improve posture, increase upper body strength, and reduce the risk of injury.
How to Perform Kettlebell Rows
Here's how to perform kettlebell rows correctly:
- Start by standing with your feet shoulder-width apart and holding a kettlebell in one hand.
- Bend forward at the hips, keeping your back straight and your abs engaged.
- Keep your arm straight as you lift the kettlebell off the ground, pulling it up towards your chest.
- Bend your elbow to bring the kettlebell to your chest.
- Pause for a moment, then slowly lower the kettlebell back down to the starting position.
- Repeat for several reps, then switch sides and repeat the exercise with the other arm.

Make sure to keep your back straight and your abs engaged throughout the exercise. Use a weight that is challenging but manageable, and always warm up before starting your workout.
Variations of Kettlebell Rows
There are several variations of kettlebell rows that you can try, including:
- Renegade rows: This variation involves performing a push-up in between each row.
- One-arm rows: This variation involves performing the exercise with one arm at a time.
- Bent-over rows: This variation involves performing the exercise with a barbell or dumbbells instead of a kettlebell.
- Seated rows: This variation involves performing the exercise while seated on a bench or chair.

Experiment with different variations to keep your workout challenging and interesting.
Conclusion
Kettlebell rows are an effective full-body exercise that targets several muscle groups in the body. By incorporating this exercise into your workout routine, you can improve posture, increase upper body strength, and reduce the risk of injury. Remember to always warm up before starting your workout and use proper form throughout the exercise.
Related video of Kettlebell Rows Muscles Worked

Shoulder cable lateral raise is an effective exercise to target the lateral head of the deltoid muscle, which is responsible for shoulder abduction and lateral rotation. This exercise is usually performed using a cable machine with a low pulley, but it can also be done with resistance bands or dumbbells. In this article, we will discuss the benefits, techniques, and variations of shoulder cable lateral raise.
Benefits of Shoulder Cable Lateral Raise

Shoulder cable lateral raise is an isolation exercise that primarily targets the lateral head of the deltoid muscle. However, it also engages other muscles such as the supraspinatus, infraspinatus, and teres minor, which assist in shoulder abduction and external rotation. Here are some of the benefits of shoulder cable lateral raise:
- It helps to strengthen and tone the lateral head of the deltoid muscle, which enhances the overall appearance of the shoulder.
- It improves shoulder stability and mobility, which is essential for performing daily activities and sports.
- It reduces the risk of shoulder injuries by strengthening the rotator cuff muscles that stabilize the shoulder joint.
- It can be easily modified to target different parts of the deltoid muscle by changing the angle of the cable, the grip, or the range of motion.
Techniques of Shoulder Cable Lateral Raise

Here are the step-by-step instructions for performing shoulder cable lateral raise:
- Stand with your feet shoulder-width apart and your knees slightly bent.
- Grasp the cable handle with your left hand and stand sideways to the cable machine.
- Keep your elbow slightly bent and your palm facing down.
- Slowly raise your left arm to the side until it reaches shoulder level.
- Pause for a moment and squeeze your shoulder muscles.
- Lower your arm back to the starting position and repeat for the desired number of repetitions.
- Switch sides and repeat the exercise with your right arm.
Here are some tips to perform shoulder cable lateral raise correctly:
- Avoid using momentum or swinging your body to lift the weight.
- Keep your core muscles engaged and your back straight throughout the exercise.
- Exhale as you lift the weight and inhale as you lower it.
- Use a weight that allows you to perform the exercise with proper form and without pain or discomfort.
- Gradually increase the weight or the number of repetitions as you get stronger and more comfortable with the exercise.
Variations of Shoulder Cable Lateral Raise

Shoulder cable lateral raise can be modified in several ways to target different parts of the deltoid muscle or to add variety to your workout routine. Here are some variations of shoulder cable lateral raise:
- Neutral grip cable lateral raise: Hold the cable handle with both hands and keep your palms facing each other. Lift the weight to the side until your arms are parallel to the ground.
- Reverse grip cable lateral raise: Hold the cable handle with an underhand grip and lift the weight to the side until your arms are parallel to the ground.
- Dumbbell lateral raise: Hold a dumbbell in each hand and lift the weight to the side until your arms are parallel to the ground. This exercise can also be done seated or standing.
- Bent-over lateral raise: Bend forward at the waist and lift the weight to the side until your arms are parallel to the ground. This exercise targets the rear deltoid muscle.
Conclusion
Shoulder cable lateral raise is a simple yet effective exercise to strengthen and tone the lateral head of the deltoid muscle. By following the proper techniques and using appropriate variations, you can enhance your shoulder strength, stability, and mobility while reducing the risk of injuries. Incorporate shoulder cable lateral raise into your workout routine and enjoy the benefits of stronger and more defined shoulders!
Related video of Shoulder Cable Lateral Raise: Benefits, Techniques, and Variations

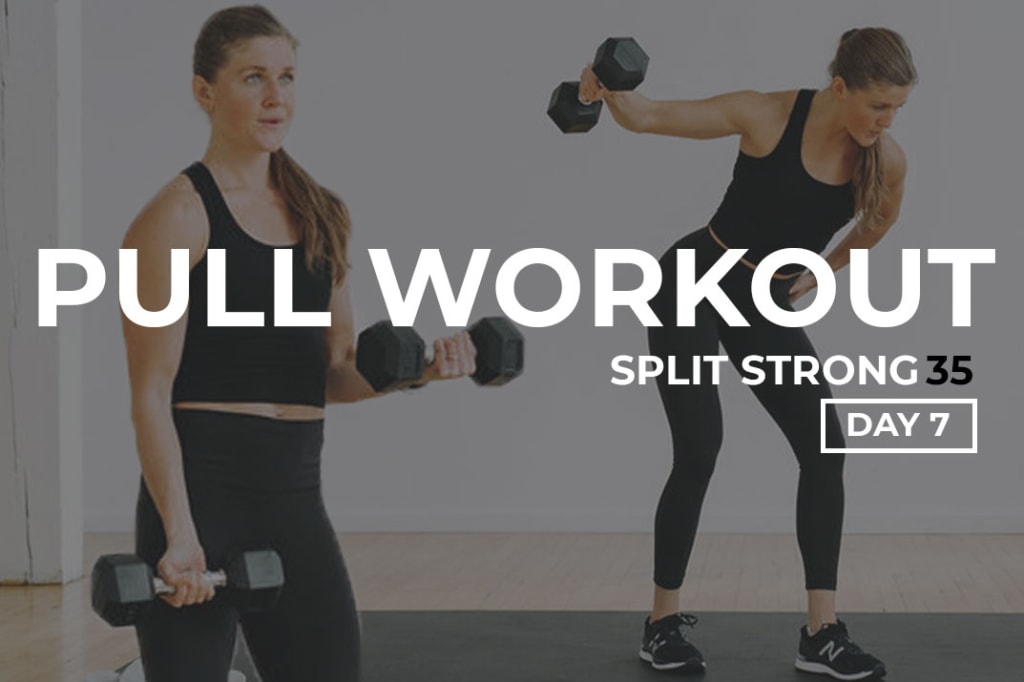
If you want to build a strong and defined upper body, pull exercises are essential. They work the big muscles in your back, shoulders, and arms, and give you a powerful and athletic look. And the good news is that you can do them at home with just a pair of dumbbells. Here are some of the best pull exercises you can do with dumbbells.
1. Bent-over rows
Bent-over rows are one of the most effective back exercises you can do. They target your lats, traps, and rhomboids, and help you build a wide and thick back. To do them, stand with your feet shoulder-width apart, bend forward at the waist, and hold the dumbbells with a neutral grip. Pull them up towards your chest, keeping your elbows close to your body, and squeeze your shoulder blades together at the top. Lower the weights slowly and repeat for 3 sets of 8-12 reps.
2. Pull-ups

Pull-ups are the king of back exercises. They work your entire upper body, from your lats to your biceps, and require no equipment except a pull-up bar or a sturdy tree branch. If you can't do full pull-ups yet, you can use a resistance band or a chair to assist you. To do them, grip the bar with your palms facing away from you, and pull your body up until your chin is above the bar. Lower yourself down slowly and repeat for 3 sets of as many reps as you can.
3. Dumbbell pullovers

Dumbbell pullovers are a classic exercise that work your lats and chest at the same time. They also stretch your ribcage and improve your breathing capacity. To do them, lie on a bench with your head hanging off the end, hold the dumbbell with both hands, and lower it behind your head until you feel a stretch in your chest and lats. Pull it back up and repeat for 3 sets of 8-12 reps.
4. Hammer curls

Hammer curls work your biceps and forearms, and give you a thicker and more rounded arm. To do them, stand with your feet shoulder-width apart, hold the dumbbells with a neutral grip, and curl them up towards your shoulders, keeping your elbows close to your body. Lower them down slowly and repeat for 3 sets of 8-12 reps.
5. Reverse flys

Reverse flys work your rear delts and upper back, and improve your posture and shoulder health. To do them, stand with your feet shoulder-width apart, bend forward at the waist, and hold the dumbbells with a pronated grip. Lift them up and out to the sides, squeezing your shoulder blades together at the top. Lower them down slowly and repeat for 3 sets of 8-12 reps.
6. Shrugs

Shrugs work your traps and give you a powerful and intimidating look. To do them, stand with your feet shoulder-width apart, hold the dumbbells with a neutral grip, and lift your shoulders up towards your ears. Hold for a second and lower them down slowly. Repeat for 3 sets of 8-12 reps.
7. Upright rows

Upright rows work your traps, delts, and upper back, and give you a broad and strong look. To do them, stand with your feet shoulder-width apart, hold the dumbbells with an overhand grip, and lift them up towards your chin, keeping your elbows high and close to your body. Lower them down slowly and repeat for 3 sets of 8-12 reps.
Conclusion
By doing these pull exercises with dumbbells, you can build a strong and defined upper body without going to the gym or buying expensive equipment. Just make sure to use proper form, start with light weights, and gradually increase the resistance as you get stronger. And don't forget to stretch and warm up before each workout, and cool down and rest after each one. Your body will thank you.
Related video of Pull Exercises At Home With Dumbbells
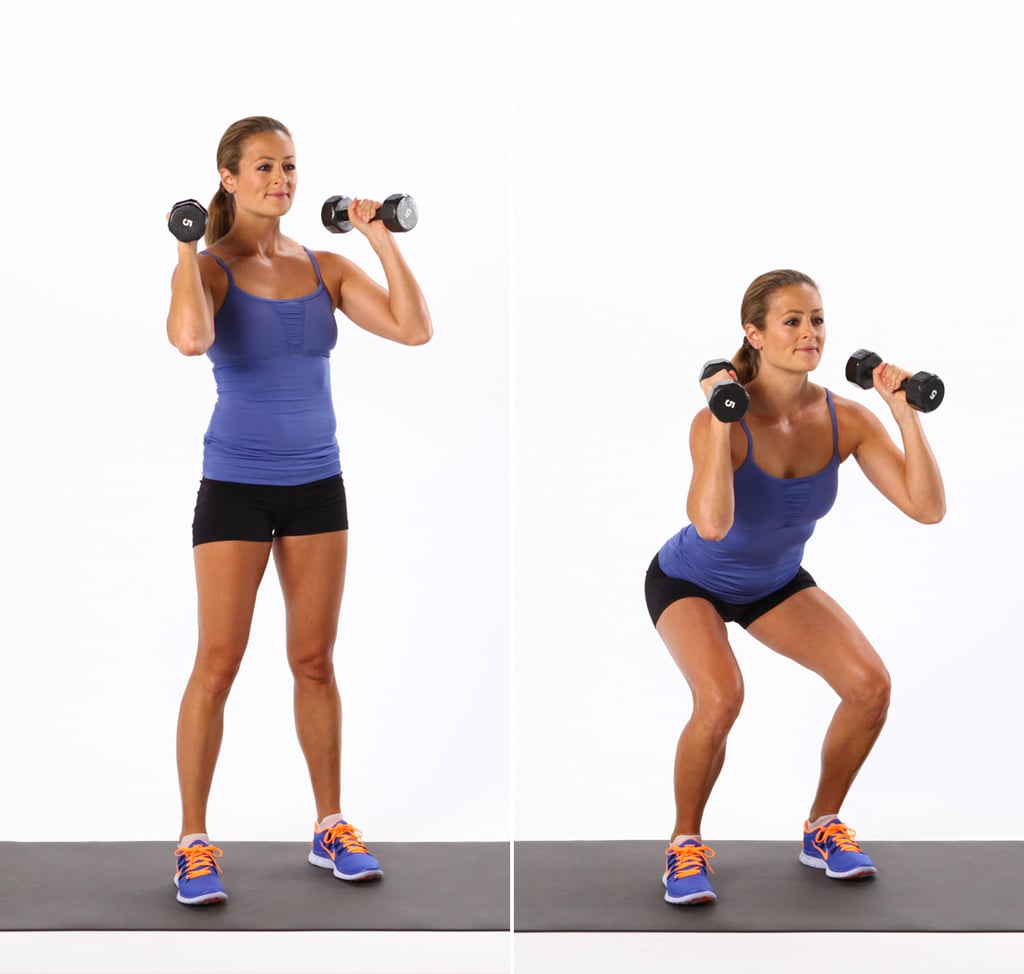
Looking to build your leg muscles? Squats with dumbbells are a great exercise to consider. Not only do they help tone your legs, but they also target your glutes, lower back, and core. Here’s a step-by-step guide on how to do a squat with dumbbells:
Step 1: Choose The Right Weight

The weight of the dumbbells you use will depend on your fitness level. If you’re new to squats, start with lighter weights until you feel comfortable. You can always increase the weight as you progress.
Step 2: Position Your Feet

Stand with your feet shoulder-width apart and your toes pointed slightly outward. This will help you maintain balance and stability throughout the exercise.
Step 3: Hold The Dumbbells

Hold a dumbbell in each hand and let them hang by your sides. Keep your arms straight and your palms facing inward.
Step 4: Start The Squat
Bend your knees and lower your body as if you’re sitting in a chair. Keep your back straight and your chest up. Make sure your knees do not go past your toes.
Step 5: Go As Low As You Can

Lower your body until your thighs are parallel to the ground. If you can go lower, do so. This will help you get the most out of the exercise.
Step 6: Push Up

Push up through your heels and return to the starting position. Exhale as you push up. Keep your back straight throughout the movement.
Step 7: Repeat

Repeat the exercise for the desired number of repetitions. If you’re new to squats, start with 10-12 repetitions and work your way up.
Tips For Doing Squats With Dumbbells

Here are some tips to keep in mind as you do squats with dumbbells:
- Keep your core tight throughout the exercise. This will help you maintain balance and stability.
- Breathe in as you lower your body and exhale as you push up.
- Don’t let your knees go past your toes. This can put unnecessary strain on your knees.
- Make sure your feet are firmly planted on the ground throughout the movement.
The Benefits Of Squats With Dumbbells

There are many benefits to doing squats with dumbbells, including:
- Strengthening your leg muscles
- Toning your glutes
- Improving your balance and stability
- Targeting your lower back and core
Conclusion
Squats with dumbbells are a great exercise to add to your workout routine. Follow these steps and tips to get the most out of the exercise. Remember to start with lighter weights and work your way up as you progress. With regular practice, you’ll notice stronger and toned leg muscles in no time!
Related video of How To Do A Squat With Dumbbells

Introduction
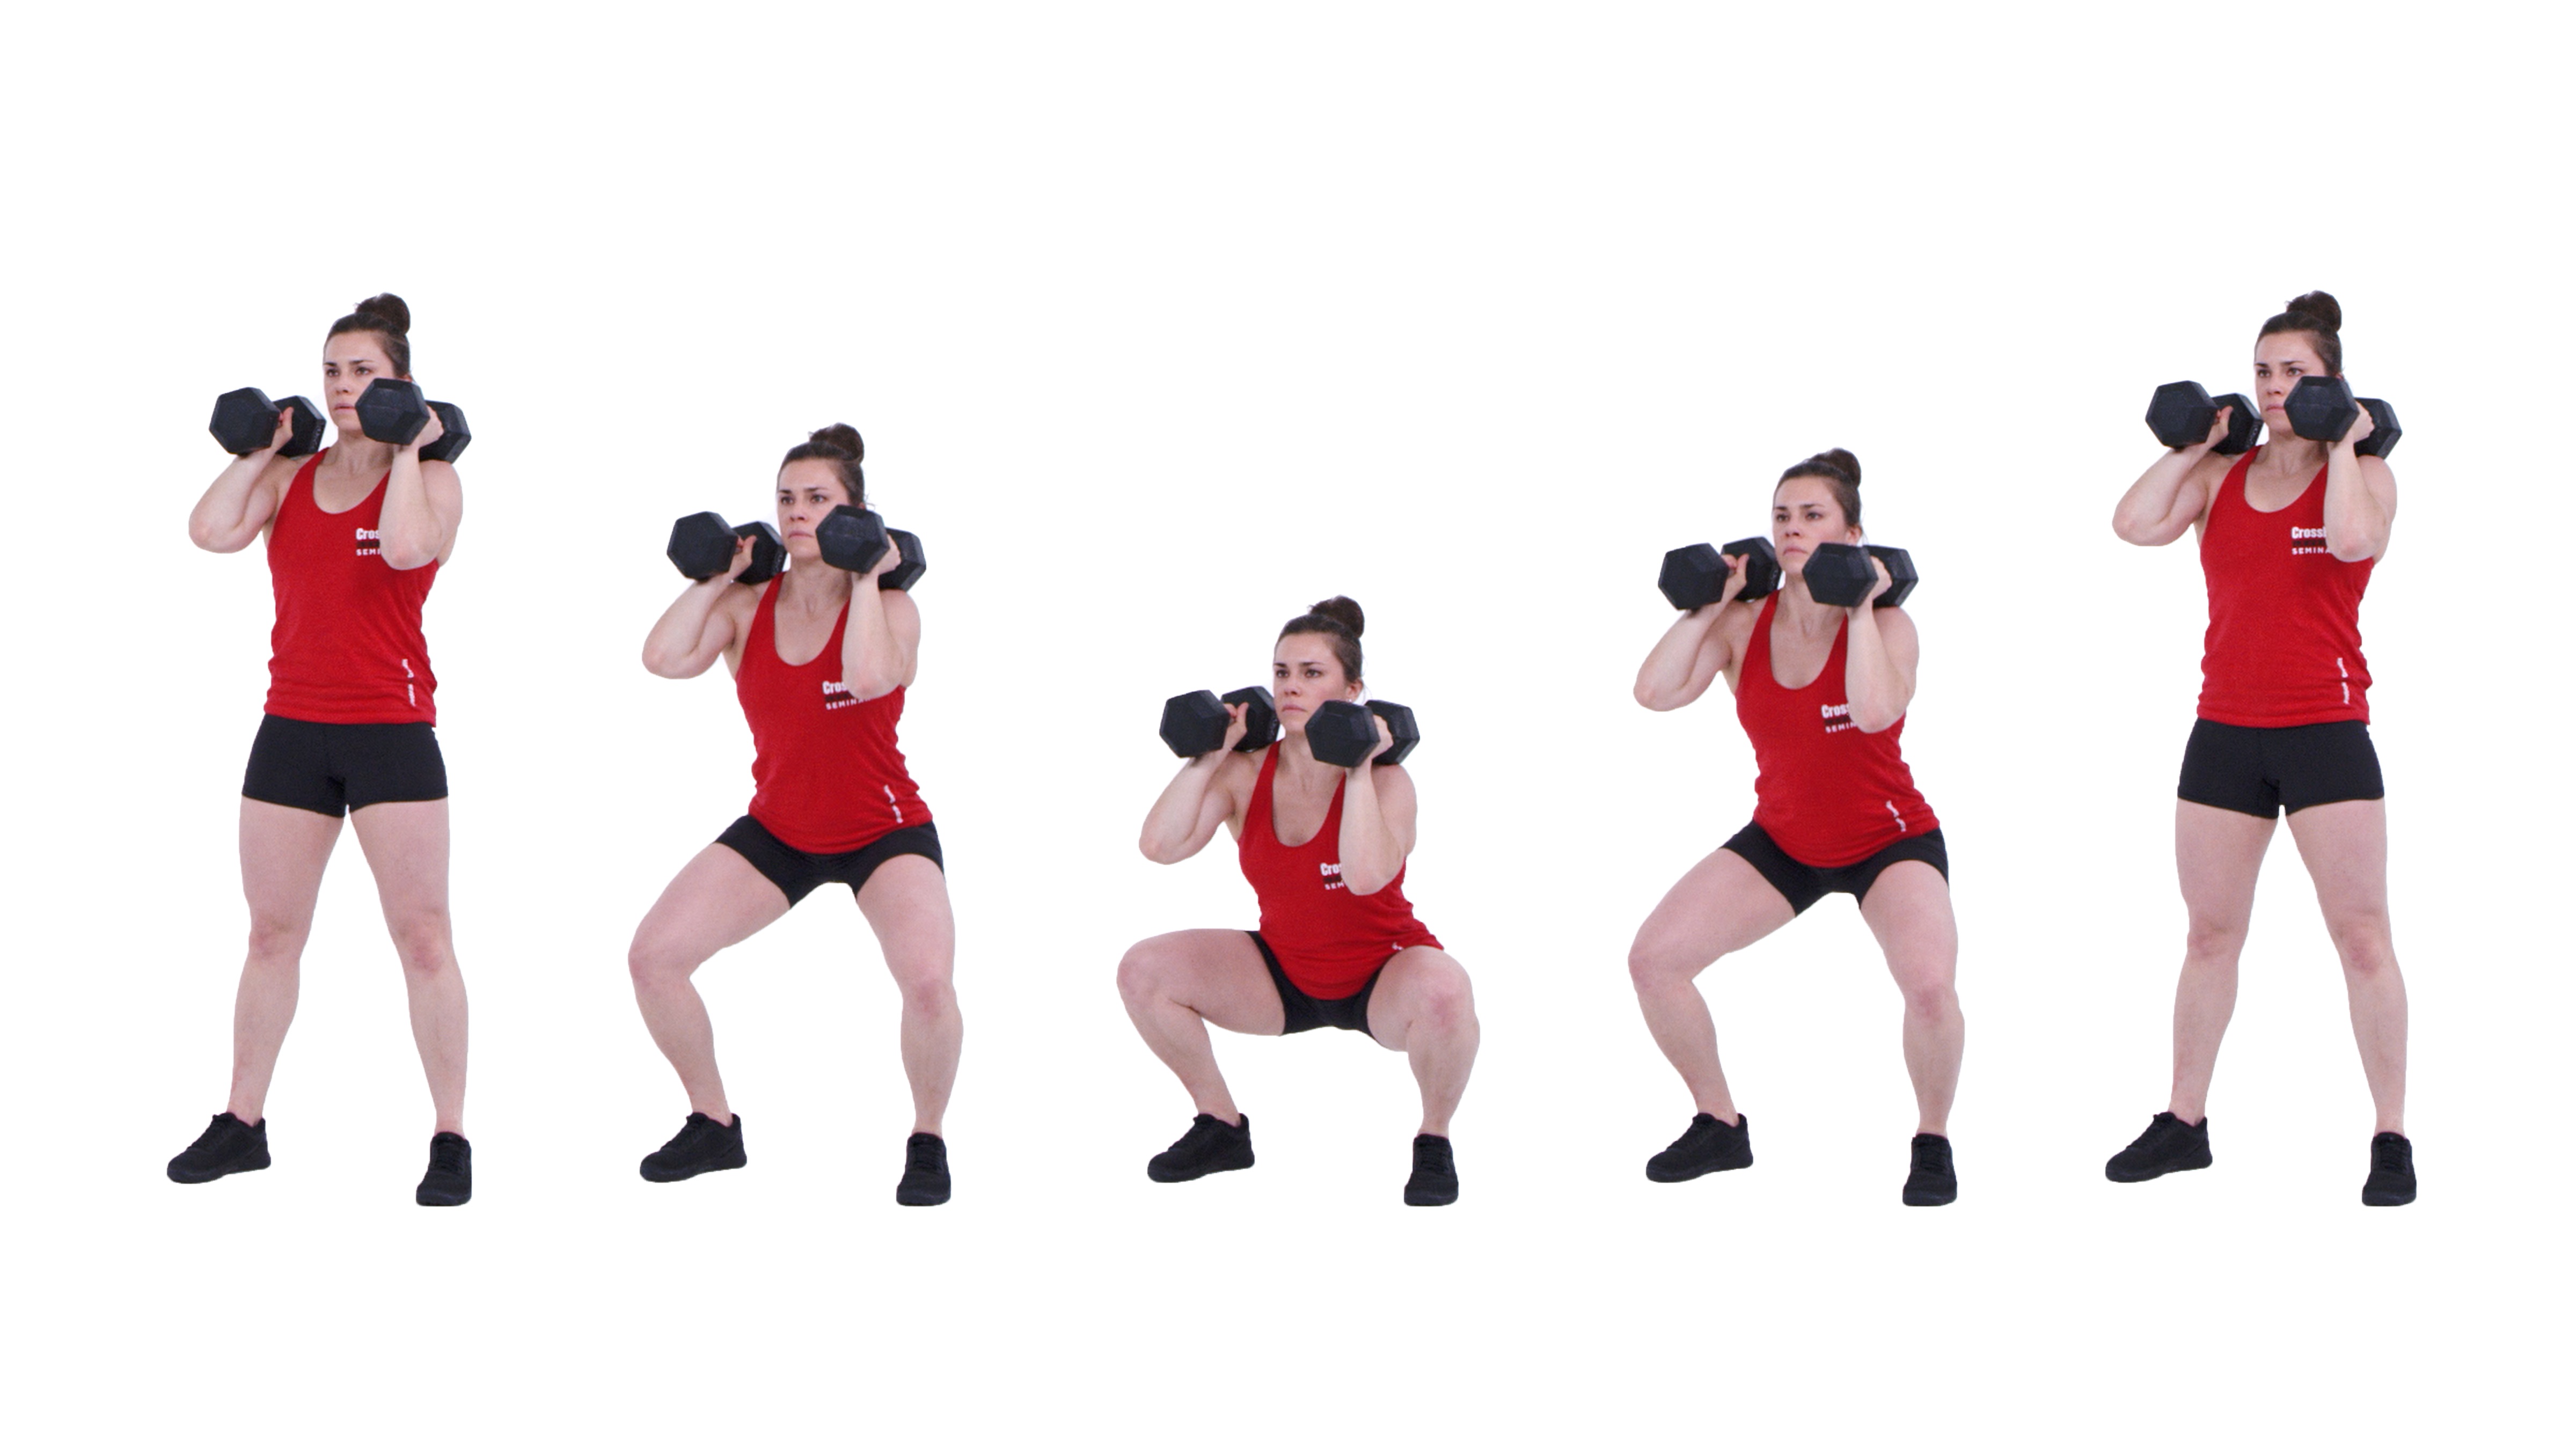
If you're looking to take your leg workout to the next level, then you might want to consider adding pistol squats to your routine. Pistol squats are a challenging exercise that require a great deal of strength, balance, and flexibility. However, with the right approach, you can work up to performing pistol squats with ease. In this article, we'll show you how to work up to a pistol squat step-by-step.Step 1: Master The Basic Squat
Before you start working on pistol squats, you'll need to master the basic squat. The basic squat is a foundational exercise that will help you build the strength and flexibility necessary for pistol squats. To perform a basic squat, stand with your feet shoulder-width apart, and lower your body down as if you're sitting in a chair. Keep your weight in your heels, and make sure your knees don't go past your toes.
Step 2: Improve Your Balance
Pistol squats require a great deal of balance, so you'll need to work on improving your balance before you can attempt them. One way to improve your balance is by practicing single-leg exercises, such as lunges and step-ups. You can also try standing on one leg and holding the position for as long as possible.
Step 3: Work On Your Flexibility
Flexibility is also key when it comes to pistol squats. You'll need to have a good range of motion in your hips, ankles, and knees to perform the exercise correctly. To improve your flexibility, you can try stretching exercises such as hip openers, ankle stretches, and hamstring stretches.
Step 4: Start With Assisted Pistol Squats
Once you've mastered the basic squat, improved your balance, and worked on your flexibility, you can start working on assisted pistol squats. Assisted pistol squats involve using a support, such as a chair or a wall, to help you lower your body down into the pistol squat position. As you get stronger and more confident, you can gradually reduce the amount of assistance you use.
Step 5: Practice Eccentric Pistol Squats
Eccentric pistol squats involve lowering your body down into the pistol squat position slowly and controlled. This exercise can help you build the strength and control necessary for the full pistol squat. To perform eccentric pistol squats, start in the pistol squat position and lower your body down as slowly as possible. Use a support if necessary.
Step 6: Work On Your Pistol Squat Form
Once you're comfortable with assisted and eccentric pistol squats, you can start working on your pistol squat form. To perform a pistol squat correctly, stand with your feet together and your arms extended in front of you. Lower your body down into a single-leg squat position while keeping your back straight and your weight in your heel. Return to the starting position and repeat on the other leg.