
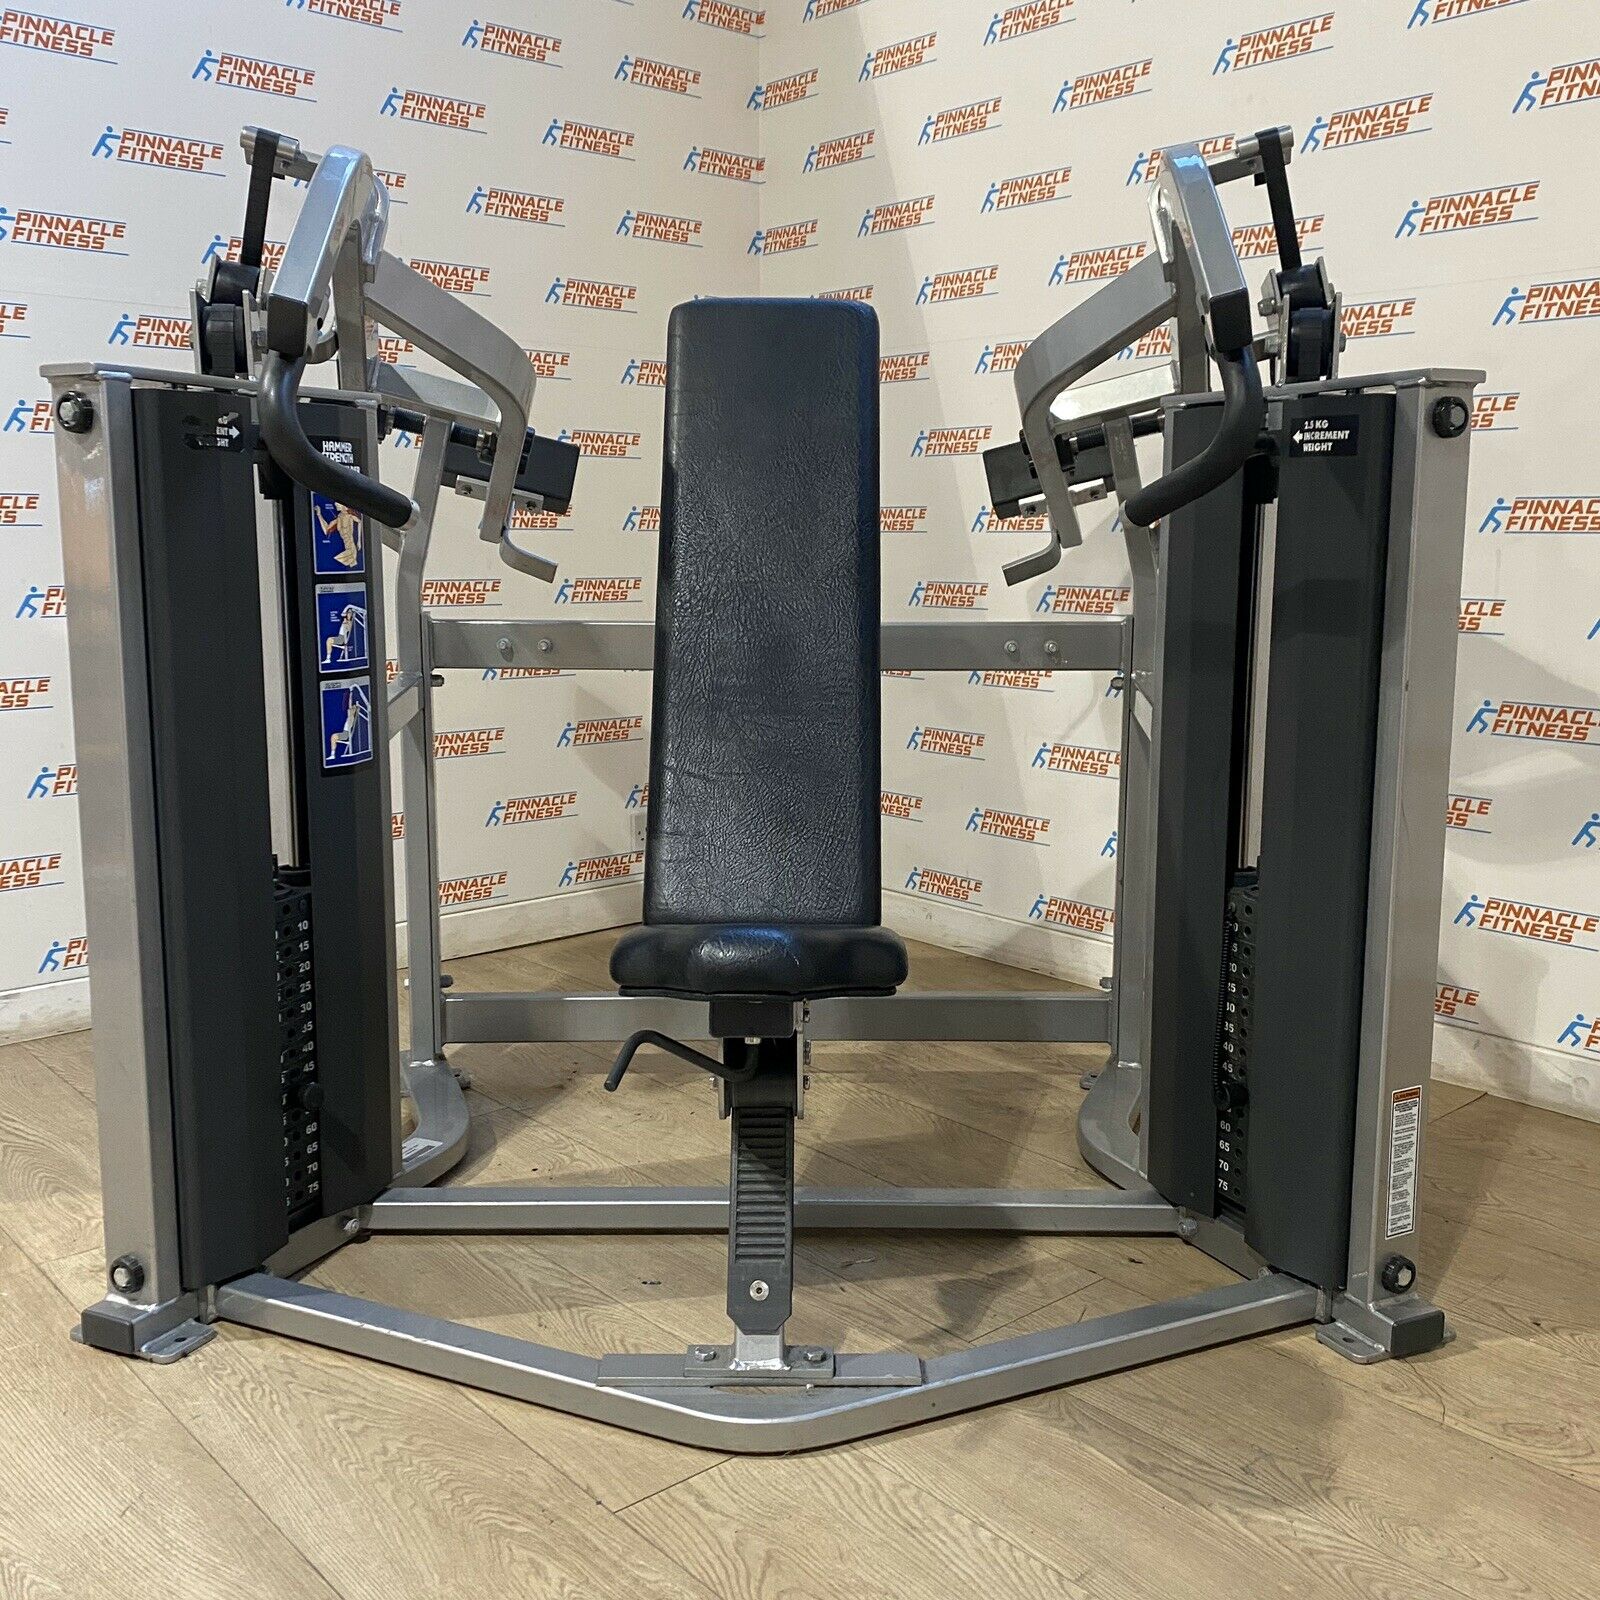
The Hammer Strength Shoulder Press Machine is a popular piece of gym equipment that is designed to help you build strong and toned shoulders. This machine is designed to mimic the movement of a traditional shoulder press, but with added resistance to help you build more muscle and improve your overall strength.
Benefits of the Hammer Strength Shoulder Press Machine
The Hammer Strength Shoulder Press Machine offers a number of benefits, including:
- Improved shoulder strength and definition.
- Reduced risk of injury by providing a stable and controlled movement.
- Increased muscle activation in the shoulders, triceps, and chest.
- Ability to perform the exercise with heavier weights compared to traditional shoulder presses.
How to Use the Hammer Strength Shoulder Press Machine

To use the Hammer Strength Shoulder Press Machine, follow these steps:
- Adjust the seat height so that the handles are at shoulder level.
- Sit on the machine with your back firmly against the backrest and your feet firmly on the floor.
- Grasp the handles with a neutral grip and press the weight forward until your arms are fully extended.
- Slowly lower the weight back down to the starting position.
- Repeat for the desired number of repetitions.
Variations of the Hammer Strength Shoulder Press Machine

There are a few variations of the Hammer Strength Shoulder Press Machine that you can try to target different areas of your shoulders and chest:
- Reverse Grip: Perform the exercise with an underhand grip to target your biceps and forearms.
- Single Arm: Use one arm at a time to target each shoulder individually.
- Drop Set: Perform multiple sets of decreasing weight to fatigue your muscles and increase muscle growth.
Tips for Using the Hammer Strength Shoulder Press Machine

Here are a few tips to keep in mind when using the Hammer Strength Shoulder Press Machine:
- Start with a lighter weight to ensure proper form and avoid injury.
- Breathe out as you push the weight up and breathe in as you lower it down.
- Keep your elbows close to your body to avoid putting unnecessary strain on your shoulders.
- Don't lock your elbows at the top of the movement to avoid overextension of your joints.
Conclusion
The Hammer Strength Shoulder Press Machine is a great piece of gym equipment to add to your shoulder workout routine. It offers numerous benefits, including increased muscle activation and reduced risk of injury. By following the tips and variations listed above, you can get the most out of this machine and achieve strong and toned shoulders.
Related video of Hammer Strength Shoulder Press Machine

Side leg raises are a popular exercise that targets the muscles on the outer thighs and hips. This exercise is also known as the lateral leg raise or the side lying leg lift. It is a simple yet effective exercise that can help tone and strengthen the muscles in the lower body. In this article, we will discuss the muscles that side leg raises work and how to perform this exercise correctly.
What Muscles Do Side Leg Raises Work?

Side leg raises primarily work the muscles on the outer thighs, also known as the abductor muscles. These muscles include the gluteus medius, gluteus minimus, and tensor fasciae latae. These muscles are responsible for stabilizing the hips, supporting the legs during movement, and helping to maintain balance.
In addition to the abductor muscles, side leg raises also work the quadriceps and the hamstrings. These muscles are located in the front and back of the thighs, respectively. The quadriceps are responsible for extending the knee, while the hamstrings are responsible for bending the knee.
Side leg raises also engage the core muscles, particularly the obliques. These muscles are located on the sides of the abdomen, and they help to stabilize the torso during the exercise.
How to Perform Side Leg Raises

To perform side leg raises, follow these steps:
- Lie on your side with your legs straight and your feet together.
- Place your bottom arm under your head for support.
- Engage your core muscles and lift your top leg as high as you can without lifting your hips off the ground.
- Pause for a few seconds at the top of the movement.
- Lower your leg back down to the starting position.
- Repeat for the desired number of repetitions.
- Switch to the other side and repeat.
It is important to keep your movements slow and controlled during this exercise. Avoid swinging your leg or using momentum to lift it. Focus on using the muscles in your outer thigh to lift your leg.
Variations of Side Leg Raises

There are several variations of side leg raises that you can try to target different muscles in the lower body:
- Clamshell: Lie on your side with your knees bent and your feet together. Lift your top knee while keeping your feet together. Lower your knee back down and repeat.
- Side Plank with Leg Lift: Start in a side plank position with your bottom elbow on the ground and your feet stacked on top of each other. Lift your top leg and hold for a few seconds before lowering it back down.
- Straight Leg Clamshell: Lie on your side with your legs straight and your feet together. Lift your top leg while keeping your feet together. Lower your leg back down and repeat.
Conclusion
Side leg raises are an effective exercise that can help tone and strengthen the muscles in the outer thighs, hips, and core. This exercise primarily targets the abductor muscles but also engages the quadriceps, hamstrings, and obliques. By incorporating variations of this exercise into your workout routine, you can target different muscles in the lower body and keep your workouts challenging and interesting.
Related video of What Muscles Do Side Leg Raises Work

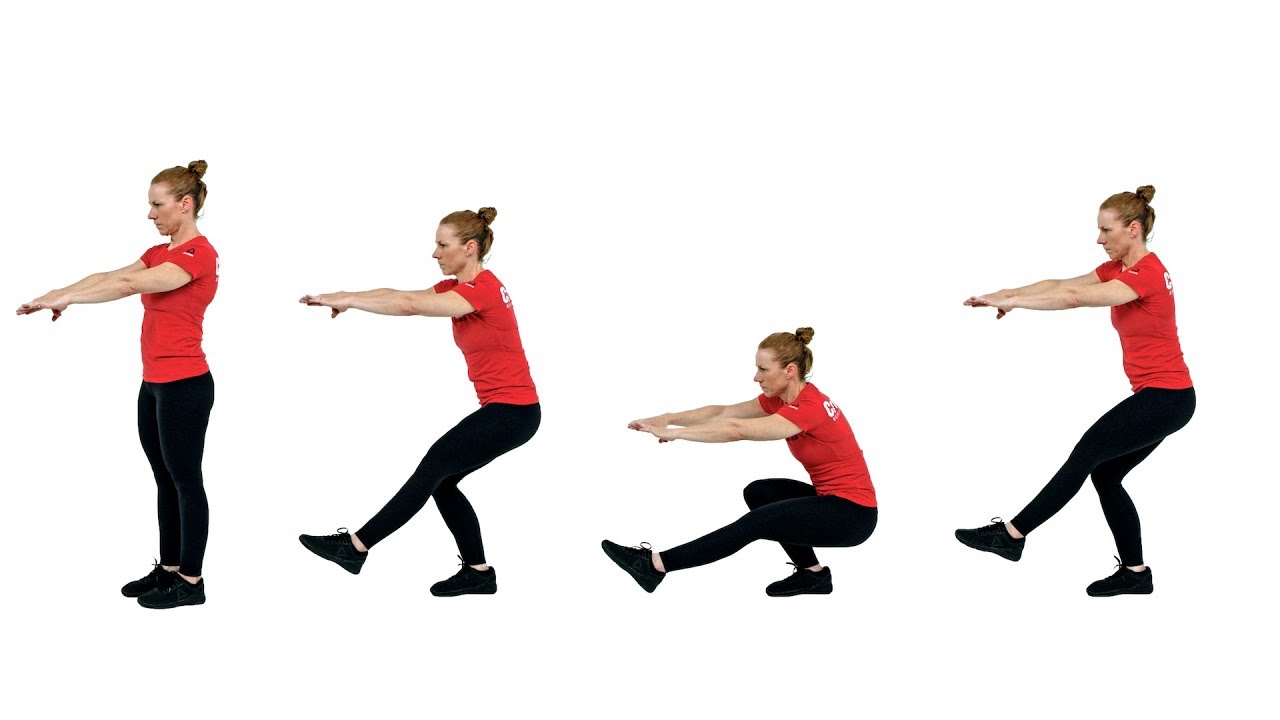
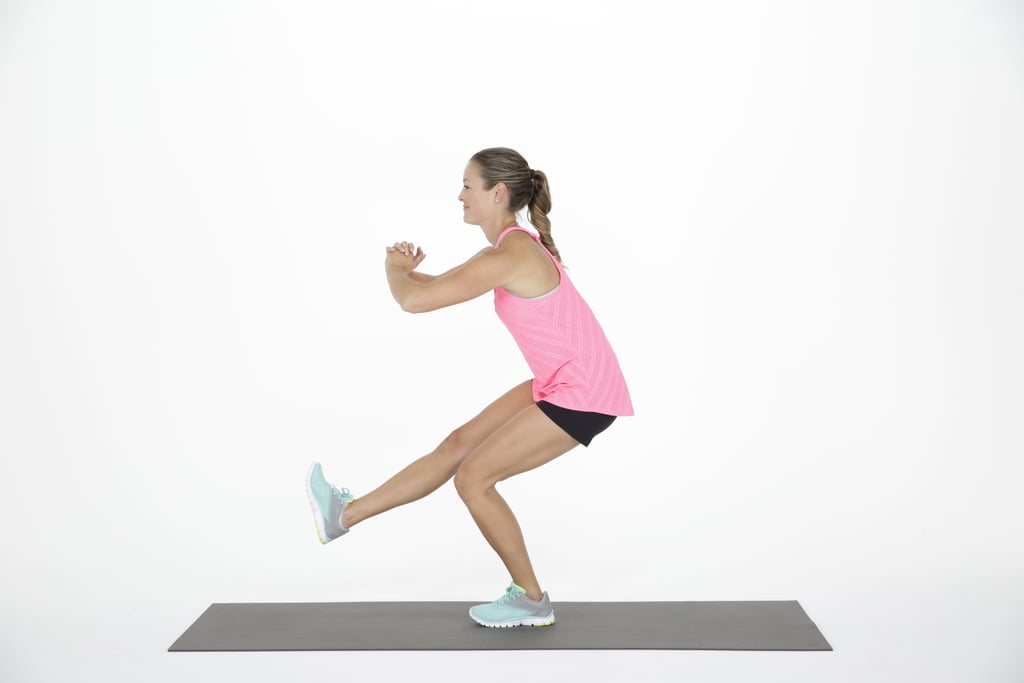
Single leg squats, also known as pistol squats, are an excellent exercise for building leg strength, balance, and flexibility. It is a challenging move that requires a lot of coordination and practice, but with the right technique and guidance, anyone can master it. In this article, we will discuss step-by-step how to do a single leg squat.
Step 1: Warm up

Before starting any exercise, it is essential to warm up your muscles to prevent injury. You can perform a few minutes of light cardio or some dynamic stretches that target your lower body, such as lunges or leg swings.
Step 2: Find your balance

Stand with your feet hip-width apart, and lift your right foot off the ground. Keep your arms extended in front of you to help with balance. Shift your weight to your left foot and engage your core.
Step 3: Lower your body

Slowly lower your body by bending your left knee and pushing your hips back. Keep your chest up, and make sure your knee stays in line with your toes. The goal is to lower yourself until your thigh is parallel to the ground.
Step 4: Push back up

Push back up to the starting position by driving through your left heel and squeezing your glutes. Keep your right leg extended in front of you throughout the movement.
Step 5: Repeat on the other side
Repeat the same movement on the other side by lifting your left foot off the ground and lowering your body until your thigh is parallel to the ground. Remember to keep your chest up, knee in line with your toes, and push through your heel to come back up.
Step 6: Progression

If you find single leg squats too challenging, you can start by using a bench or a chair for support. Hold onto the bench or chair with one hand while you perform the exercise, and gradually decrease the amount of support you need until you can do it without any support.
Step 7: Common mistakes

One of the most common mistakes people make when performing single leg squats is allowing their knee to collapse inward, which can put stress on the knee joint. Make sure to keep your knee in line with your toes throughout the movement. Another mistake is leaning too far forward, which can put pressure on your lower back. Keep your chest up and your core engaged to maintain proper form.
Step 8: Benefits

Single leg squats offer several benefits, such as building leg strength, improving balance and stability, and increasing flexibility. They also help to correct muscle imbalances and can be an excellent addition to any leg workout routine.
Step 9: Safety precautions
Like any exercise, single leg squats come with some risks. If you have a history of knee or back injuries, it is best to consult with a doctor or a physical therapist before attempting this exercise. Start with the modified version and gradually work your way up to the full movement.
Step 10: Conclusion

Single leg squats are an excellent exercise for building leg strength and improving balance and stability. They require a lot of practice and patience, but with the right technique and guidance, anyone can master this move. Remember to warm up before starting, find your balance, keep your form, and progress gradually.
Related video of How To Do Single Leg Squats
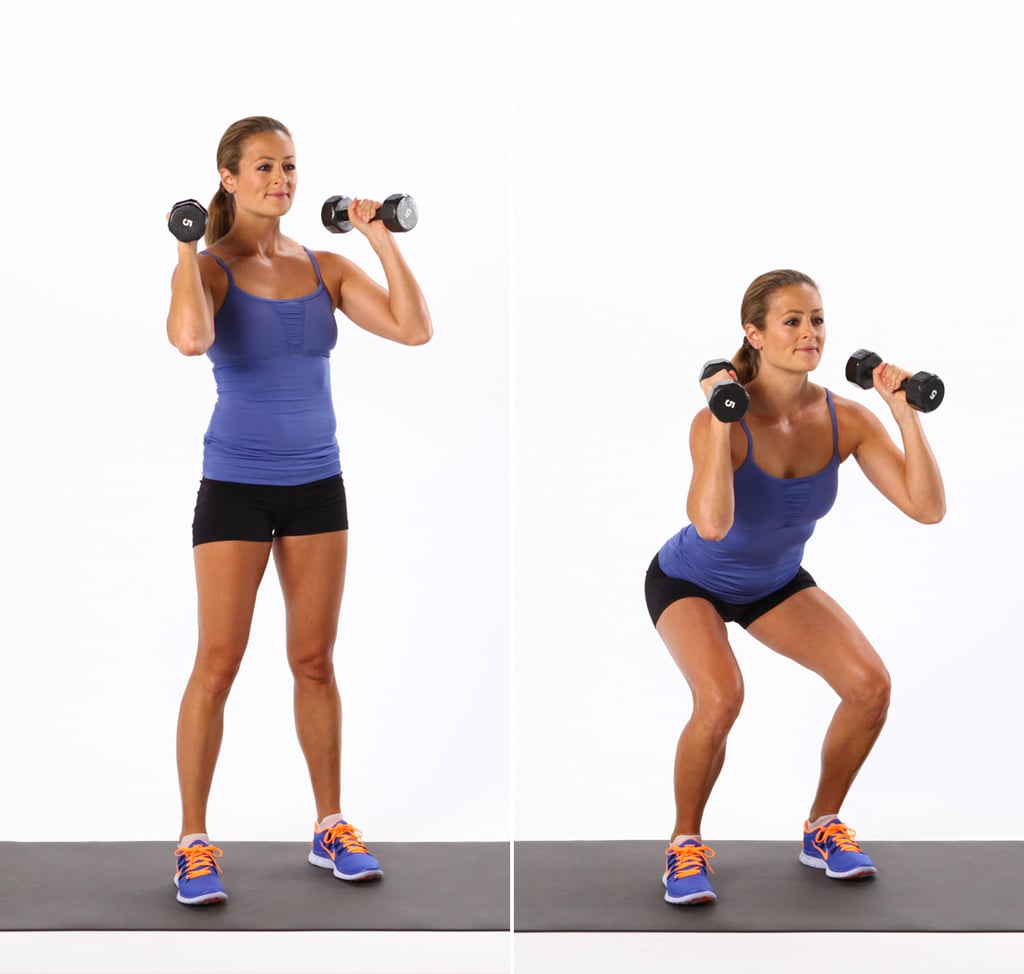
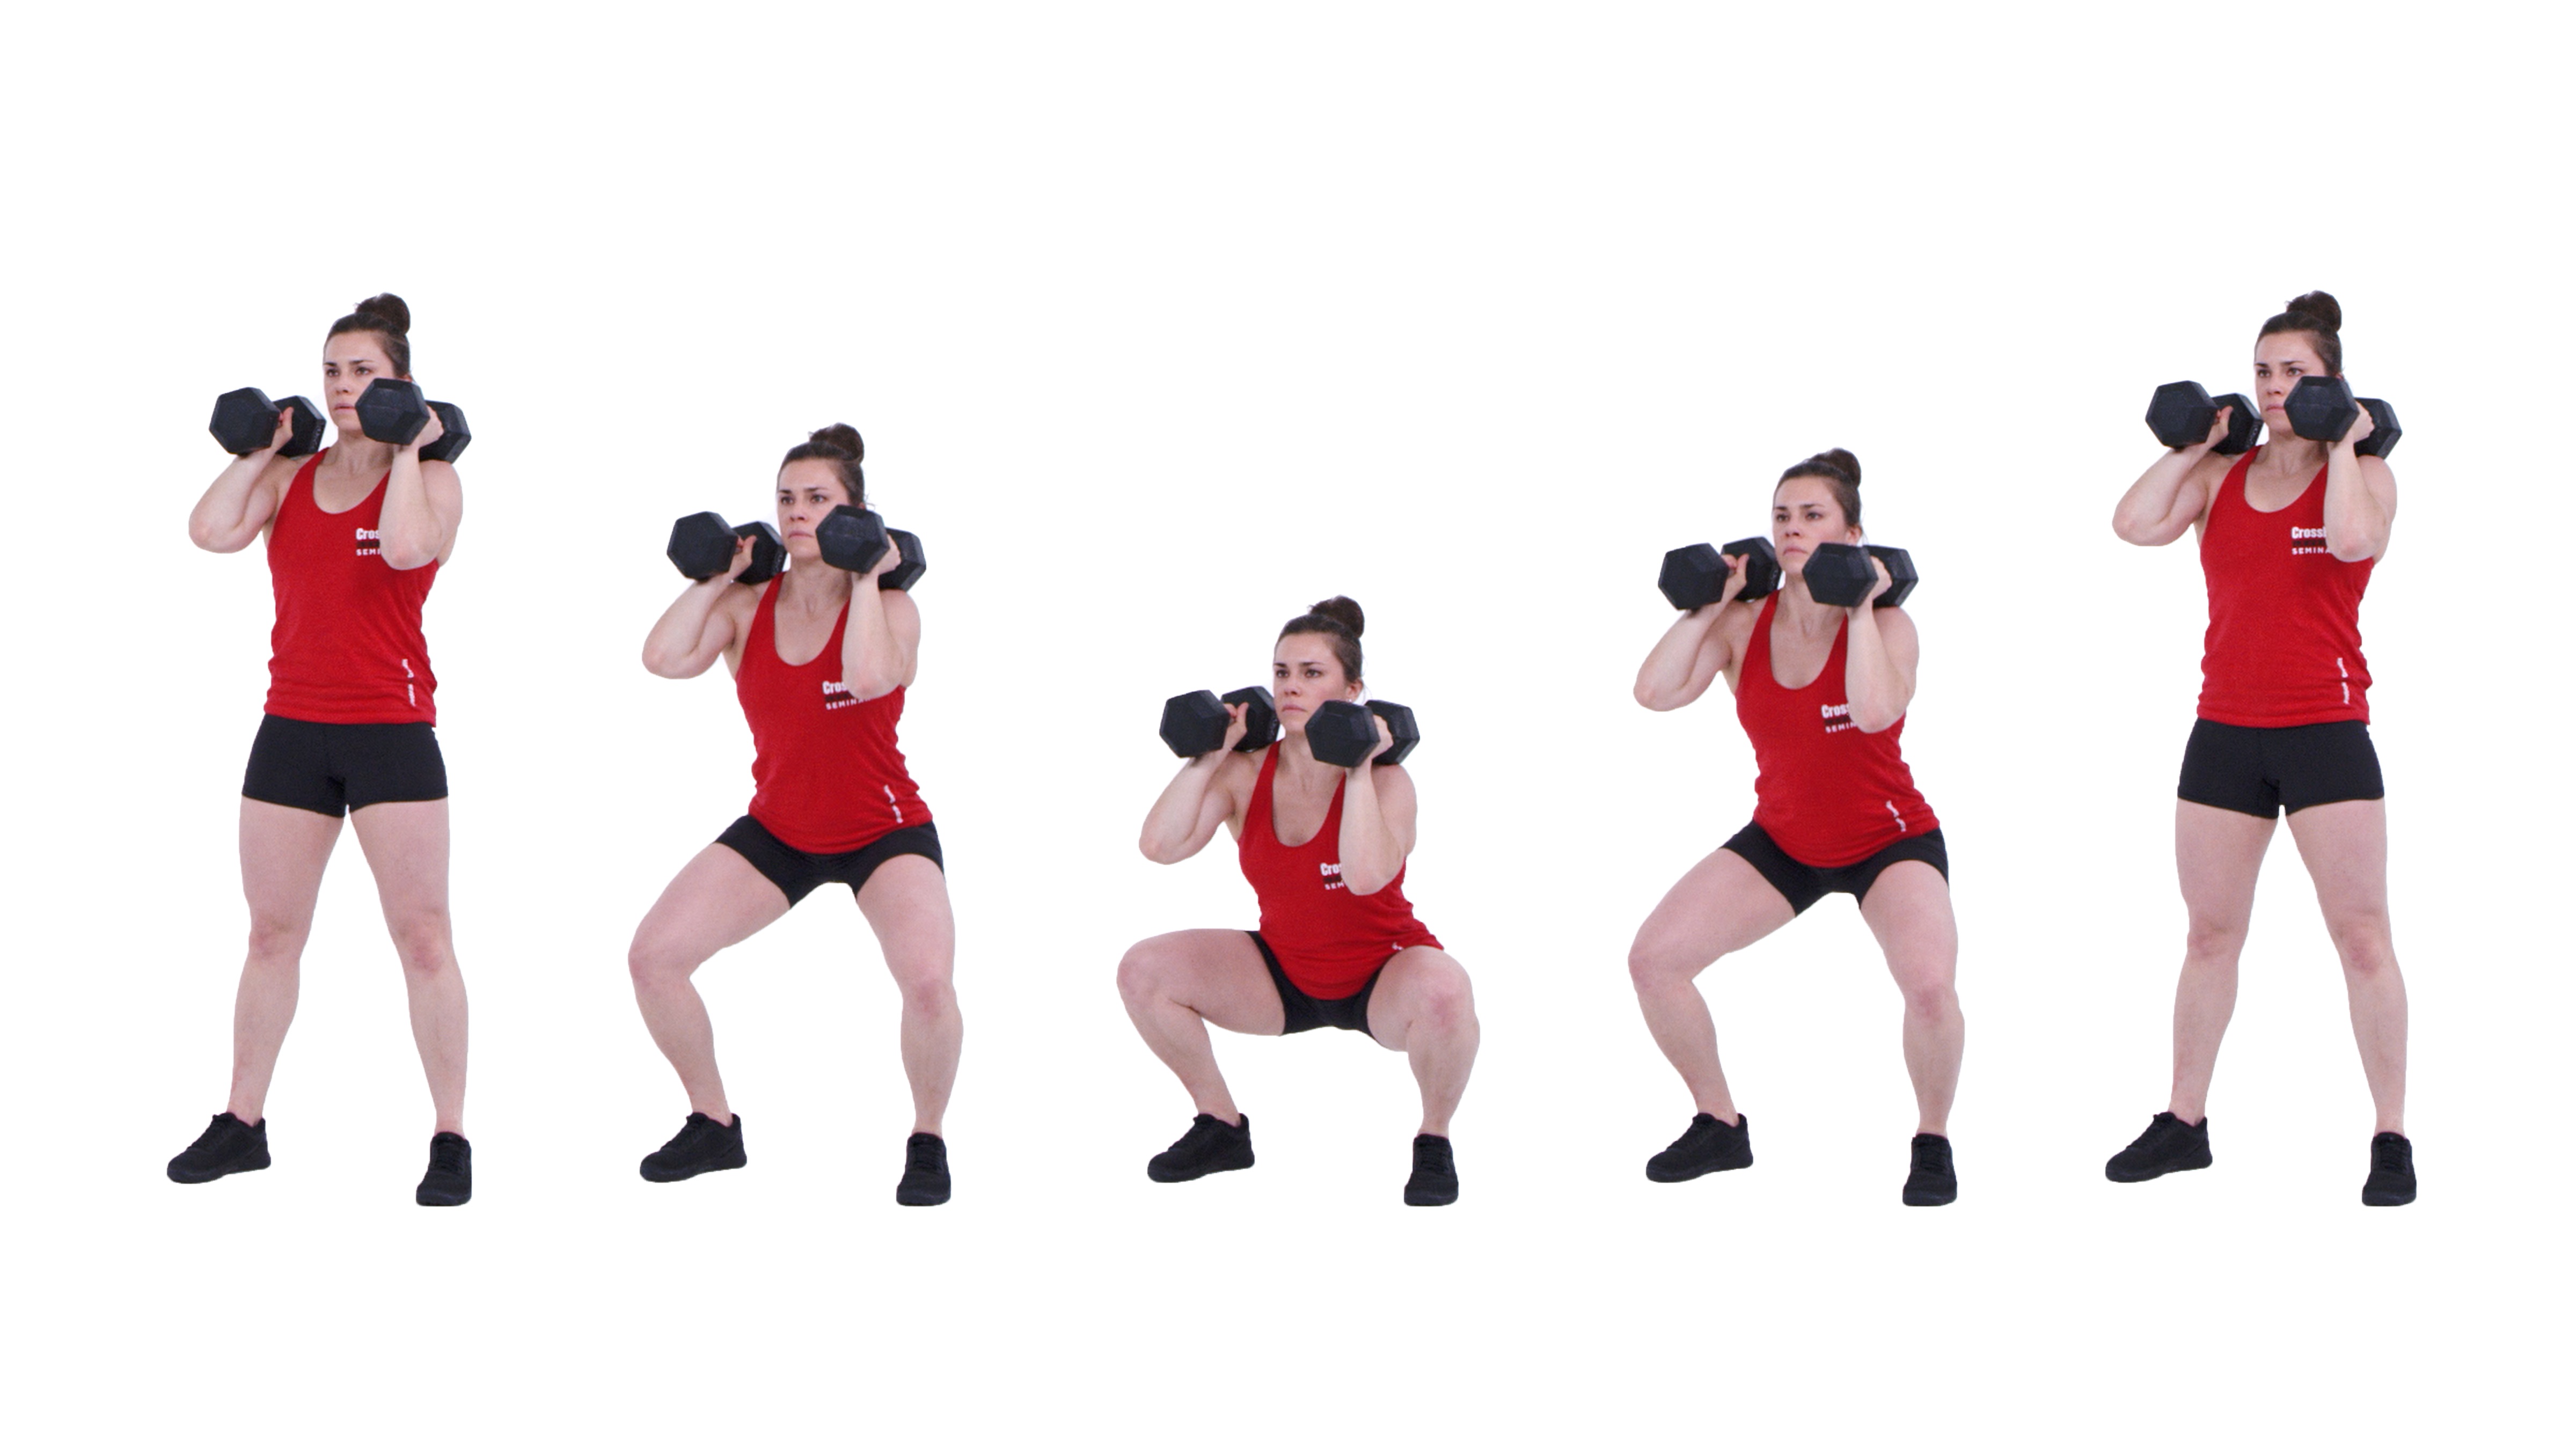
Squats are one of the most effective exercises for building strength and muscle in your lower body. They work the muscles in your thighs, hips, and glutes, and can also help improve your balance and stability. Adding dumbbells to your squat workout can increase the intensity and provide an even greater challenge for your muscles.
Why Use Dumbbells?
Using dumbbells during your squat workout can help target specific muscles and provide added resistance to your movements. This can help you build more strength and muscle tone in your lower body. Dumbbells are also a great way to add variety to your workout routine and prevent boredom.
How to Perform Squat Workout with Dumbbells
To perform a squat workout with dumbbells, start by standing with your feet shoulder-width apart and holding a dumbbell in each hand. Hold the dumbbells at your sides with your palms facing inwards. Keep your back straight and your core engaged.
Next, slowly lower your body down into a squat position, keeping your knees behind your toes and your weight in your heels. As you lower yourself down, raise the dumbbells up to shoulder level, keeping your elbows tucked in close to your body.
Pause for a moment at the bottom of the squat, then slowly rise back up to a standing position, lowering the dumbbells back down to your sides. Repeat for 10-12 reps, then rest for 30 seconds before doing another set.
Variations of Squat Workout with Dumbbells

There are several variations of the squat workout with dumbbells that you can try to target different muscles and add variety to your routine. Here are a few to consider:
- Sumo Squat: Stand with your feet wider than shoulder-width apart and your toes pointed outwards. Hold a dumbbell in each hand at your sides and lower yourself down into a squat position. Keep your back straight and your core engaged.
- Bulgarian Split Squat: Stand with one foot on a bench or step and hold a dumbbell in each hand at your sides. Lower yourself down into a squat position with your front leg, keeping your back straight and your core engaged.
- Jump Squat: Hold a dumbbell in each hand at your sides and lower yourself down into a squat position. As you rise back up, jump up explosively and land softly back into a squat position.
Tips for a Successful Squat Workout with Dumbbells

Here are some tips to keep in mind when performing a squat workout with dumbbells:
- Start with lighter weights and gradually increase the weight as you get stronger.
- Keep your back straight and your core engaged throughout the exercise.
- Lower yourself down slowly and avoid bouncing at the bottom of the squat.
- Make sure your knees are behind your toes and your weight is in your heels.
- Breathe deeply and exhale as you rise back up to a standing position.
Conclusion
Squat workout with dumbbells can be an effective way to build strength and muscle tone in your lower body. By adding resistance to your movements, you can challenge your muscles and see greater results. Be sure to use proper form and start with lighter weights before progressing to heavier weights. With consistency and dedication, you can achieve your fitness goals and feel stronger and more confident in your body.
Related video of Squat Workout With Dumbbells

The dumbbell lying rear lateral raise is an excellent exercise for targeting the rear deltoids, which are often neglected in most workout routines. It is a simple yet extremely effective exercise that can be performed by anyone looking to build strong and defined shoulders.
How to Perform the Dumbbell Lying Rear Lateral Raise

To perform the dumbbell lying rear lateral raise, follow the steps below:
- Start by lying face down on a flat bench with your feet flat on the ground and your arms extended straight down towards the floor.
- Hold a pair of dumbbells with your palms facing each other and your elbows slightly bent.
- Slowly raise the dumbbells to the sides of your body, keeping your elbows bent and your palms facing down.
- Pause at the top of the movement and squeeze your shoulder blades together.
- Slowly lower the dumbbells back to the starting position and repeat for the desired number of reps.
It is important to keep your head and neck in a neutral position throughout the exercise to avoid straining your neck muscles.
Variations of the Dumbbell Lying Rear Lateral Raise

There are several variations of the dumbbell lying rear lateral raise that you can incorporate into your shoulder workout routine:
- Single-Arm Dumbbell Lying Rear Lateral Raise: This variation involves performing the exercise one arm at a time, which allows you to focus more on each individual shoulder.
- Incline Dumbbell Lying Rear Lateral Raise: This variation involves performing the exercise on an incline bench, which places more emphasis on the upper part of the rear deltoids.
- Cable Dumbbell Lying Rear Lateral Raise: This variation involves using a cable machine instead of dumbbells, which provides a constant tension on the rear deltoids throughout the movement.
Benefits of the Dumbbell Lying Rear Lateral Raise

The dumbbell lying rear lateral raise offers several benefits, including:
- Strengthening the rear deltoids, which helps improve shoulder stability and posture.
- Improving overall shoulder strength and mobility, which can reduce the risk of shoulder injuries.
- Helping to create a more defined and aesthetically pleasing shoulder appearance.
Tips for Performing the Dumbbell Lying Rear Lateral Raise
Here are a few tips to help you get the most out of your dumbbell lying rear lateral raise:
- Use a weight that allows you to perform the exercise with proper form and technique.
- Avoid lifting your head or neck off the bench during the exercise.
- Squeeze your shoulder blades together at the top of the movement to fully engage the rear deltoids.
- Perform the exercise in a slow and controlled manner to maximize muscle activation.
Incorporating the Dumbbell Lying Rear Lateral Raise into Your Workout Routine
The dumbbell lying rear lateral raise can be incorporated into your shoulder workout routine by performing 3-4 sets of 10-12 reps. It is best to perform the exercise towards the end of your workout after you have completed your heavier compound exercises.
Conclusion
The dumbbell lying rear lateral raise is a highly effective exercise for targeting the rear deltoids and improving overall shoulder strength and mobility. By incorporating this exercise into your workout routine, you can build stronger, more defined shoulders and reduce the risk of shoulder injuries.
Related video of Dumbbell Lying Rear Lateral Raise: A Comprehensive Guide
Introduction
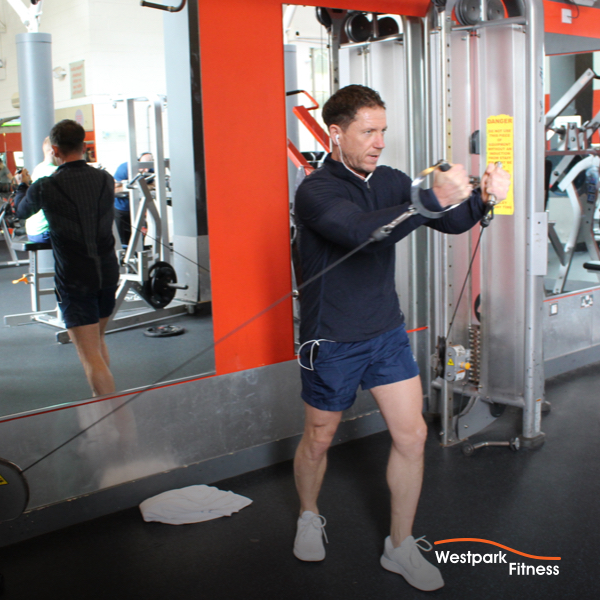
Are you tired of doing the same chest workouts with dumbbells and barbells? If so, you might want to try chest workouts with cables. Cables provide a unique resistance that can help you build muscle and strength in your chest. In this article, we will discuss some of the best chest workouts with cables that you can incorporate into your workout routine.
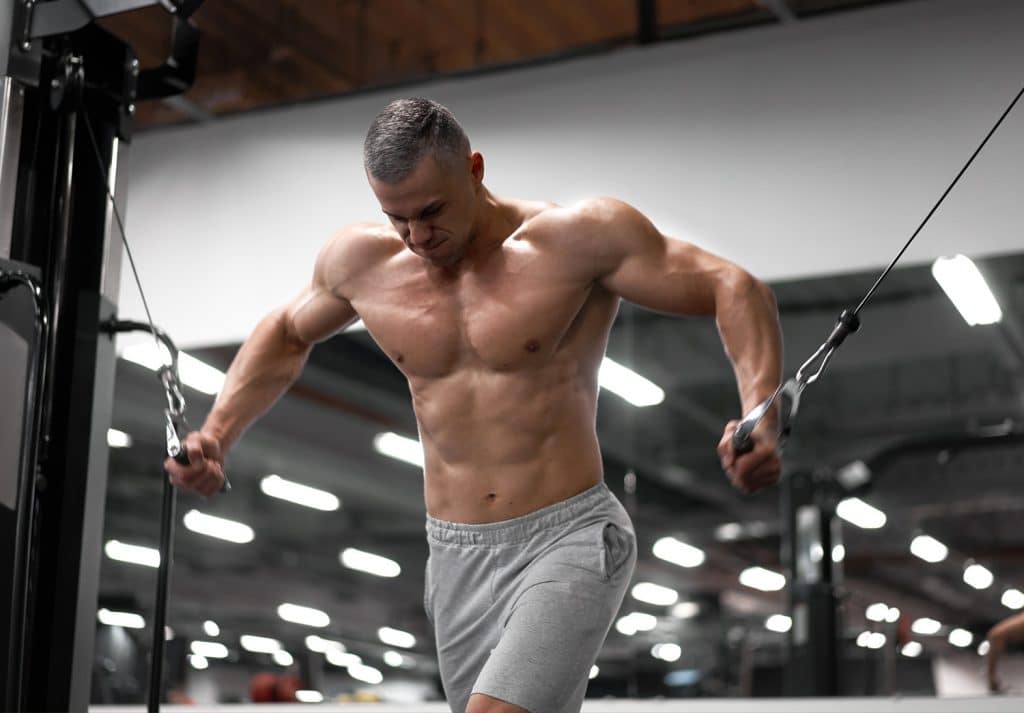
Cable Chest Press

The cable chest press is similar to a bench press, but instead of using a barbell or dumbbells, you will use cables. To perform this exercise, attach the cables to a low pulley machine and grasp the handles. Stand with your feet shoulder-width apart and bring the handles to your chest. Extend your arms forward, squeezing your chest muscles, and then slowly return to the starting position.
Cable Flyes

The cable flyes are a great exercise to isolate your chest muscles. To perform this exercise, attach the cables to a high pulley machine and grasp the handles. Stand with your feet shoulder-width apart and extend your arms to your sides. Bring your hands together in front of your chest, squeezing your chest muscles, and then slowly return to the starting position.
Incline Cable Press
The incline cable press targets your upper chest muscles. To perform this exercise, adjust the bench to a 45-degree angle and attach the cables to a low pulley machine. Grasp the handles and lie back on the bench. Bring the handles to your chest and then extend your arms forward, squeezing your chest muscles. Slowly return to the starting position.
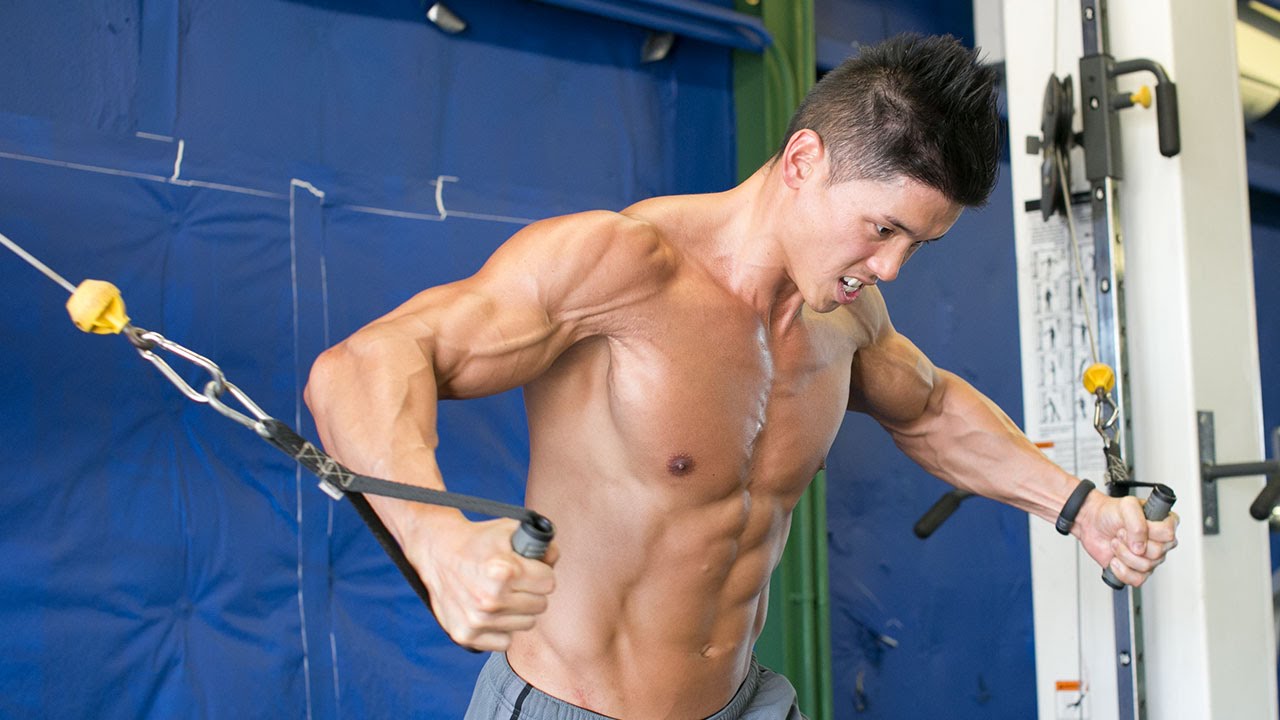
Cable Crossovers

The cable crossovers are a great exercise to target your inner chest muscles. To perform this exercise, attach the cables to a high pulley machine and grasp the handles. Stand with your feet shoulder-width apart and bring the handles to your sides. Cross the handles in front of your body, squeezing your chest muscles, and then slowly return to the starting position.
Single-Arm Cable Press

The single-arm cable press is a great exercise to focus on each side of your chest individually. To perform this exercise, attach the cable to a low pulley machine and stand with your side facing the machine. Grasp the handle with one hand and bring it to your chest. Extend your arm forward, squeezing your chest muscles, and then slowly return to the starting position. Repeat on the other side.
Cable Pullovers
The cable pullovers are a great exercise to target your upper and inner chest muscles. To perform this exercise, attach the cable to a high pulley machine and grasp the handle with both hands. Stand with your feet shoulder-width apart and lean forward. Bring the handle over your head, stretching your chest muscles, and then slowly return to the starting position.
Conclusion
There are many different chest workouts with cables that you can incorporate into your workout routine. These exercises provide a unique resistance that can help you build muscle and strength in your chest. Try adding some of these exercises to your next chest workout and see the results for yourself!
Related video of Chest Workouts With Cables

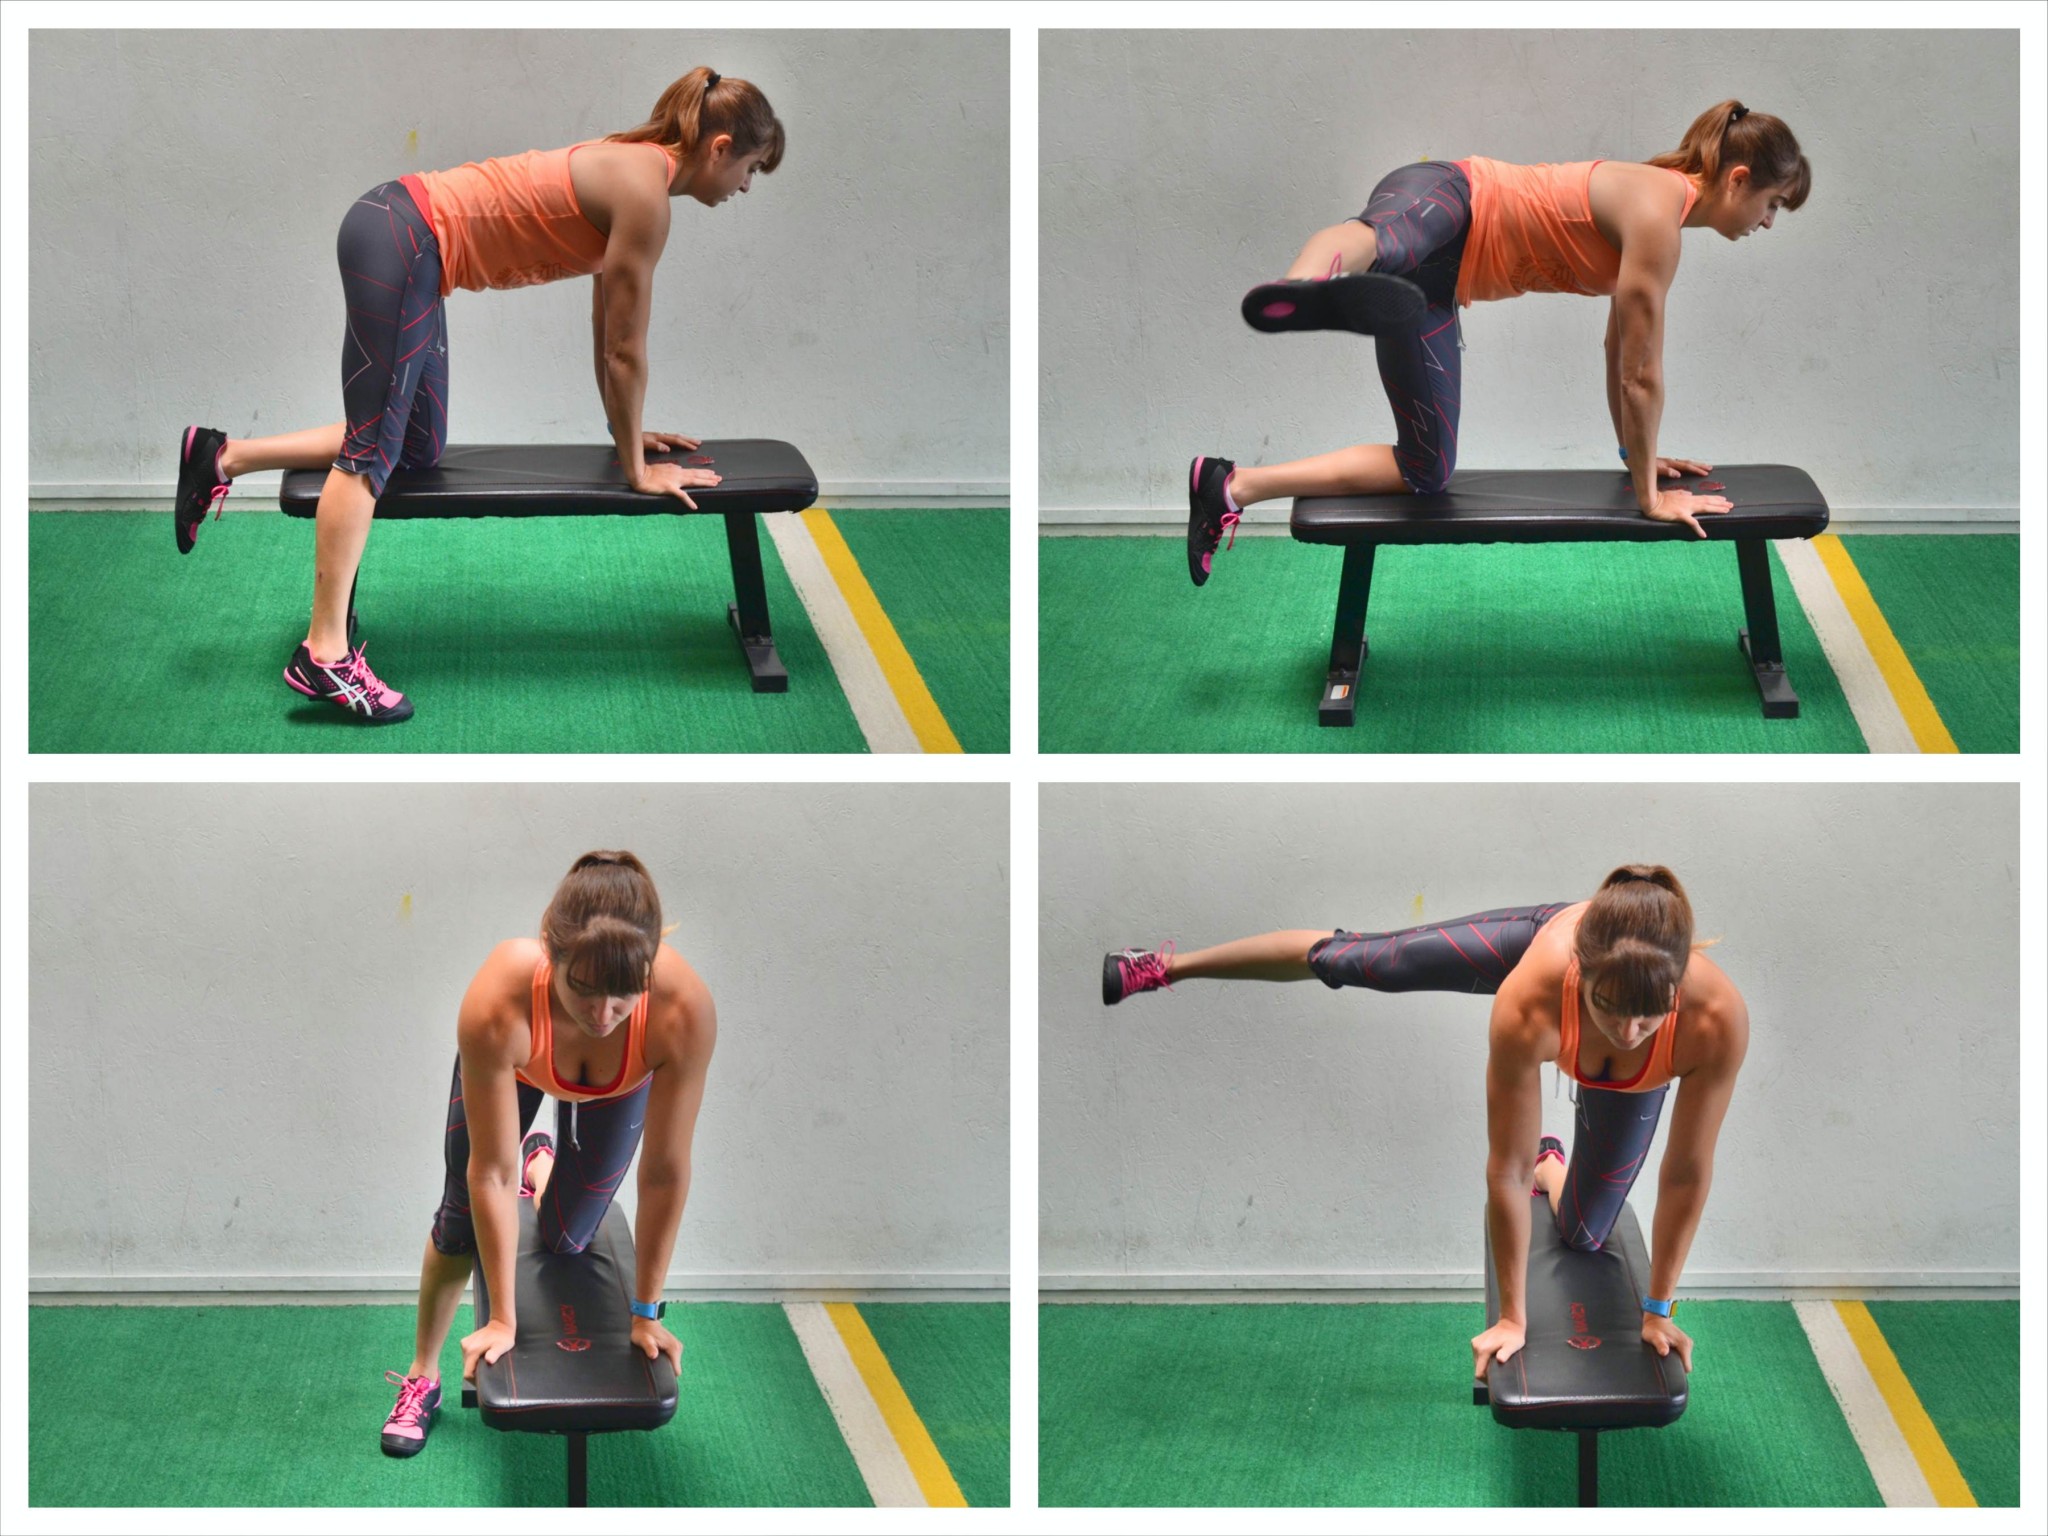
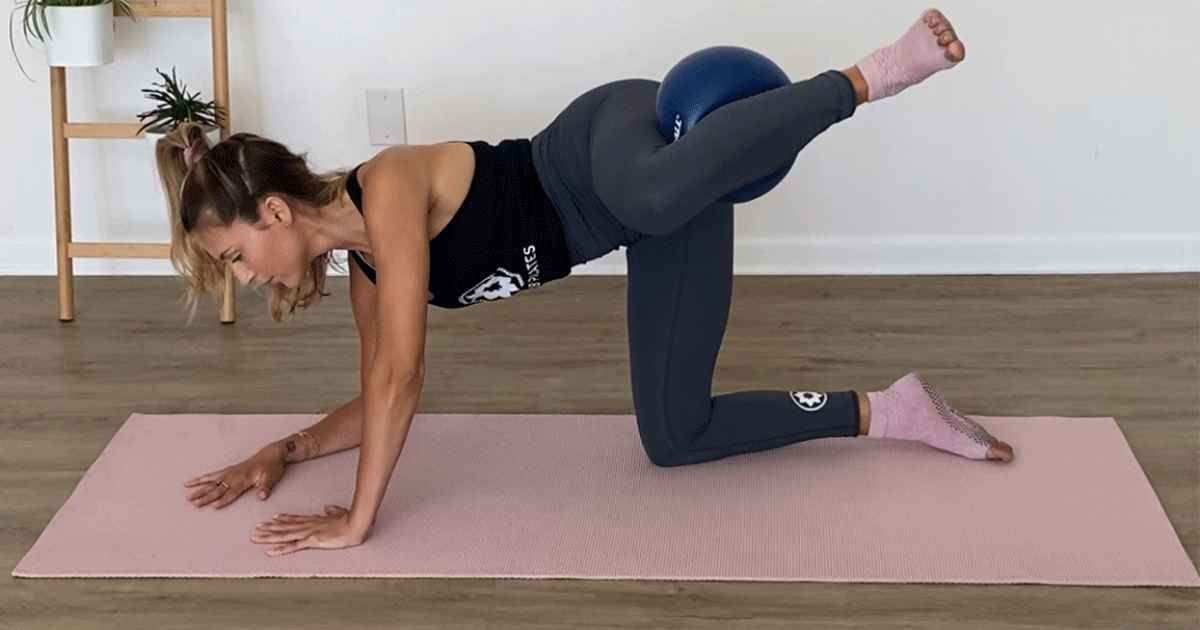
The fire hydrant exercise is a popular bodyweight exercise that targets your glutes, hips, and thighs. This exercise is named after the way a dog pees on a fire hydrant, as it resembles the same motion. It's a great exercise to incorporate into your workout routine to strengthen and tone your lower body.
How To Do The Fire Hydrant Exercise

To perform the fire hydrant exercise, follow these steps:
- Get down on all fours with your hands shoulder-width apart and your knees hip-width apart.
- Lift your right leg out to the side, keeping your knee bent at a 90-degree angle.
- Pause at the top of the movement and squeeze your glutes.
- Lower your leg back down to the starting position.
- Repeat with your left leg.
- Alternate between your right and left leg for the desired number of reps.
Variations of the Fire Hydrant Exercise

There are several variations of the fire hydrant exercise that you can try to challenge yourself or target different areas of your lower body:
- Fire Hydrant Kickback: After lifting your leg out to the side, straighten your leg and kick it back behind you.
- Weighted Fire Hydrant: Hold a dumbbell or kettlebell behind your knee as you lift your leg out to the side.
- Fire Hydrant Circles: Move your lifted leg in a circular motion, as if you're drawing a circle with your foot.
The Benefits of the Fire Hydrant Exercise

The fire hydrant exercise offers several benefits for your lower body:
- Strengthens and tones your glutes, hips, and thighs
- Improves hip mobility and flexibility
- Helps to prevent knee and lower back pain
- Targets hard-to-reach areas of your glutes
How To Incorporate The Fire Hydrant Exercise Into Your Workout Routine
The fire hydrant exercise can be incorporated into your lower body workout routine in a few different ways:
- As a warm-up exercise to activate your glutes and hips
- As a standalone exercise to target your glutes, hips, and thighs
- As part of a circuit or superset with other lower body exercises
Precautions When Doing The Fire Hydrant Exercise
While the fire hydrant exercise is generally considered safe, there are a few precautions you should take:
- Keep your core engaged throughout the exercise to protect your lower back.
- Avoid arching your back or lifting your leg too high, as this can strain your hip flexors.
- Start with a low number of reps and gradually increase as you get stronger.
- If you experience any pain or discomfort during the exercise, stop immediately.
In Conclusion
The fire hydrant exercise is a simple yet effective exercise that targets your glutes, hips, and thighs. It can be easily incorporated into your workout routine and offers several benefits for your lower body. By following the proper form and taking precautions, you can safely perform this exercise and see results in no time.
Related video of What Is The Fire Hydrant Exercise?

The single dumbbell bench press is a great exercise for building upper body strength, particularly in the chest, triceps, and shoulders. It is a variation of the traditional bench press, and it is a great exercise for those who don't have access to a barbell or just want to switch up their routine. In this article, we'll go over how to perform the single dumbbell bench press, its benefits, and some tips to make sure you're doing it correctly.
How to perform the Single Dumbbell Bench Press
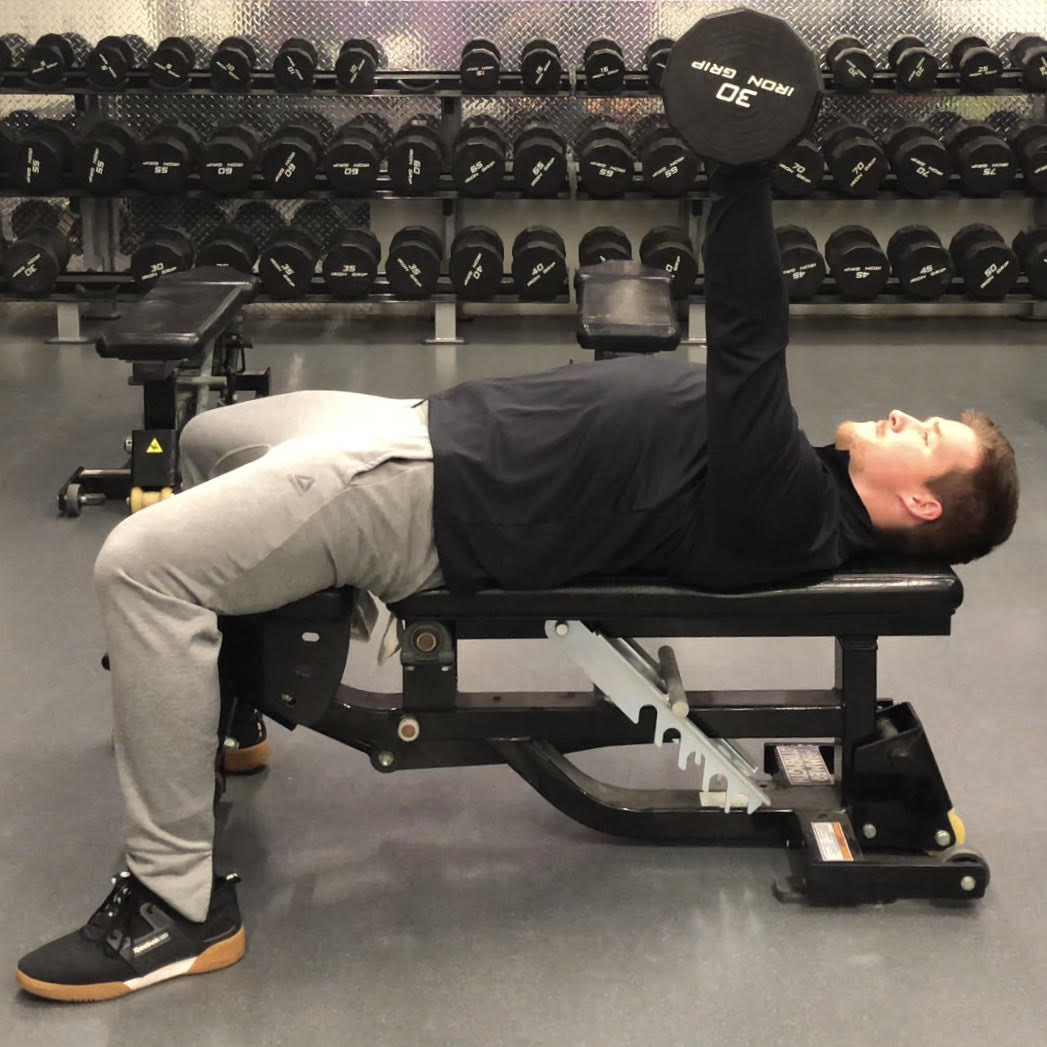
To perform the single dumbbell bench press, you'll need a bench and a dumbbell. You can use a flat, incline, or decline bench depending on your preference. Here's how to do it:
- Lie flat on the bench with your feet firmly planted on the ground. Your head, shoulders, and butt should be in contact with the bench.
- Hold the dumbbell in one hand and bring it up to the center of your chest. Your palm should be facing away from your body.
- Press the dumbbell up towards the ceiling, keeping your elbow close to your body.
- Lower the dumbbell back down to your chest in a controlled manner.
- Repeat for the desired number of reps.
Make sure to switch arms after completing a set with one arm. It is recommended to do 3-4 sets of 8-12 reps with each arm.
Benefits of the Single Dumbbell Bench Press

The single dumbbell bench press provides many benefits that include:
- Building upper body strength: The exercise targets the chest, triceps, and shoulders, helping to build overall upper body strength.
- Increasing balance: The exercise requires you to use one arm at a time, which can help improve balance and stability.
- Improving coordination: The exercise requires coordination between your upper body and lower body to maintain proper form.
- Providing variety: The exercise is a great variation of the traditional bench press, allowing you to switch up your routine and challenge your muscles in different ways.
Tips for Performing the Single Dumbbell Bench Press
Here are some tips to keep in mind when performing the single dumbbell bench press:
- Start with a lighter weight: Since you're only using one arm at a time, it's important to start with a lighter weight than what you would use for a traditional bench press.
- Maintain proper form: Keep your head, shoulders, and butt in contact with the bench throughout the exercise. Keep your elbow close to your body and avoid flaring it out to the side.
- Breathe properly: Inhale as you lower the weight and exhale as you press it up.
- Use a spotter: If you're using heavy weights, it's always a good idea to have a spotter to ensure your safety.
Conclusion
The single dumbbell bench press is a great exercise for building upper body strength, improving balance and coordination, and providing variety in your workout routine. By following the proper form and using a lighter weight than what you would use for a traditional bench press, you can perform this exercise safely and effectively. Give it a try and see the results for yourself!
Related video of Single Dumbbell Bench Press - A Comprehensive Guide to Perform the Exercise

YouTube, one of the largest video-sharing platforms on the internet, has recently announced that they will be increasing the monetization threshold for their Partner Program - otherwise known as I Y T Raises. This news has sparked both excitement and frustration among content creators, who rely on YouTube as a source of income. In this article, we'll explore what I Y T Raises are, why they matter, and what this change means for content creators on the platform.
What is the YouTube Partner Program?

The YouTube Partner Program is a way for content creators to monetize their videos on the platform. To be eligible for the program, a creator must have at least 1,000 subscribers and 4,000 hours of watch time in the past 12 months. Once a creator is accepted into the program, they can earn revenue from advertisements that are displayed before or during their videos.
What are I Y T Raises?

I Y T Raises are changes made by YouTube to the Partner Program's monetization threshold. In January 2018, YouTube announced that they would be increasing the threshold to 1,000 subscribers and 4,000 hours of watch time in the past 12 months. This change was made in an effort to prevent spam and abuse on the platform, and to ensure that only high-quality content was being monetized.
Why do I Y T Raises matter?

I Y T Raises matter because they affect the ability of content creators to earn money from their videos. For many creators, YouTube is their primary source of income, and the changes to the Partner Program's monetization threshold can have a significant impact on their earnings. Additionally, the changes can make it more difficult for new creators to break into the platform and earn a living from their content.
What does the recent change mean for content creators?

The recent change to I Y T Raises means that content creators will now need to meet the new threshold of 1,000 subscribers and 4,000 hours of watch time in the past 12 months in order to monetize their videos. Creators who do not meet this threshold will no longer be able to earn revenue from advertisements on their videos.
What are the implications of the change?

The change to I Y T Raises has both positive and negative implications for content creators. On the positive side, the change can help to weed out low-quality content and prevent spam and abuse on the platform. Additionally, it can incentivize creators to produce high-quality content that attracts viewers and generates revenue. On the negative side, the change can make it more difficult for new creators to get started on the platform and earn a living from their content. It can also be demotivating for creators who have been working hard to build their channels, only to find that they no longer meet the Partner Program's threshold.
What can content creators do?

Content creators who are affected by the change to I Y T Raises can take several steps to adapt to the new threshold. First, they can focus on producing high-quality content that attracts viewers and generates engagement. They can also promote their channels on social media and other platforms to increase their visibility and reach. Additionally, they can explore alternative revenue streams, such as merchandise sales or sponsored content partnerships.
Conclusion
Overall, the change to I Y T Raises has significant implications for content creators on YouTube. While the change can help to prevent spam and abuse on the platform, it can also be demotivating for creators who are affected by the new threshold. Content creators who are impacted by the change should focus on producing high-quality content and exploring alternative revenue streams to adapt to the new threshold. As YouTube continues to evolve and change, it's important for creators to stay informed and adapt to the platform's policies and guidelines.