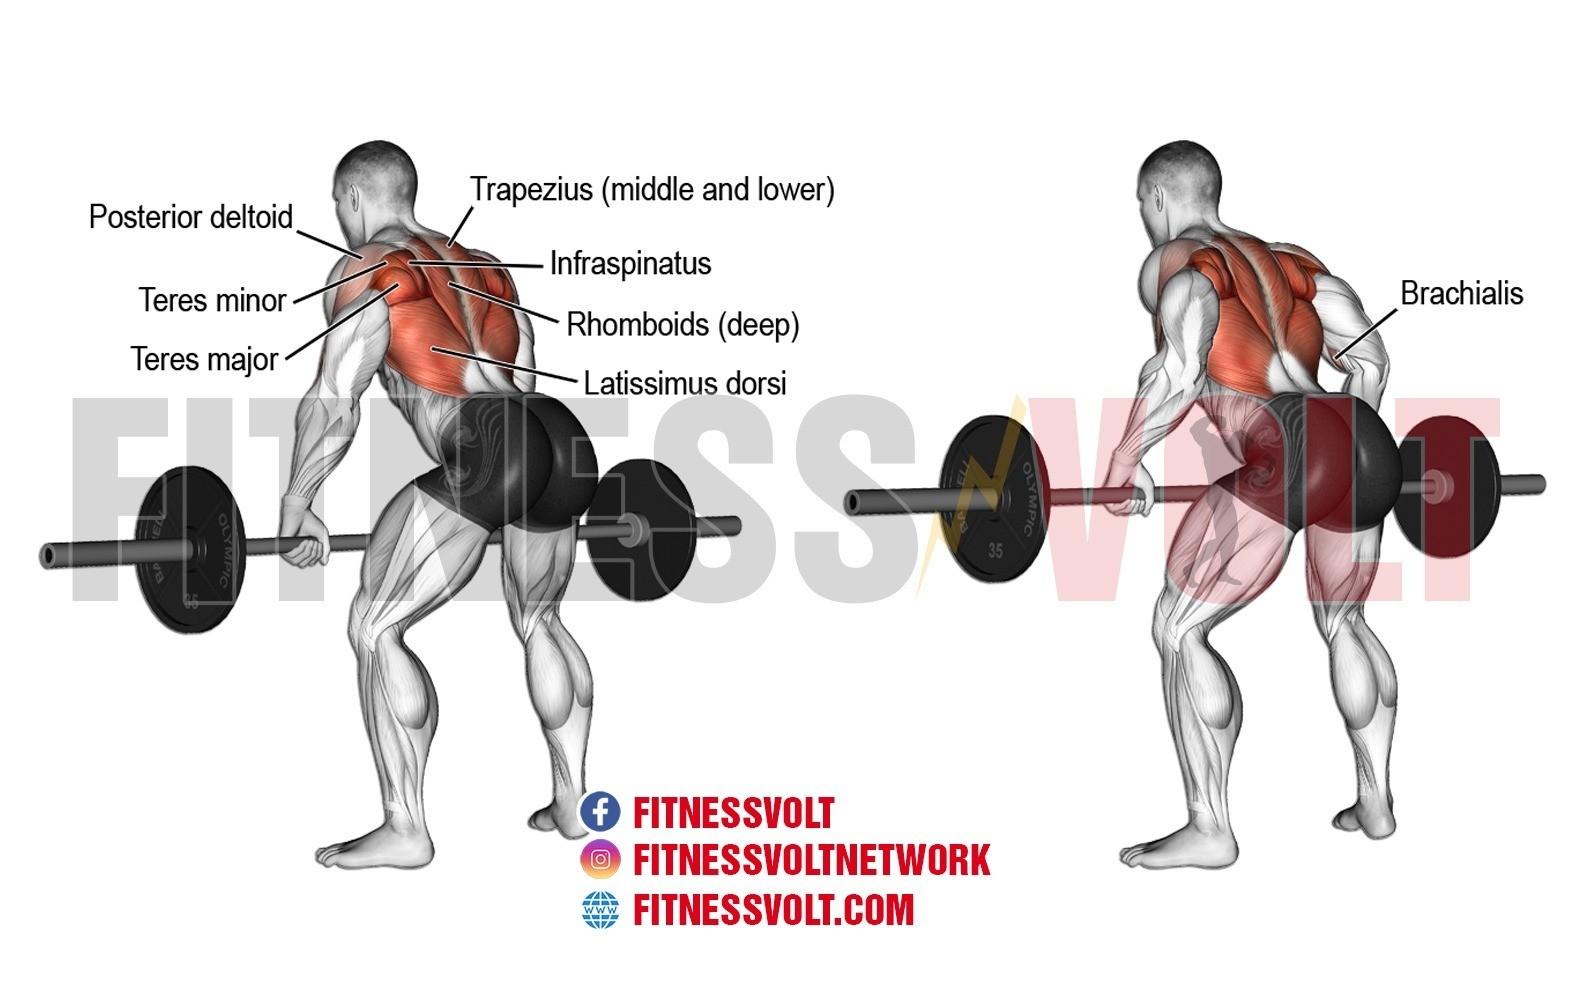
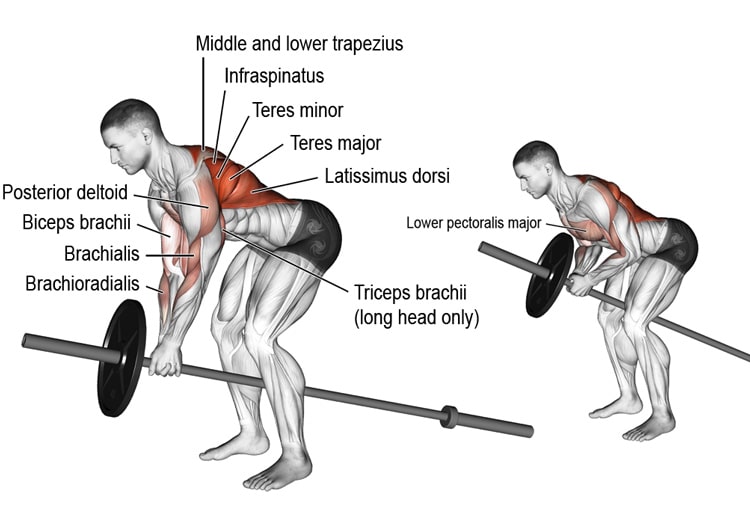
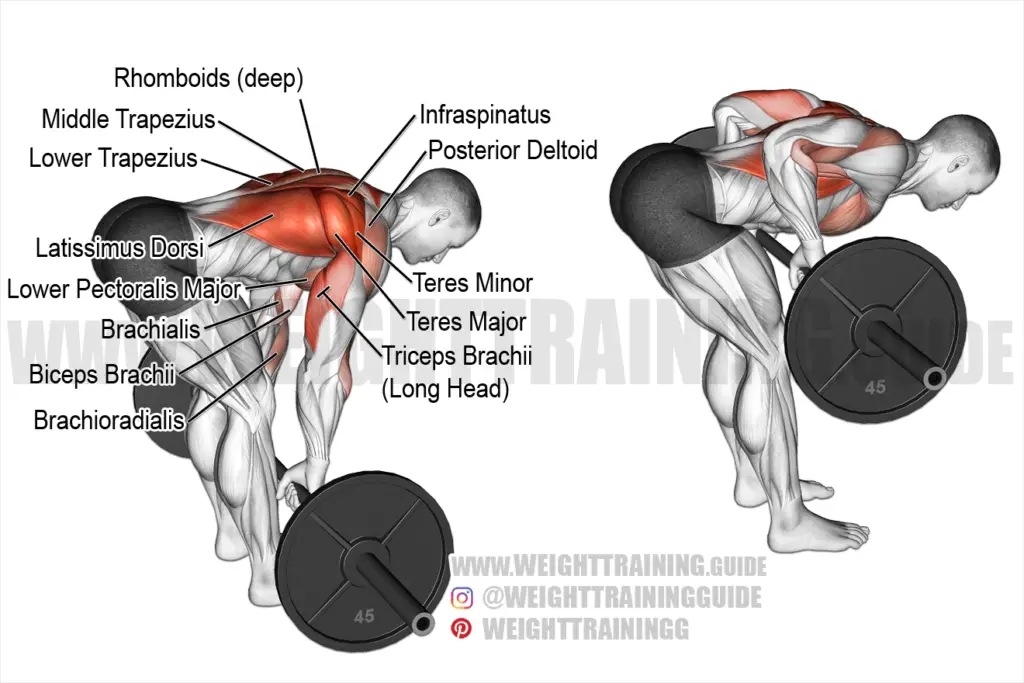
The barbell row is a weight training exercise that primarily targets the muscles in the upper back. It is also known as the bent-over row, and it is a compound exercise, which means it works multiple muscle groups at once. The barbell row is a great exercise for building strength and muscle mass in the back, shoulders, and arms.
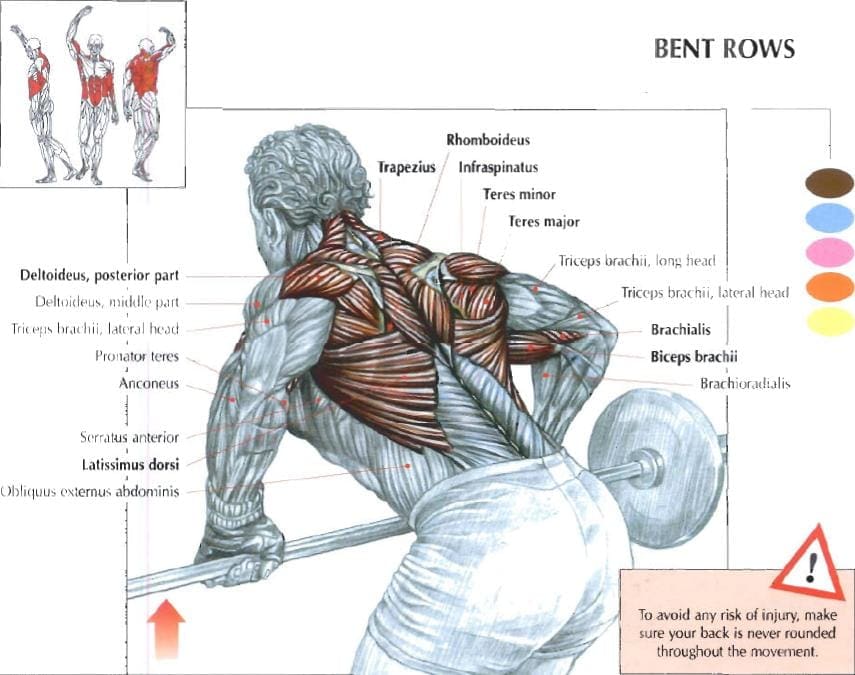
Muscles Targeted by the Barbell Row
The barbell row targets several muscle groups, including:
- Latissimus dorsi (lats)
- Trapezius (traps)
- Rhomboids
- Erector spinae (lower back muscles)
- Biceps
- Forearms
The barbell row is a great exercise for building a strong and defined back, which is why it is a staple in many bodybuilding and powerlifting programs. The exercise also works the biceps and forearms, which are important for grip strength and overall upper body development.
How to Perform the Barbell Row
The barbell row is a relatively simple exercise, but it does require good form and technique to avoid injury and maximize results. Here is how to perform the barbell row:
- Stand with your feet shoulder-width apart and knees slightly bent.
- Bend over at the waist, keeping your back straight and your head up.
- Grasp the barbell with an overhand grip, hands slightly wider than shoulder-width apart.
- Pull the barbell up towards your chest, keeping your elbows close to your body.
- Lower the barbell back down to the starting position and repeat for the desired number of reps.
It is important to keep your back straight and your head up throughout the exercise to avoid straining your lower back. You should also use a weight that is challenging but allows you to maintain good form throughout the exercise.
Variations of the Barbell Row
There are several variations of the barbell row that can target different areas of the back and arms. Here are some common variations:
- Pendlay row - this variation involves lifting the barbell from a dead stop on the ground, which requires more explosive power and targets the lower back and glutes.
- T-bar row - this variation involves using a T-bar machine or a landmine attachment to perform the exercise, which can be easier on the lower back and allow for a greater range of motion.
- Underhand row - this variation involves using an underhand grip on the barbell, which targets the biceps and forearms more than the traditional overhand grip.
Benefits of the Barbell Row
The barbell row offers several benefits for building strength and muscle mass:
- Targets multiple muscle groups at once
- Builds a strong and defined back
- Improves grip strength and forearm development
- Increases overall upper body strength
- Helps prevent injury by strengthening the muscles of the upper back and shoulders
Overall, the barbell row is a great exercise for anyone looking to build a strong and muscular back and improve upper body strength and development.

Conclusion
The barbell row is a compound exercise that targets multiple muscle groups in the upper back, shoulders, and arms. It is a great exercise for building strength and muscle mass, and it offers several benefits for overall upper body development. By incorporating the barbell row into your training program, you can build a strong and defined back, improve grip strength and forearm development, and increase overall upper body strength and power.
Related video of Barbell Row Muscle Worked

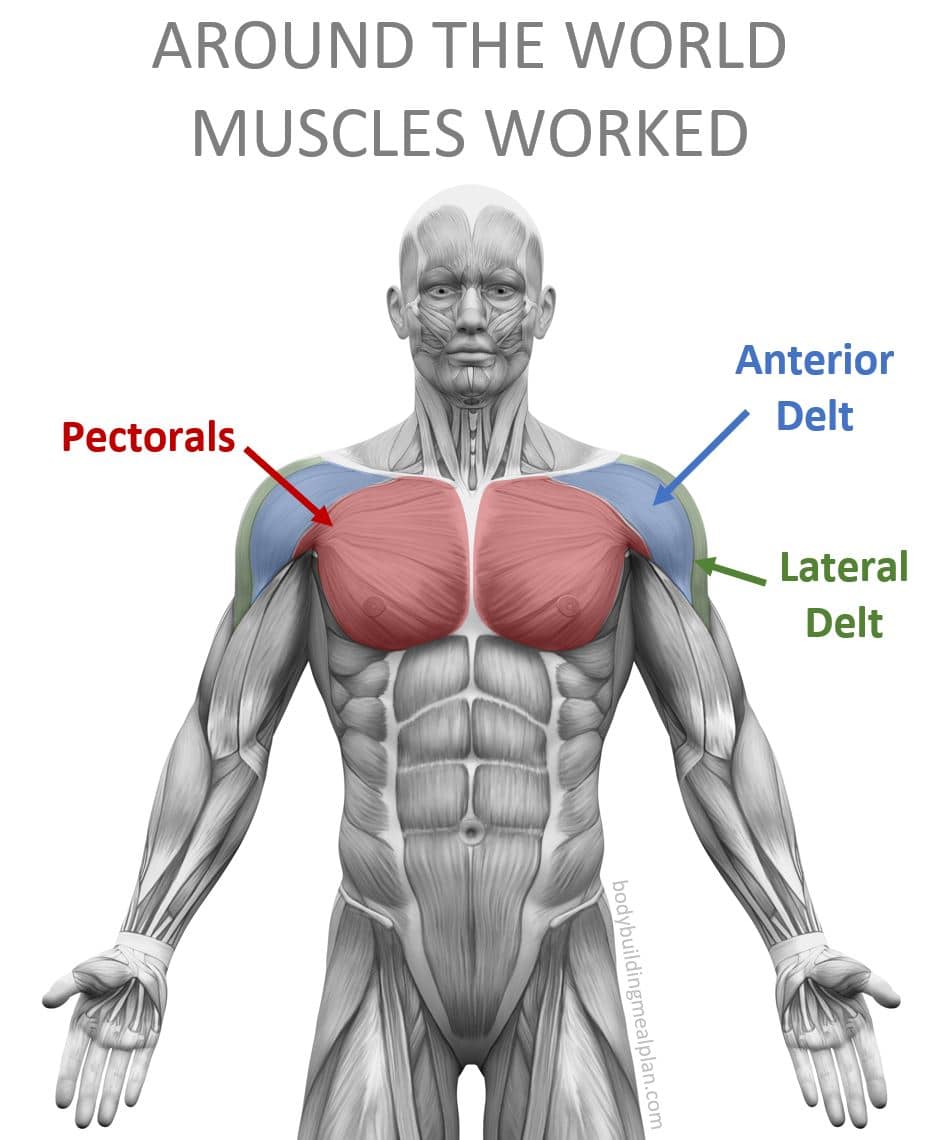
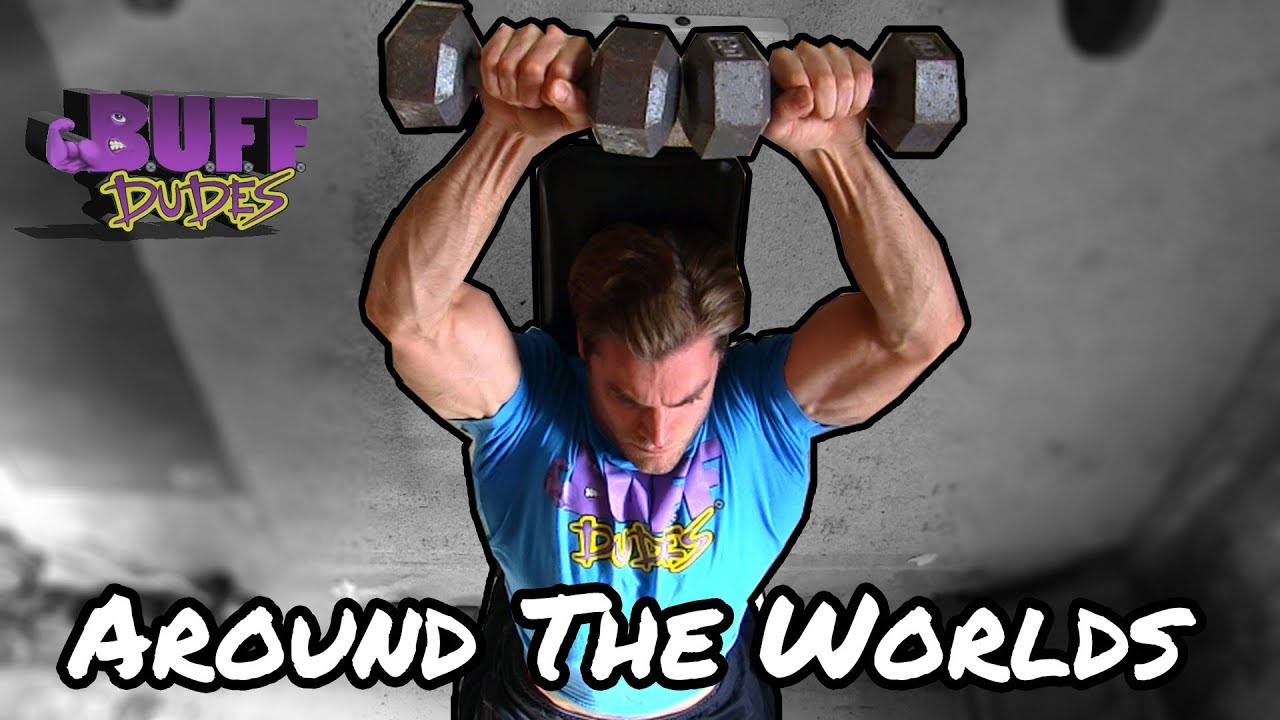
Around the World is a simple yet highly effective exercise that targets several major muscle groups in the upper body. This exercise is also known as the Standing Dumbbell Circles, and it is a great way to work your shoulders, arms, and back muscles all at once.
How to Perform the Around the World Exercise
The Around the World exercise involves standing up straight with your feet shoulder-width apart and your arms extended to your sides. Hold a dumbbell in each hand and begin by rotating your arms in a circular motion, making a full circle in front of your body and then behind your back.
Keep your arms as straight as possible throughout the movement, and make sure to use a weight that is challenging but manageable for the number of repetitions you plan to do. Remember to keep your core engaged and your back straight to avoid injury.
Muscles Worked by the Around the World Exercise

The Around the World exercise primarily targets the shoulder muscles, including the deltoids and rotator cuffs. This exercise also works the upper back muscles, including the trapezius and rhomboids, as well as the biceps and triceps in the arms.
Because this exercise involves a circular motion of the arms, it also engages the core muscles, including the abdominals, obliques, and lower back muscles. This makes it a great exercise for improving overall strength and stability in the upper body.
Variations of the Around the World Exercise
There are many variations of the Around the World exercise that you can try to target different muscle groups or add variety to your workout routine. One variation is the Standing Dumbbell Figure 8, which involves making a figure 8 motion with the dumbbells while standing up straight.
You can also try the Seated Around the World exercise, which involves sitting on a bench or chair and performing the same circular motion with your arms while holding a dumbbell in each hand. This variation is great for targeting the shoulder muscles and improving posture.
Benefits of the Around the World Exercise

The Around the World exercise is a great way to improve overall upper body strength and stability. It can also help to improve posture and reduce the risk of shoulder injuries by strengthening the rotator cuff muscles.
Additionally, this exercise is easy to perform and can be done with minimal equipment, making it a great addition to any home workout routine. By incorporating the Around the World exercise into your regular workout routine, you can target multiple muscle groups at once and see noticeable improvements in your upper body strength and stability over time.
Conclusion
If you're looking for a simple yet effective exercise to add to your upper body workout routine, the Around the World exercise is definitely worth trying. By targeting multiple major muscle groups at once, this exercise can help you to improve overall strength and stability in your upper body and reduce the risk of injury.
Whether you're a beginner or an experienced fitness enthusiast, the Around the World exercise is a great way to challenge yourself and take your workout routine to the next level. So why not give it a try today and see how it can benefit your body and your health?
Related video of Around The World Exercise Muscles Worked

When it comes to exercising, there are a lot of options out there. However, if you're looking for exercises that start with the letter "U," you might find yourself scratching your head. Fear not! There are actually quite a few exercises that start with this letter. Here are some of the most effective ones:
1. Upright Row

The upright row is a great exercise for your shoulders and upper back. To perform this exercise, start by holding a barbell or dumbbells in front of your thighs with your palms facing your body. Then, lift the weight straight up to your chin, keeping your elbows close to your body. Lower the weight back down to the starting position and repeat for several reps.
2. Upward Dog

Upward dog is a yoga pose that targets your chest, shoulders, and core. To perform this pose, start by lying face down on the ground with your hands under your shoulders. Push up through your hands to lift your chest off the ground and straighten your arms. Keep your legs and hips on the ground and hold the pose for several breaths.
3. Underhand Grip Lat Pulldown

The underhand grip lat pulldown is a great exercise for your back and biceps. To perform this exercise, sit at a lat pulldown machine and grab the bar with an underhand grip (palms facing you). Pull the bar down to your chest, keeping your elbows close to your body. Slowly release the bar back up and repeat for several reps.
4. Ulnar Deviation

Ulnar deviation is a wrist exercise that can help improve grip strength and prevent injury. To perform this exercise, hold a dumbbell in your hand with your palm facing up. Bend your wrist to the side so that your hand moves towards your pinky finger. Return to the starting position and repeat for several reps before switching sides.
5. Up and Over

The up and over exercise is a great full-body exercise that targets your core, legs, and upper body. To perform this exercise, start by standing with your feet hip-width apart and your arms at your sides. Then, jump up and over an object (like a bench or step) while swinging your arms up and over your head. Land on the other side and repeat for several reps.
6. Unilateral Tricep Extension

The unilateral tricep extension is a great exercise for your triceps and shoulders. To perform this exercise, hold a dumbbell in one hand and extend your arm straight up. Lower the weight behind your head, keeping your elbow close to your head. Lift the weight back up to the starting position and repeat for several reps before switching sides.
7. Upper Body Ergometer

The upper body ergometer is a great cardio exercise that targets your upper body. To perform this exercise, sit at an ergometer machine and grab the handles with your hands. Move your arms in a circular motion to simulate rowing. Keep your core engaged and your legs stationary as you row.
8. Ulnar Nerve Flossing

Ulnar nerve flossing is a mobility exercise that can help improve the flexibility of your nerves. To perform this exercise, start by sitting or standing with your arms at your sides. Reach your arm out to the side and then slowly bring it up and over your head. Keep your arm straight and your palm facing down. Then, slowly bring your arm back down to the starting position and repeat for several reps before switching sides.
9. Uddiyana Bandha

Uddiyana bandha is a breathing exercise that can help improve your digestion and reduce stress. To perform this exercise, stand with your feet hip-width apart and your hands on your thighs. Inhale deeply and then exhale all the air out of your lungs. Hold your breath and pull your belly button in towards your spine. Hold for a few seconds and then release your breath.
10. Utkatasana

Utkatasana, also known as chair pose, is a yoga pose that targets your quads, glutes, and core. To perform this pose, start by standing with your feet together and your arms at your sides. Bend your knees and lower your hips as if you're sitting in a chair. Raise your arms up over your head and hold the pose for several breaths.
11. Ulnar Wrist Curl

The ulnar wrist curl is a wrist exercise that targets your forearm muscles. To perform this exercise, hold a dumbbell in one hand with your palm facing up. Rest your forearm on a bench or table with your wrist hanging off the edge. Curl your wrist up towards your forearm and then lower it back down. Repeat for several reps before switching sides.
12. Underhand Grip Barbell Row

The underhand grip barbell row is a great exercise for your back and biceps. To perform this exercise, hold a barbell with an underhand grip (palms facing you) and stand with your feet hip-width apart. Bend forward at the waist and pull the bar up towards your chest, keeping your elbows close to your body. Lower the weight back down and repeat for several reps.
13. Upward Facing Two-Foot Staff Pose

The upward facing two-foot staff pose is a yoga pose that targets your core, arms, and legs. To perform this pose, start by sitting on the ground with your legs straight out in front of you. Place your hands on the ground behind you and lift your hips up towards the ceiling. Hold the pose for several breaths.
14. Ulnar Nerve Glides

Ulnar nerve glides are a mobility exercise that can help improve the flexibility of your nerves. To perform this exercise, start by sitting or standing with your arms at your sides. Reach your arm out to the side and then bend your elbow so that your hand is pointing towards the ceiling. Slowly straighten your arm and then release it back down to the starting position. Repeat for several reps before switching sides.
15. Upward Salute

The upward salute is a yoga pose that targets your shoulders, chest, and core. To perform this pose, start by standing with your feet hip-width apart and your arms at your sides. Inhale deeply and lift your arms up over your head. Keep your palms facing each other and your gaze towards the ceiling. Hold the pose for several breaths.
Related video of Exercises That Start With U
Walking is one of the easiest and most effective ways to improve your physical health. It can help you lose weight, reduce your risk of chronic diseases, and improve your mental well-being. However, if you want to take your walking routine to the next level, you may want to consider using resistance bands. In this article, we will discuss the benefits of using resistance bands for walking, how to use them properly, and some tips for getting the most out of your workout.
What Are Resistance Bands?

Resistance bands are elastic bands that come in various sizes, strengths, and shapes. They are a popular tool in the fitness industry because they are lightweight, portable, and versatile. Resistance bands can be used for a variety of exercises, such as strength training, stretching, and rehabilitation. They provide resistance to your muscles, making them work harder and increasing the effectiveness of your workout.
Benefits of Using Resistance Bands for Walking
Using resistance bands for walking can provide many benefits, including:
- Increased calorie burn: Resistance bands make your muscles work harder, which can increase your calorie burn during your walk.
- Improved muscle strength: Resistance bands can help you build and tone your muscles, particularly in your legs and glutes.
- Enhanced balance and stability: Resistance bands can improve your balance and stability by forcing your muscles to work harder to maintain proper form.
- Reduced impact on joints: Resistance bands can reduce the impact on your joints during your walk, making it a low-impact exercise option.
How to Use Resistance Bands for Walking

Using resistance bands for walking is simple and easy. Here's how:
- Choose the right resistance band: Select a resistance band that matches your fitness level and your goals. You can choose from different colors, which represent different levels of resistance.
- Attach the resistance band: Attach the resistance band to your ankles, just above your ankle bones. Make sure the band is secure and not too tight or too loose.
- Start walking: Begin your walk as you normally would. The resistance band will provide added resistance to your leg muscles, making them work harder.
- Adjust the resistance: If you find the resistance is too easy or too hard, you can adjust it by choosing a different color band or changing the placement of the band.
- Stretch after your walk: After your walk, take some time to stretch your leg muscles to prevent injury and improve flexibility.
Tips for Getting the Most Out of Your Resistance Band Walking Workout
/legs-of-young-woman-training-in-park--stretching-resistance-band-667607855-5a32886d9802070037cf144f.jpg)
If you want to get the most out of your resistance band walking workout, here are some tips to keep in mind:
- Start slowly: If you're new to using resistance bands for walking, start with a low-resistance band and gradually work your way up to higher levels.
- Focus on proper form: Make sure you maintain proper form during your walk, keeping your back straight, shoulders relaxed, and core engaged.
- Combine with other exercises: Resistance band walking can be combined with other exercises, such as lunges, squats, and leg lifts, to create a more comprehensive workout.
- Wear comfortable shoes: Make sure you wear comfortable, supportive shoes that provide good traction to avoid slipping or tripping.
- Stay hydrated: Drink plenty of water before, during, and after your walk to stay hydrated.
Conclusion
Resistance bands can add a new dimension to your walking routine, helping you achieve your fitness goals more quickly and effectively. By using resistance bands for walking, you can increase your calorie burn, build muscle strength, improve balance and stability, and reduce the impact on your joints. Just remember to choose the right resistance band, use proper form, and stay hydrated to get the most out of your workout.
Related video of Resistance Bands For Walking: A Comprehensive Guide

Looking for a challenging, yet effective exercise to incorporate into your fitness routine? Look no further than the single leg v up! This exercise is a great way to target your abs, obliques, and hip flexors, while also improving your overall balance and stability.
What is a Single Leg V Up?

The Single Leg V Up is a bodyweight exercise that involves lying on your back with your legs extended and then lifting them up to meet your hands, forming a "V" shape. This exercise can be modified to suit different fitness levels, making it a versatile addition to any workout routine.
How to Perform the Single Leg V Up

To perform the single leg v up, follow these steps:
- Lie on your back with your legs extended and your arms overhead.
- Engage your core and lift your right leg and your upper body off the ground at the same time.
- Reach your arms forward and try to touch your toes with your hands.
- Lower your body and your leg back down to the starting position.
- Repeat on the other side, lifting your left leg and upper body off the ground and reaching for your toes with your hands.
- Continue alternating sides for the desired number of reps.
Common Mistakes to Avoid

When performing the single leg v up, it's important to avoid these common mistakes:
- Not engaging your core: To get the most out of this exercise, you need to engage your core muscles throughout the movement.
- Using momentum: It's easy to use momentum to lift your upper body off the ground, but this takes away from the effectiveness of the exercise. Instead, focus on using your abs to lift your body up.
- Not breathing properly: Make sure you breathe in as you lower your body down and breathe out as you lift your body up and reach for your toes.
Modifications and Variations

If you're just starting out with the single leg v up or find the exercise too challenging, there are a few modifications you can try:
- Double leg v up: Instead of lifting one leg at a time, lift both legs up to meet your hands.
- Knee tucks: Instead of reaching for your toes, bring your knees in towards your chest.
- Reverse crunches: Lie on your back with your legs bent and your knees towards your chest. Lift your hips off the ground and then lower them back down.
Incorporating Single Leg V Ups into Your Workout Routine

The single leg v up is a great exercise to add to your existing workout routine. Here are a few tips for incorporating it into your workouts:
- Warm up properly before beginning the exercise to help prevent injury.
- Start with a smaller number of reps and gradually increase over time as your fitness level improves.
- Include the single leg v up as part of a circuit or superset for a more challenging workout.
- Combine the single leg v up with other exercises that target the same muscle groups for a more comprehensive workout.
Conclusion
The single leg v up is a challenging, yet effective exercise that can help you target your abs, obliques, and hip flexors. By following the proper form and technique, you can improve your balance and stability while also building strength in your core muscles. Give this exercise a try and see the benefits for yourself!
Related video of Single Leg V Up - A Comprehensive Guide
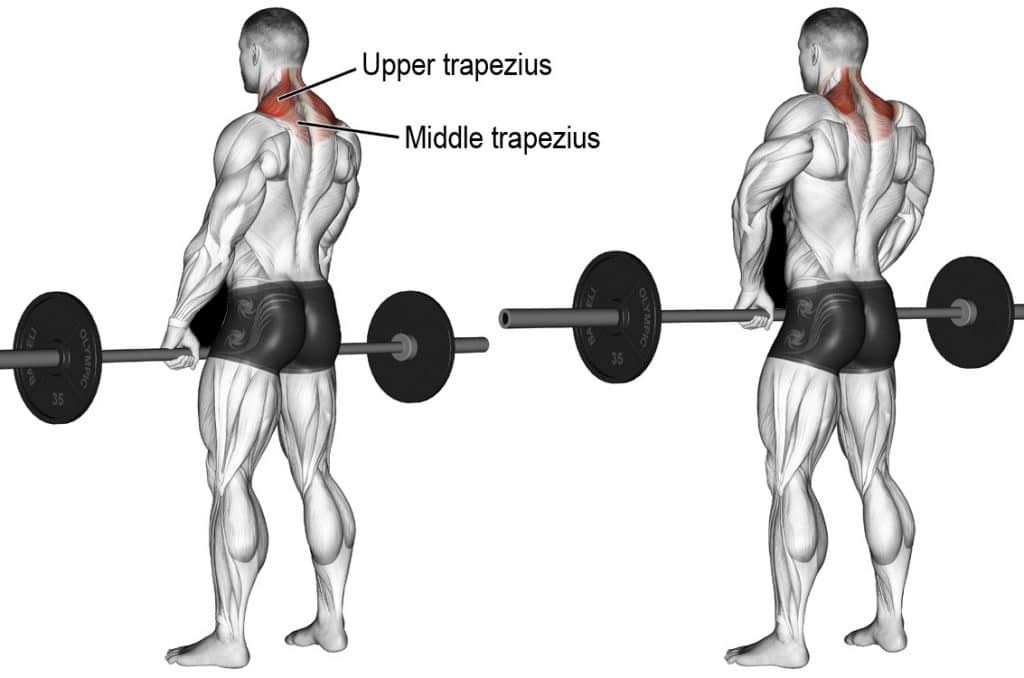
Barbell shrugs are a popular exercise among bodybuilders, powerlifters, and fitness enthusiasts. It is an excellent exercise to target the upper trapezius (traps) muscle, which is responsible for elevating the shoulder blades. However, the barbell shrug also works other muscles in the upper body, including the neck, shoulders, and back. In this article, we will discuss the muscles worked during the barbell shrug and how to perform the exercise correctly.
Muscles Worked During Barbell Shrug
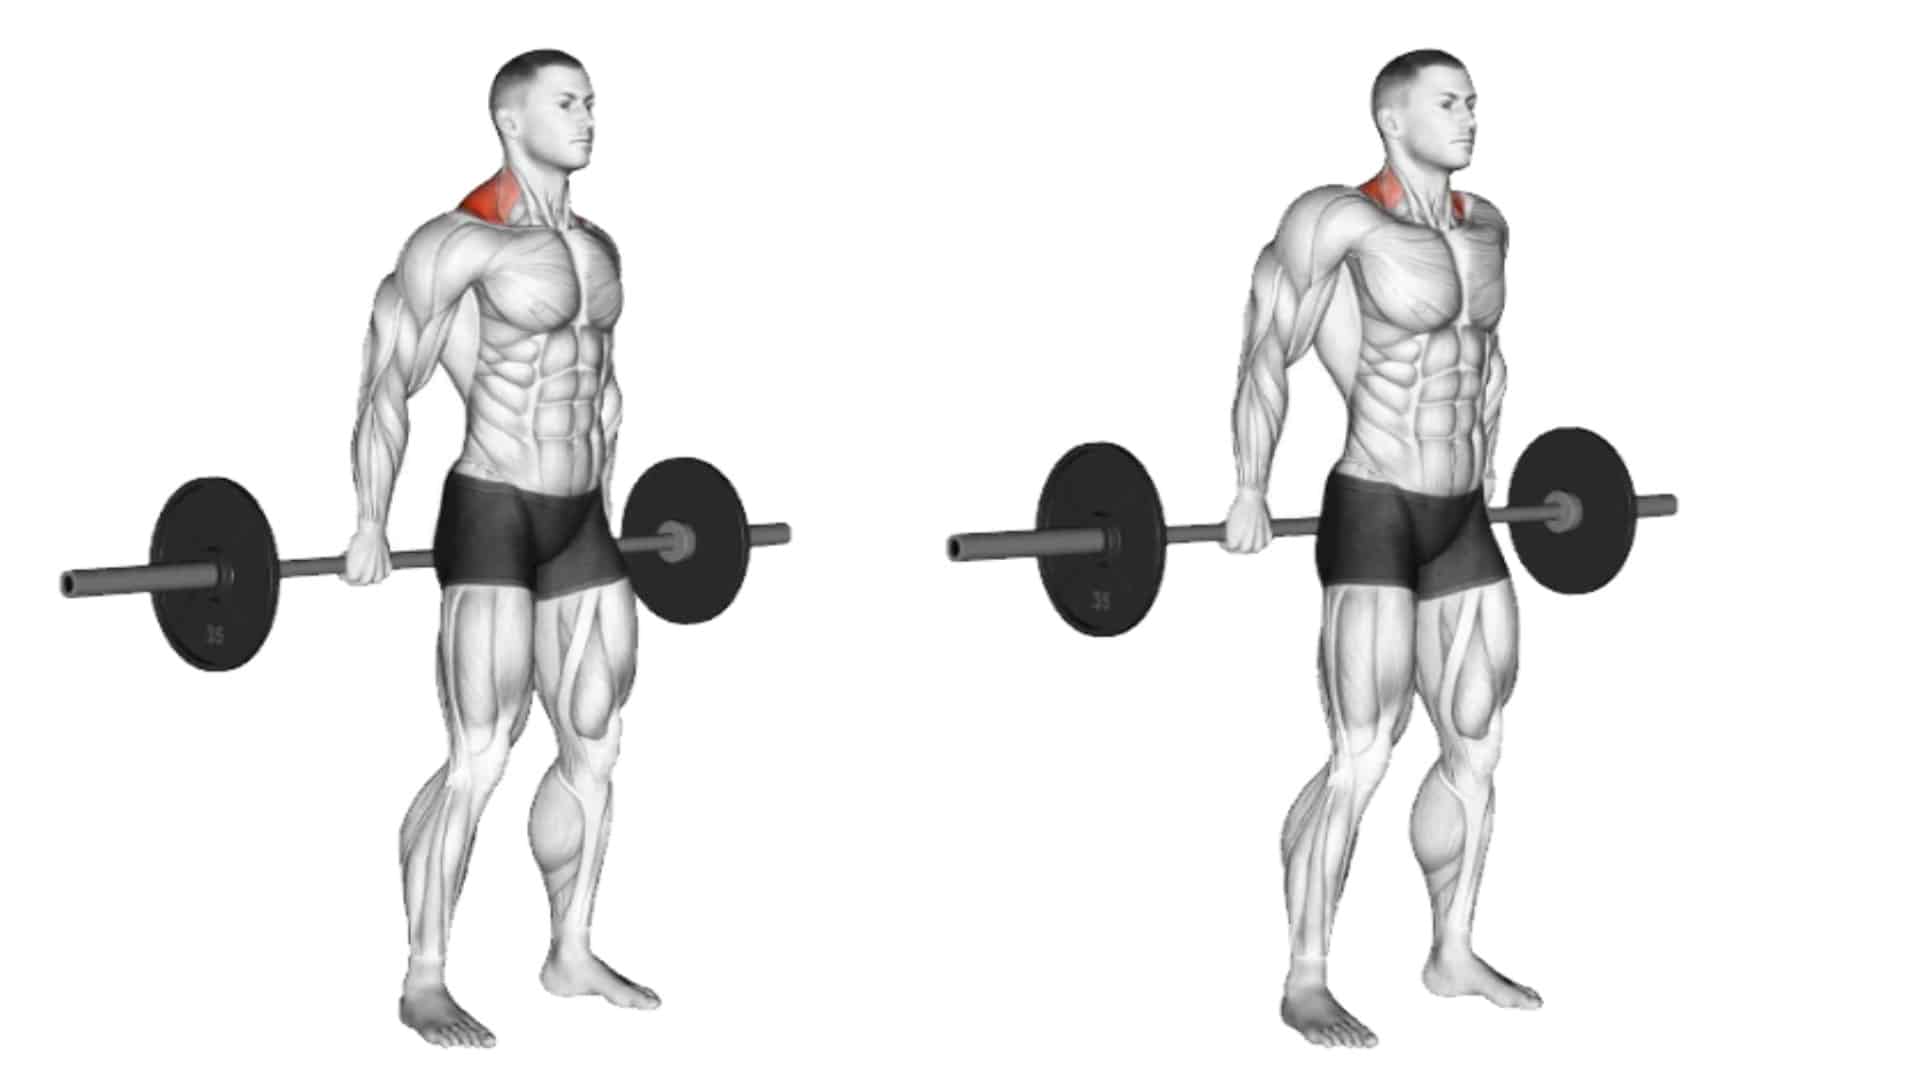
The barbell shrug primarily targets the upper trapezius muscle. This muscle is located in the upper back and is responsible for lifting the shoulder blades. When you perform the barbell shrug, you lift the weight using the trapezius muscle, which helps to build strength and size in this area. However, other muscles also come into play during the exercise, including:
- Middle and lower trapezius
- Levator scapulae
- Rhomboids
- Deltoids
- Erector spinae
The middle and lower trapezius work together with the upper traps to stabilize the shoulder blades and prevent them from winging out. The levator scapulae muscle helps to elevate the shoulder blades, while the rhomboids retract the shoulder blades towards the spine. The deltoids work as synergists, helping to lift the weight, while the erector spinae muscles provide stability to the spine.
How to Perform Barbell Shrug

To perform the barbell shrug, follow these steps:
- Stand with your feet shoulder-width apart, toes pointed forward.
- Grasp the barbell with an overhand grip, hands shoulder-width apart.
- Lift the barbell by extending your hips and knees, keeping your back straight.
- Shrug your shoulders up towards your ears, lifting the weight as high as possible.
- Hold the contraction for a second, then lower the weight back to the starting position.
- Repeat for the desired number of reps.
When performing the barbell shrug, make sure to keep your shoulders down and back, and your elbows straight. Avoid rolling your shoulders forward or rounding your back, as this can lead to injury. Also, make sure to use a weight that allows you to perform the exercise with proper form.
Variations of Barbell Shrug

There are several variations of the barbell shrug that you can perform to target different muscles in the upper body. These include:
- Behind the back barbell shrug
- Single-arm barbell shrug
- Upright row
- Clean pull
The behind the back barbell shrug targets the lower traps and rhomboids, while the single-arm barbell shrug helps to correct muscle imbalances between the left and right sides of the body. The upright row targets the deltoids and traps, while the clean pull targets the traps and erector spinae muscles.
Conclusion
The barbell shrug is an excellent exercise to target the upper trapezius muscles and other muscles in the upper body. By performing the exercise correctly and using proper form, you can build strength and size in your traps and improve your overall upper body strength. With the variations of the exercise, you can also target other muscles in your upper body for a well-rounded workout.
Related video of Barbell Shrug Muscles Worked

Are you looking for an exercise that can help you build stronger and defined shoulder muscles? Then, you should try out lateral raises on cable. This exercise is an excellent way to target your lateral deltoids, which are the muscles that run from your shoulder joint to the center of your upper arm.
What is Lateral Raises on Cable?

Lateral raises on cable is an isolation exercise that requires a cable machine. In this exercise, you stand facing the cable machine with your feet shoulder-width apart. You hold the cable handles with both hands and then raise your arms to the side until they reach shoulder height. Then, you slowly lower your arms back down to the starting position.
Benefits of Lateral Raises on Cable

Lateral raises on cable has numerous benefits, including:
- Helps to strengthen and tone your shoulder muscles
- Improves your shoulder mobility and flexibility
- Reduces the risk of shoulder injuries
- Targets your lateral deltoids more effectively than other exercises
- Can be modified to suit different fitness levels and goals
How to Perform Lateral Raises on Cable
Follow these steps to perform lateral raises on cable:
- Stand facing the cable machine with your feet shoulder-width apart.
- Hold the cable handles with both hands and keep your arms straight and your palms facing down.
- Slowly raise your arms to the side until they reach shoulder height.
- Hold the position for a few seconds and then slowly lower your arms back down to the starting position.
- Repeat for the desired number of repetitions.
Tips for Lateral Raises on Cable

Here are some tips to help you perform lateral raises on cable correctly:
- Keep your elbows slightly bent throughout the exercise to avoid strain on your joints.
- Focus on using your shoulder muscles to lift the weight, not your arms or back.
- Avoid swinging your body or using momentum to lift the weight.
- Exhale as you lift the weight and inhale as you lower it.
- Start with a lighter weight and gradually increase as you get stronger.
Variations of Lateral Raises on Cable

Here are some variations of lateral raises on cable that you can try:
- Single-arm lateral raise: Hold one cable handle with one hand and perform the exercise on one side at a time.
- Bent-over lateral raise: Bend forward at the waist and perform the exercise with your arms hanging down.
- Cable front raise: Stand facing away from the cable machine and raise your arms to the front instead of the side.
Conclusion
Lateral raises on cable is an effective exercise for targeting your lateral deltoids and building stronger shoulder muscles. By following the correct form and using the right weight, you can enjoy the numerous benefits of this exercise. So, add lateral raises on cable to your workout routine today and watch your shoulder muscles grow!
Related video of Lateral Raises on Cable: The Ultimate Guide
Single leg lateral hops are a type of plyometric exercise that involves jumping from one foot to the other, laterally. This exercise is a great way to improve your athletic performance, increase your lower body strength, and prevent injuries. In this article, we will discuss the benefits of single leg lateral hops and how to perform them correctly.
What are the Benefits of Single Leg Lateral Hops?

Single leg lateral hops offer a variety of benefits for your body, including:
- Increased lower body strength: The jumping motion of this exercise activates your leg muscles, including your glutes, quads, and hamstrings. As you continue to perform this exercise, you will gradually build stronger leg muscles.
- Improved balance and stability: Since you are jumping on one foot at a time, this exercise helps improve your balance and stability. This will come in handy if you play sports that require quick lateral movements.
- Reduced risk of injury: By strengthening the muscles in your legs, you will be less likely to experience injuries, such as sprains or strains.
How to Perform Single Leg Lateral Hops
Before performing single leg lateral hops, it is important to warm up your body with some light cardio and dynamic stretches. Once you are warmed up, follow these steps:
- Stand on one foot with your knee slightly bent and your hands on your hips.
- Jump laterally to the side, landing on your other foot with your knee slightly bent.
- Immediately jump back to the starting position on your original foot.
- Repeat this motion for 10-15 reps on each leg.
It is important to maintain proper form while performing single leg lateral hops. Keep your back straight, your core engaged, and your knees slightly bent. Make sure to land softly on your foot to avoid injury.
Who can Benefit from Single Leg Lateral Hops?

Single leg lateral hops can benefit anyone looking to improve their lower body strength and athletic performance. This exercise is especially beneficial for athletes who play sports that require quick lateral movements, such as basketball, tennis, or soccer.
However, it is important to consult with a doctor before starting any new exercise routine, especially if you have a history of knee or ankle injuries.
Conclusion
Single leg lateral hops are a simple yet effective exercise that can help improve your lower body strength, balance, and stability. By incorporating this exercise into your workout routine, you can help prevent injuries and improve your overall athletic performance.
Related video of Single Leg Lateral Hops: Boosting Your Athletic Performance and Overall Health

The single leg Romanian deadlift with one dumbbell is an effective exercise that targets your glutes, hamstrings, lower back, and core muscles. This exercise is perfect for those who want to build strength, improve balance, and enhance their athletic performance.
How to Perform the Single Leg Romanian Deadlift One Dumbbell
To perform the single leg Romanian deadlift with one dumbbell, follow these steps:
- Stand with your feet hip-width apart and hold a dumbbell in your right hand.
- Shift your weight to your left foot and lift your right foot off the ground.
- Slowly hinge forward at your hips, keeping your back straight and your core engaged.
- Lower the dumbbell towards the ground, keeping your right leg straight and your left knee slightly bent.
- Pause for a moment when the dumbbell is just above the ground.
- Slowly return to the starting position by squeezing your glutes and hamstrings.
- Repeat for the desired number of reps before switching sides.

The Benefits of the Single Leg Romanian Deadlift One Dumbbell
The single leg Romanian deadlift with one dumbbell has many benefits, including:
- Improved balance and stability.
- Increased lower body strength.
- Better posture and core stability.
- Reduced risk of injury.
- Enhanced athletic performance.
Tips for Performing the Single Leg Romanian Deadlift One Dumbbell
Here are some tips to help you perform the single leg Romanian deadlift with one dumbbell correctly:
- Start with a light dumbbell and work your way up to heavier weights.
- Keep your core engaged throughout the movement to maintain stability.
- Focus on keeping your back straight and your chest up.
- Keep your foot off the ground throughout the movement.
- Perform the exercise in front of a mirror to check your form.
Conclusion
The single leg Romanian deadlift with one dumbbell is a great exercise for building lower body strength, improving balance, and enhancing athletic performance. By following the tips above and performing the exercise regularly, you can reap the benefits of this effective movement.