
If you're looking for an exercise that will help you build strong glutes, the dumbbell hip thrust floor is a great option. This exercise is easy to do and can be done at home or in the gym. In this article, we will discuss the benefits of the dumbbell hip thrust floor, how to do it correctly, and some variations that you can try.
What are the Benefits of the Dumbbell Hip Thrust Floor?
The dumbbell hip thrust floor is a great exercise that targets the glutes, hamstrings, and lower back. It is a great exercise for building strength and muscle in these areas, which can improve your overall fitness and performance. Here are some of the benefits of the dumbbell hip thrust floor:
- It helps to build strong glutes, which can improve your posture, reduce lower back pain, and enhance your athletic performance.
- It works your hamstrings and lower back, which can improve your overall lower body strength.
- It is a low-impact exercise that is easy on your joints.
- It can be done at home or in the gym with minimal equipment.

How to Do the Dumbbell Hip Thrust Floor?
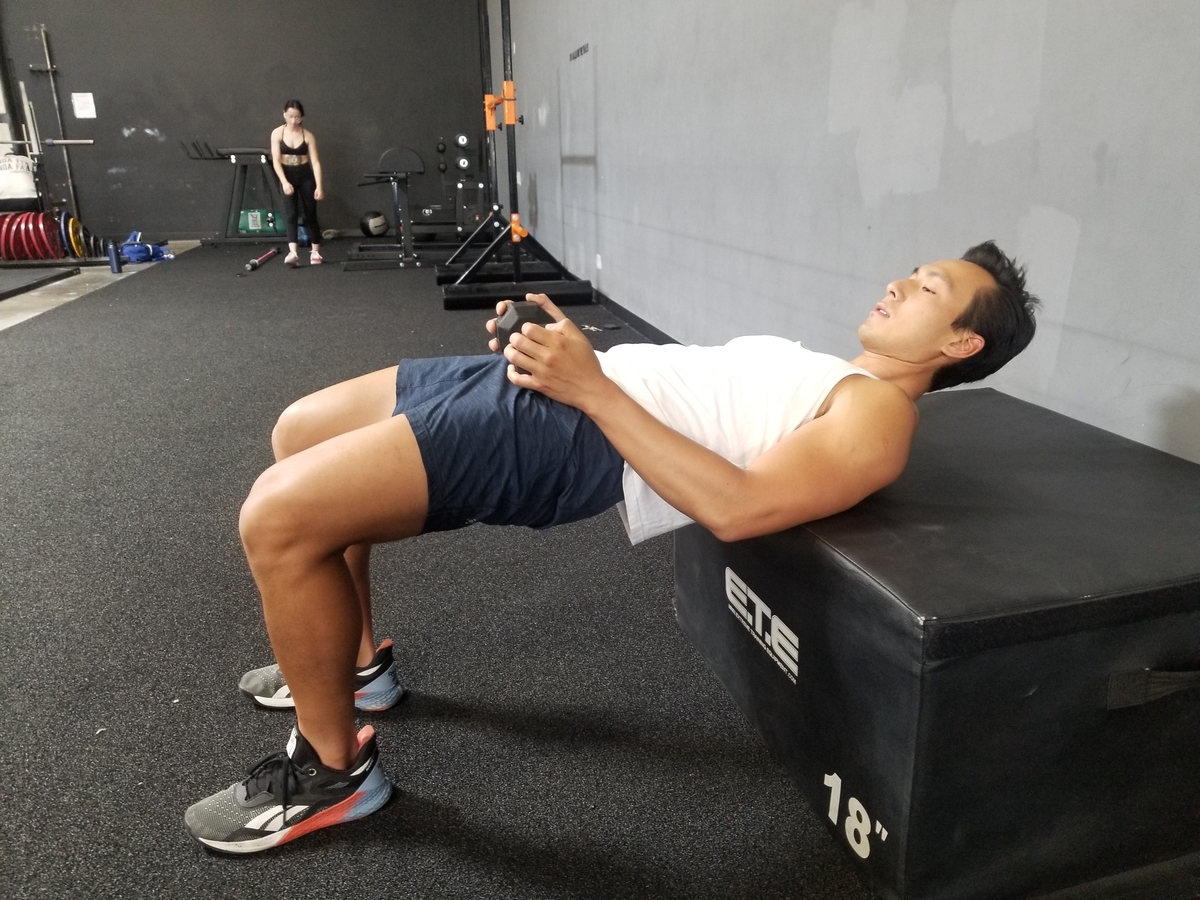
Before you start doing the dumbbell hip thrust floor, it is important to warm up your glutes, hamstrings, and lower back. You can do some simple stretches or use a foam roller to warm up these muscles. Here are the steps to do the dumbbell hip thrust floor:
- Start by sitting on the floor with your knees bent and your feet flat on the ground.
- Place a dumbbell on your lap and hold it in place with your hands.
- Slowly lean back and rest your upper back on a bench or step.
- Place your feet hip-width apart and keep your knees bent.
- Engage your glutes and drive your hips up towards the ceiling.
- Pause for a few seconds at the top and then slowly lower your hips back down to the starting position.
- Repeat for the desired number of reps.

Some Variations of the Dumbbell Hip Thrust Floor
If you want to make the dumbbell hip thrust floor more challenging, you can try some variations. Here are some variations that you can try:
- Single-Leg Dumbbell Hip Thrust Floor: This variation targets each leg individually and can help to improve your balance and stability.
- Weighted Dumbbell Hip Thrust Floor: By adding more weight, you can increase the resistance and work your muscles harder.
- Elevated Dumbbell Hip Thrust Floor: By elevating your feet on a bench or step, you can increase the range of motion and work your muscles harder.

Tips for Doing the Dumbbell Hip Thrust Floor Correctly
Here are some tips to help you do the dumbbell hip thrust floor correctly:
- Engage your glutes and core throughout the exercise.
- Keep your knees bent and your feet flat on the ground.
- Use a weight that is challenging but still allows you to maintain proper form.
- Do not arch your lower back or hyperextend your hips at the top of the movement.
- Breathe in as you lower your hips and breathe out as you drive your hips up.
Conclusion
The dumbbell hip thrust floor is a great exercise that can help you build strong glutes, hamstrings, and lower back. By following the proper form and using the right weight, you can get the most out of this exercise. Whether you're a beginner or an advanced lifter, the dumbbell hip thrust floor is a great addition to your workout routine.
Related video of Dumbbell Hip Thrust Floor: The Ultimate Guide

When it comes to building strong and defined biceps, many people focus on traditional bicep curls. However, there is another exercise that can also target and strengthen the biceps – the reverse curl. In this article, we will explore the question of whether reverse curls work the biceps and how to perform them effectively.
What are Reverse Curls?
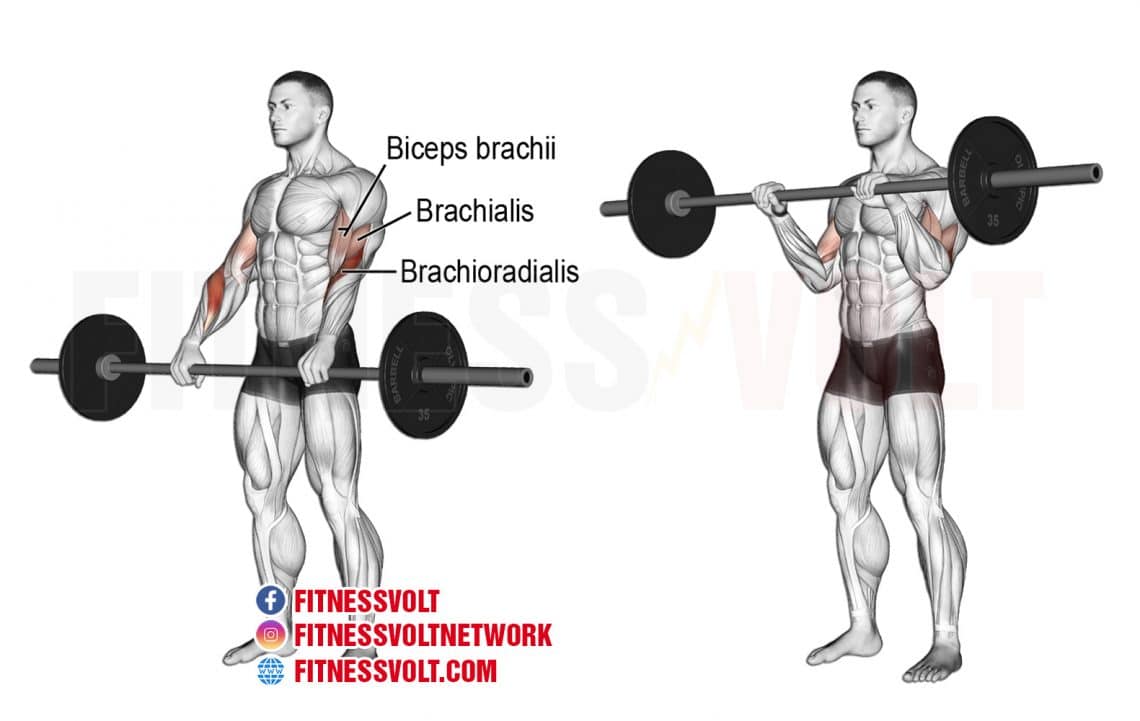
Reverse curls are a strength-training exercise that targets the biceps, forearms, and wrists. Unlike traditional bicep curls, reverse curls involve holding the weight with an overhand grip, palms facing down. This grip targets the brachialis muscle, which is located underneath the biceps and helps to push them up and out.
Do Reverse Curls Work the Biceps?
Yes, reverse curls do work the biceps. In fact, they can be just as effective as traditional bicep curls for building bicep strength and size. The brachialis muscle, which is targeted by the overhand grip used in reverse curls, plays a crucial role in bicep development. By strengthening the brachialis, you can create a more defined and aesthetically pleasing bicep shape.
How to Perform Reverse Curls

To perform reverse curls, follow these steps:
- Stand with your feet shoulder-width apart and hold a barbell with an overhand grip, palms facing down.
- Keeping your elbows close to your sides, slowly lift the barbell towards your shoulders, exhaling as you lift.
- Pause for a second at the top of the movement, then slowly lower the barbell back down to the starting position, inhaling as you lower.
- Repeat for the desired number of reps.
Tips for Effective Reverse Curls

To get the most out of your reverse curls, keep these tips in mind:
- Use a weight that is challenging but still allows you to maintain proper form.
- Keep your elbows close to your sides throughout the movement to target the brachialis muscle.
- Avoid using momentum to lift the weight – focus on using your biceps and forearms to control the movement.
- Incorporate reverse curls into your overall bicep workout routine for maximum results.
Conclusion
In conclusion, reverse curls are a highly effective exercise for targeting and strengthening the biceps. By using an overhand grip, they target the brachialis muscle and can create a more defined and aesthetically pleasing bicep shape. When performed with proper form and incorporated into a comprehensive bicep workout routine, reverse curls can help you achieve your bicep goals.
Related video of Do Reverse Curls Work Biceps?

Are you looking for a new way to work your abs? Then, you should definitely try the Russian Twist with a ball. This exercise is not only effective but also fun to do. It engages your entire core while also targeting your obliques, which are the muscles on the sides of your abdomen. In this article, we will take a closer look at how to perform the Russian Twist with a ball and what benefits it offers.
What is the Russian Twist with Ball?
The Russian Twist with a ball is a variation of the classic Russian Twist, which is a popular exercise that targets your obliques. The difference is that instead of using just your body weight, you use a ball to make the exercise more challenging. The ball adds an extra element of instability, which requires you to engage your core muscles even more.
How to Perform the Russian Twist with Ball?

Here are the steps to perform the Russian Twist with a ball:
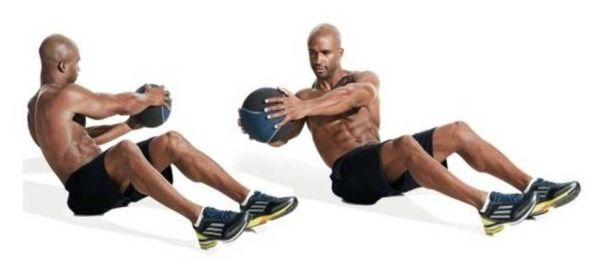
- Start by sitting on the floor with your knees bent, feet flat on the ground, and your back straight.
- Hold the ball with both hands and extend your arms in front of you.
- Slowly lean back, keeping your back straight and your abs engaged, until you feel a slight tension in your core.
- Twist your torso to the right side, bringing the ball towards your right hip.
- Pause for a second and then twist your torso to the left side, bringing the ball towards your left hip.
- Repeat this movement for the desired number of repetitions.
You can make the exercise more challenging by lifting your feet off the ground or holding the ball further away from your body.
Benefits of the Russian Twist with Ball

Here are some of the benefits of the Russian Twist with a ball:
- Targets your obliques: The Russian Twist with a ball is an excellent exercise for targeting your obliques, which are often neglected in traditional ab exercises.
- Engages your entire core: The exercise engages your entire core, including your abs, lower back, and hip muscles.
- Improves stability: The instability of the ball requires you to engage your core muscles even more, which can help improve your stability and balance.
- Can be done anywhere: The exercise can be done anywhere, as long as you have a ball.
- Fun and challenging: The Russian Twist with a ball is a fun and challenging exercise that can help you break out of your workout rut.
Tips for Performing the Russian Twist with Ball Safely

Here are some tips for performing the Russian Twist with a ball safely:
- Start with a light ball: If you are new to the exercise, start with a light ball and gradually increase the weight as you get stronger.
- Keep your back straight: Make sure to keep your back straight throughout the exercise to avoid straining your lower back.
- Breathe: Remember to breathe throughout the exercise. Inhale as you twist to one side and exhale as you twist to the other side.
- Engage your abs: Keep your abs engaged throughout the exercise to protect your lower back.
- Don't overdo it: Start with a few repetitions and gradually increase the number as you get stronger. Don't overdo it, as this can lead to injury.
Conclusion
The Russian Twist with a ball is an effective and fun exercise that can help you target your obliques and engage your entire core. By following the tips above, you can perform the exercise safely and get the most out of it. So, next time you want to work your abs in a new way, give the Russian Twist with a ball a try!
Related video of Russian Twist With Ball: A Complete Guide
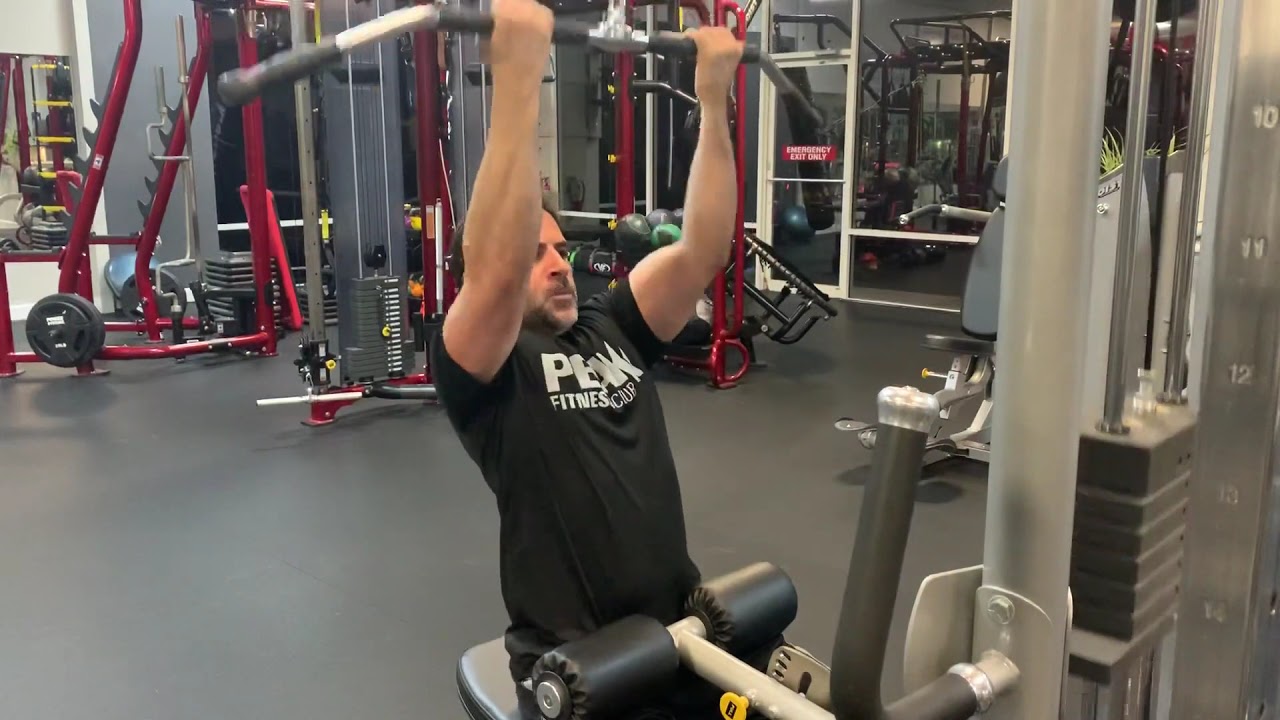
When it comes to building a strong and toned back, there are many exercises that you can do. One of the most effective exercises for targeting your back muscles is the reverse grip cable pulldown. This exercise is great for building strength and muscle in your upper back, and it can also help improve your posture and reduce your risk of injury.

What is the Reverse Grip Cable Pulldown?
The reverse grip cable pulldown is an exercise that targets the muscles in your upper back, including your lats, traps, and rhomboids. To perform this exercise, you'll need a cable machine with a straight bar attachment.
How to Do the Reverse Grip Cable Pulldown
To perform the reverse grip cable pulldown, follow these steps:
- Attach a straight bar to the cable machine at the highest setting.
- Stand facing the machine with your feet shoulder-width apart.
- Grab the bar with an underhand grip (palms facing up) and your hands shoulder-width apart.
- Lean back slightly and pull the bar down towards your chest, keeping your elbows close to your body.
- Squeeze your shoulder blades together at the bottom of the movement, then slowly release the bar back up to the starting position.
- Repeat for 3-4 sets of 8-10 reps.

The Benefits of the Reverse Grip Cable Pulldown
The reverse grip cable pulldown offers several benefits for your back and overall fitness:
- Targets your upper back muscles: The reverse grip targets your lats, traps, and rhomboids, which are key muscles for a strong and toned back.
- Improves posture: Strengthening your upper back muscles can help improve your posture and reduce your risk of injury.
- Variation: The reverse grip cable pulldown offers a variation to the traditional overhand grip pulldown, which can help target different muscles in your back.
- Easy to do: The reverse grip cable pulldown is a simple exercise that can be done with a cable machine and straight bar attachment.

Tips for Performing the Reverse Grip Cable Pulldown
Here are some tips to help you perform the reverse grip cable pulldown with proper form:
- Use a weight that allows you to perform the exercise with proper form and control.
- Keep your elbows close to your body throughout the movement.
- Squeeze your shoulder blades together at the bottom of the movement to fully engage your upper back muscles.
- Avoid using momentum to pull the bar down.
- Breathe in as you pull the bar down and exhale as you release it back up.
Conclusion
The reverse grip cable pulldown is a great exercise for targeting your upper back muscles and improving your posture. By following proper form and incorporating this exercise into your workout routine, you can build a strong and toned back that not only looks great but also helps support your overall health and fitness.
Related video of Reverse Grip Cable Pulldown: A Great Exercise for Your Back
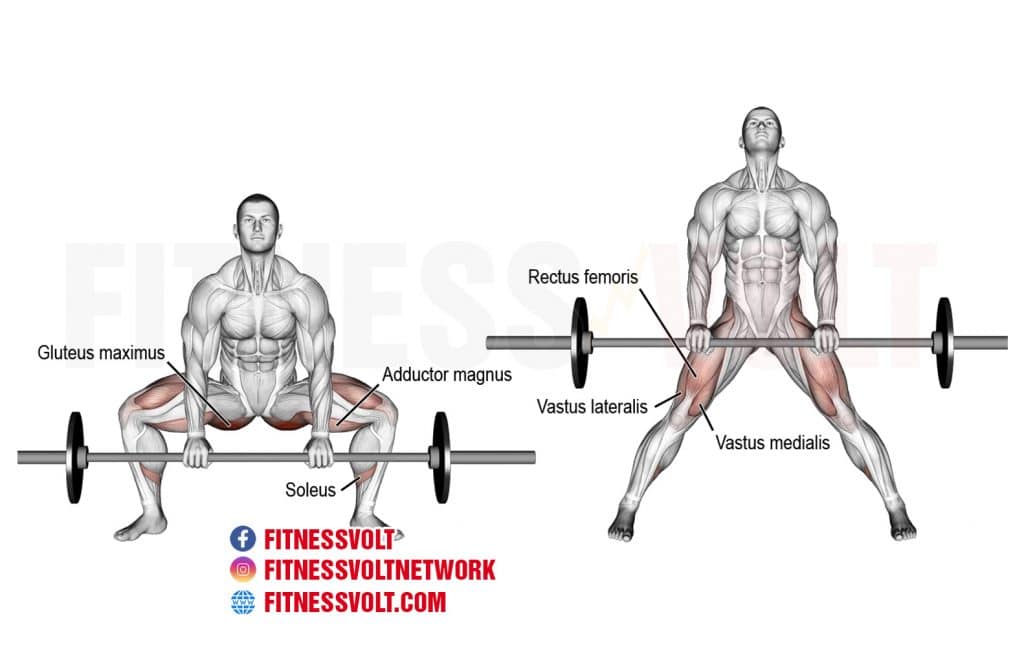
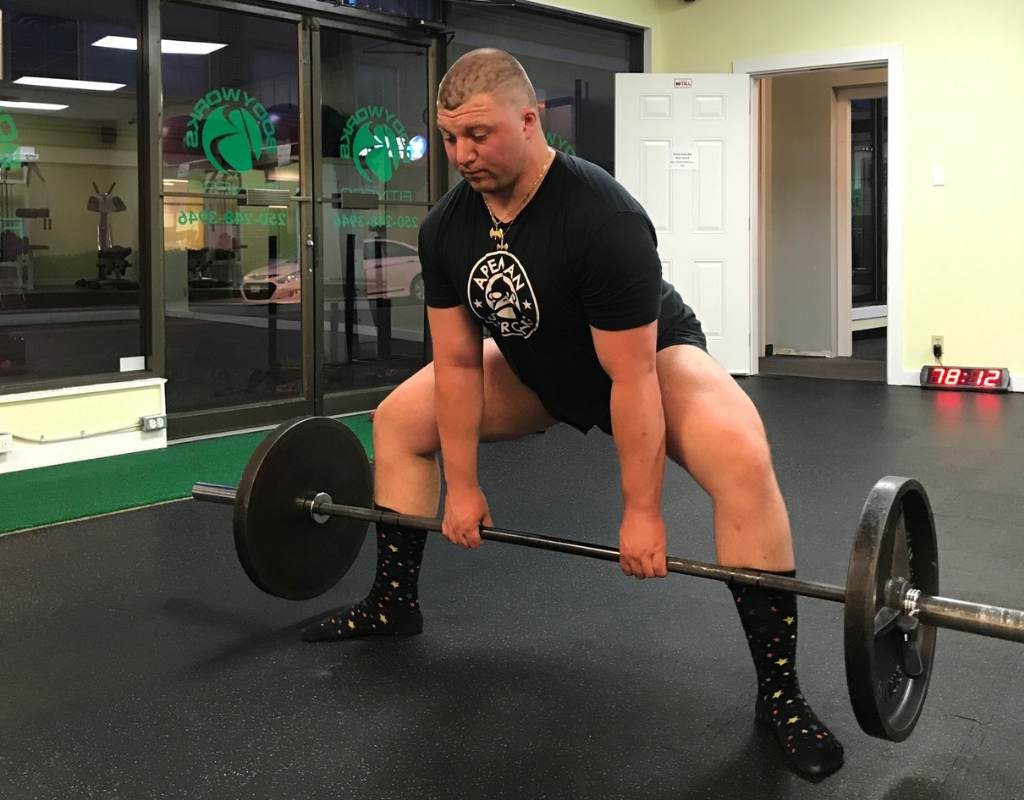
Sumo deadlift is a popular exercise that targets several muscles in the body. This exercise is similar to the conventional deadlift, but the stance is wider, and the grip is inside the knees. Sumo deadlifts are commonly used by powerlifters and athletes to increase their strength and power. In this article, we will discuss the muscles targeted by the sumo deadlift.
Glutes

The glutes or the buttocks are the primary muscles targeted by the sumo deadlift. The wider stance and grip allow the lifter to lift more weight and put more stress on the glutes. The glutes are responsible for hip extension, which is the primary movement in the deadlift. Therefore, sumo deadlifts are an excellent exercise for developing stronger and bigger glutes.
Hamstrings

The hamstrings are a group of muscles located on the back of the thigh. These muscles are also targeted by the sumo deadlift. The wider stance and grip allow the lifter to use more of the hamstrings during the lift. Strong hamstrings are essential for athletic performance and preventing injuries.
Quadriceps
The quadriceps or the front thigh muscles are also targeted by the sumo deadlift. These muscles are used during the initial part of the lift when the lifter is pushing off the ground. The sumo deadlift is an excellent exercise for developing stronger and bigger quadriceps.
Lower Back

The lower back or the erector spinae muscles are heavily involved in the sumo deadlift. These muscles are responsible for keeping the spine in a neutral position and preventing injury during the lift. The sumo deadlift is an excellent exercise for developing a stronger and more resilient lower back.
Abdominals

The abdominals or the core muscles are also targeted by the sumo deadlift. These muscles are responsible for keeping the spine stable during the lift. The sumo deadlift is an excellent exercise for developing stronger and more defined abs.
Forearms

The forearms are also heavily involved in the sumo deadlift. The wider grip requires the lifter to use more of their forearm muscles to hold onto the bar. The sumo deadlift is an excellent exercise for developing stronger and more defined forearms.
Conclusion
The sumo deadlift is an excellent exercise for targeting several muscles in the body. This exercise is especially useful for developing stronger and bigger glutes, hamstrings, quadriceps, lower back, abdominals, and forearms. If you are looking to build a stronger and more muscular body, then the sumo deadlift is an exercise that you should include in your workout routine.
Related video of Sumo Deadlift Muscles Targeted

If you're looking to build bigger and stronger biceps, the one arm bicep curl is a great exercise to add to your routine. This isolation exercise targets the biceps and helps to create definition and shape in the upper arms.
How to Do a One Arm Bicep Curl

To perform a one arm bicep curl, follow these steps:
- Stand with your feet shoulder-width apart and hold a dumbbell in one hand.
- Keep your arm straight and your palm facing forward.
- Slowly curl the weight up towards your shoulder by bending your elbow.
- Pause for a moment at the top of the movement, then slowly lower the weight back down to the starting position.
- Repeat for the desired number of reps, then switch sides and perform the exercise with the other arm.
Tips for Performing a One Arm Bicep Curl

Here are some tips to help you get the most out of your one arm bicep curl:
- Keep your elbow close to your body throughout the movement to maximize bicep activation.
- Focus on squeezing your bicep at the top of the movement to create a strong contraction.
- Avoid swinging your arm or using momentum to lift the weight. This will take the focus off your biceps and reduce the effectiveness of the exercise.
- Vary the weight and rep range to keep your muscles challenged and prevent plateaus.
Variations of the One Arm Bicep Curl

There are several variations of the one arm bicep curl that you can try to target different areas of the biceps or add variety to your workout:
- Concentration curl: Sit on a bench with your elbow resting on your inner thigh. Curl the weight up towards your shoulder, keeping your elbow stationary.
- Hammer curl: Hold the weight with your palm facing inward instead of forward. This targets the brachialis muscle, which sits underneath the biceps.
- Reverse curl: Hold the weight with your palm facing downward. This targets the brachioradialis muscle, which runs along the forearm.
Benefits of the One Arm Bicep Curl

The one arm bicep curl offers several benefits for those looking to build bigger and stronger biceps:
- Isolation: This exercise targets the biceps specifically, allowing you to create more definition and shape in this area.
- Strength: The one arm bicep curl helps to build strength in the biceps, which can translate to improved performance in other exercises.
- Variety: Adding the one arm bicep curl to your routine can add variety and prevent boredom in your workouts.
- Balance: Working the biceps on each side of the body independently can help to improve muscle imbalances and prevent injury.
Conclusion
If you're looking to build bigger and stronger biceps, the one arm bicep curl is a must-try exercise. By following proper form and incorporating variations into your routine, you can maximize the benefits of this isolation exercise and see results in no time.
Related video of One Arm Bicep Curl: The Ultimate Guide

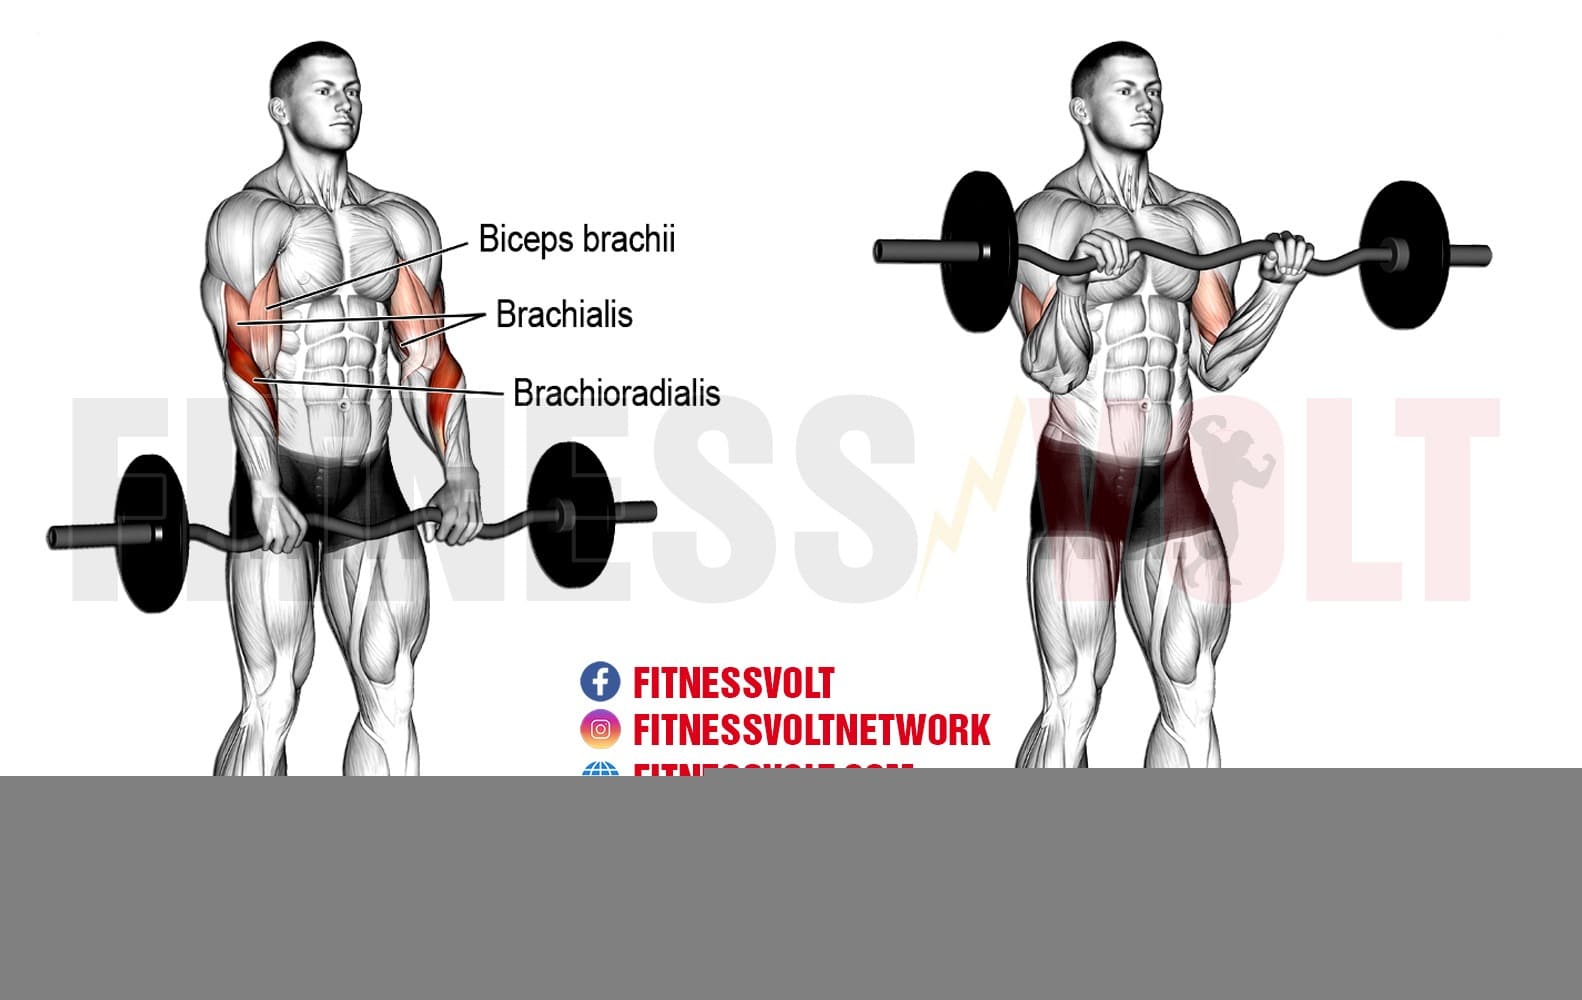
Reverse grip curls, also known as reverse barbell curls, is a popular exercise that targets the biceps brachii muscle. This exercise is performed by holding the barbell with a reverse grip, which means your palms are facing down instead of up. Reverse grip curls are often used as an alternative to traditional bicep curls because they work the muscle in a different way. In this article, we will discuss what do reverse grip curls work and how to perform this exercise correctly.
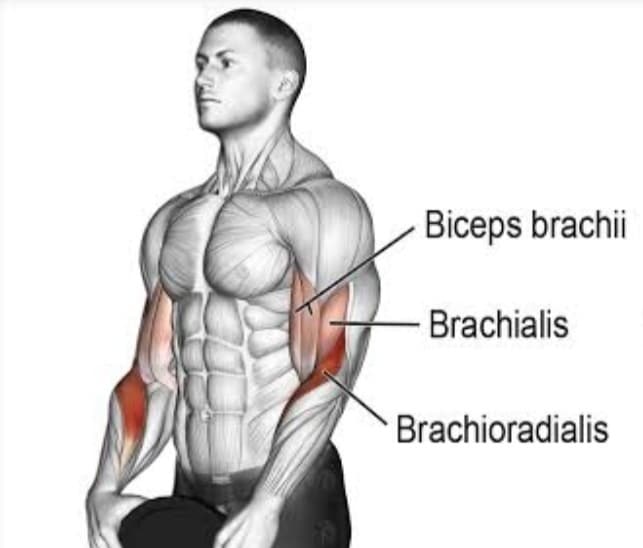
The Muscles Worked

Reverse grip curls mainly target the biceps brachii muscle, which is the muscle located on the front of your upper arm. This muscle is responsible for flexing your elbow and rotating your forearm. In addition to the biceps, reverse grip curls also work the brachialis and brachioradialis muscles. The brachialis muscle is located underneath the biceps and helps in elbow flexion, while the brachioradialis muscle is located on the outer side of the forearm and helps in forearm rotation and elbow flexion.
How to Perform Reverse Grip Curls
To perform reverse grip curls, follow these steps:
- Stand straight with your feet shoulder-width apart and hold the barbell with a reverse grip, i.e., palms facing down.
- Keep your elbows close to your sides and lift the barbell towards your shoulders by flexing your biceps.
- Pause for a second and then slowly lower the barbell back to the starting position.
- Repeat for the desired number of repetitions.
It is important to keep your back straight and avoid swinging the weight or using momentum to lift the barbell. You can also perform this exercise with dumbbells or an EZ bar.
Variations
There are several variations of reverse grip curls that you can try to target different parts of your biceps and forearms. Some of these variations include:
- Seated reverse grip curls
- Reverse grip hammer curls
- Reverse grip cable curls
- Reverse grip preacher curls
Each of these variations has its own unique benefits and can help you achieve your fitness goals.
Benefits of Reverse Grip Curls
Reverse grip curls offer several benefits, including:
- Targeting the biceps and forearms from a different angle
- Strengthening the grip and wrist
- Improving overall arm strength and size
- Reducing the risk of injury by strengthening the supporting muscles and tendons
Reverse grip curls are a great exercise for anyone looking to build bigger, stronger biceps and forearms. They can be incorporated into your workout routine along with other compound exercises like chin-ups and rows.
Conclusion
Reverse grip curls are a popular exercise that targets the biceps and forearms from a different angle. This exercise mainly works the biceps brachii muscle but also targets the brachialis and brachioradialis muscles. Reverse grip curls can be performed with a barbell, dumbbells, or an EZ bar. There are several variations of reverse grip curls that you can try to target different parts of your biceps and forearms. This exercise offers several benefits, including improving overall arm strength and reducing the risk of injury by strengthening the supporting muscles and tendons. Incorporate reverse grip curls into your workout routine for bigger, stronger arms.
Related video of What Do Reverse Grip Curls Work

The bend and reach is a simple exercise that can help improve flexibility and strength in various muscle groups. It involves bending forward and reaching towards the toes, and is often used as a warm-up or cool-down exercise in fitness classes, sports, and other physical activities.
How to Do the Bend and Reach Exercise

To perform the bend and reach, follow these steps:
- Stand up straight with your feet shoulder-width apart and your arms at your sides.
- Inhale deeply and raise your arms overhead, keeping them straight and parallel to each other.
- Exhale slowly and bend forward from the hips, keeping your back straight and your arms extended towards the floor.
- Try to touch your toes or reach as far as you can without straining your back or hamstrings.
- Hold the stretch for a few seconds, then inhale and slowly return to the starting position.
You can repeat the exercise several times, gradually increasing the depth and duration of the stretch. You can also modify the exercise by bending one leg slightly or placing your hands on your shins or knees instead of the floor.
Benefits of the Bend and Reach Exercise

The bend and reach exercise offers several benefits for your body, including:
- Improving flexibility and range of motion in your spine, hips, hamstrings, and calves.
- Strengthening your core muscles, including your abs, back, and glutes.
- Reducing the risk of lower back pain and injury by promoting proper posture and alignment.
- Increasing blood flow and oxygenation to your muscles, which can help boost energy and reduce stress.
- Providing a low-impact, easy-to-learn exercise that can be done anywhere, anytime, without any equipment or special clothing.
Whether you're a beginner or an experienced athlete, the bend and reach exercise can help you improve your overall fitness and well-being. It's a versatile and effective way to stretch and strengthen your body, and can be customized to your individual needs and goals.
Tips for Doing the Bend and Reach Exercise Safely

To get the most out of the bend and reach exercise and avoid injury, keep these tips in mind:
- Start slowly and gradually increase the depth and duration of the stretch over time.
- Avoid bouncing or jerking movements, which can strain your muscles and joints.
- Listen to your body and stop if you feel any pain or discomfort.
- If you have any medical conditions or injuries, consult your doctor or physical therapist before doing the exercise.
- Wear comfortable clothing and shoes that allow you to move freely.
Conclusion
The bend and reach exercise is a simple, effective, and safe way to improve your flexibility and strength. By incorporating this exercise into your daily routine, you can enhance your overall fitness and well-being, and reduce the risk of injury and pain. So why not give it a try today and see how it can benefit your body and mind?
Related video of The Bend And Reach: A Simple Exercise for Flexibility and Strength
Are you looking for a way to tone and strengthen your triceps? Look no further than the Ez Bar Overhead Triceps Extension. This exercise is a great addition to any arm workout routine and can be done by individuals of all fitness levels.
What is the Ez Bar Overhead Triceps Extension?

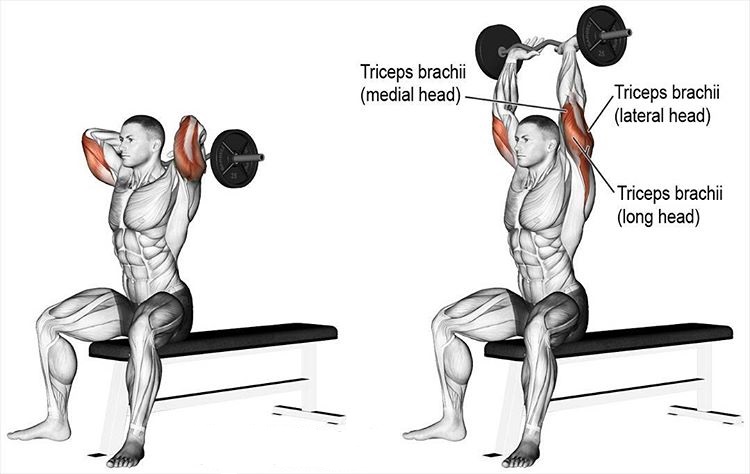
The Ez Bar Overhead Triceps Extension is a weightlifting exercise that targets the triceps muscle. It involves using an Ez Bar and performing a controlled movement in which the bar is lifted above the head and then lowered behind the neck.
How to Perform the Ez Bar Overhead Triceps Extension

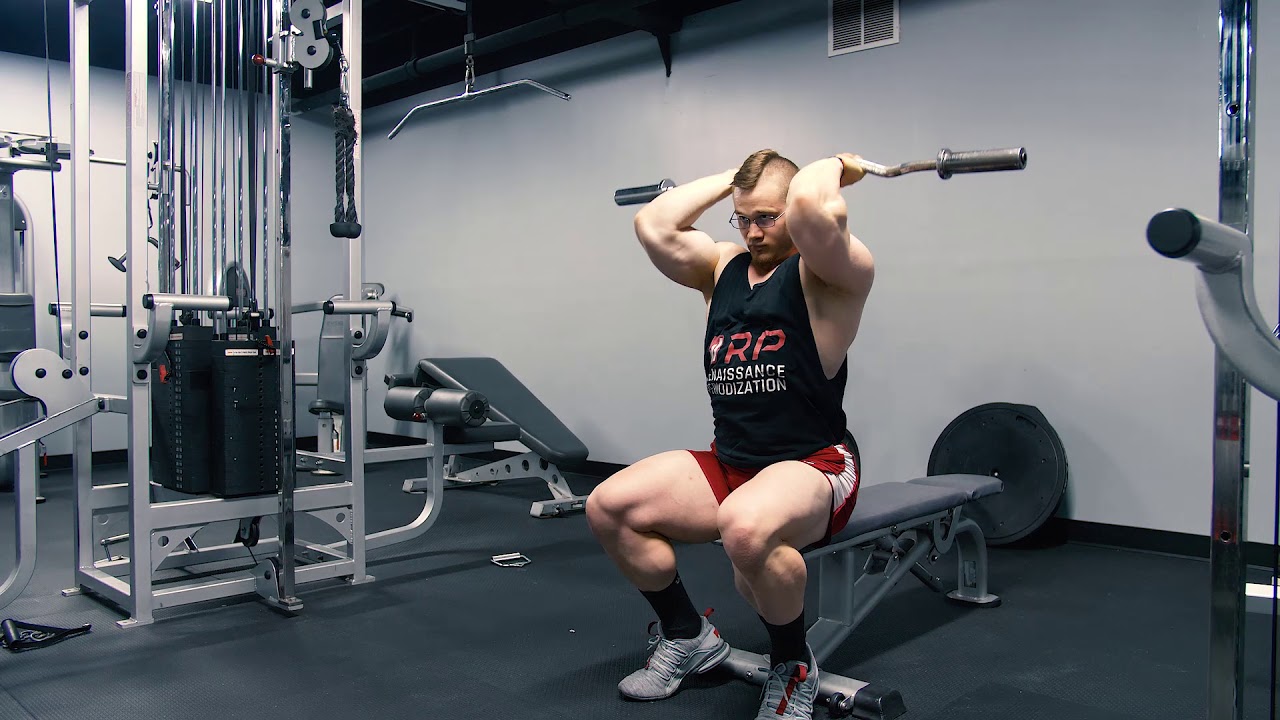
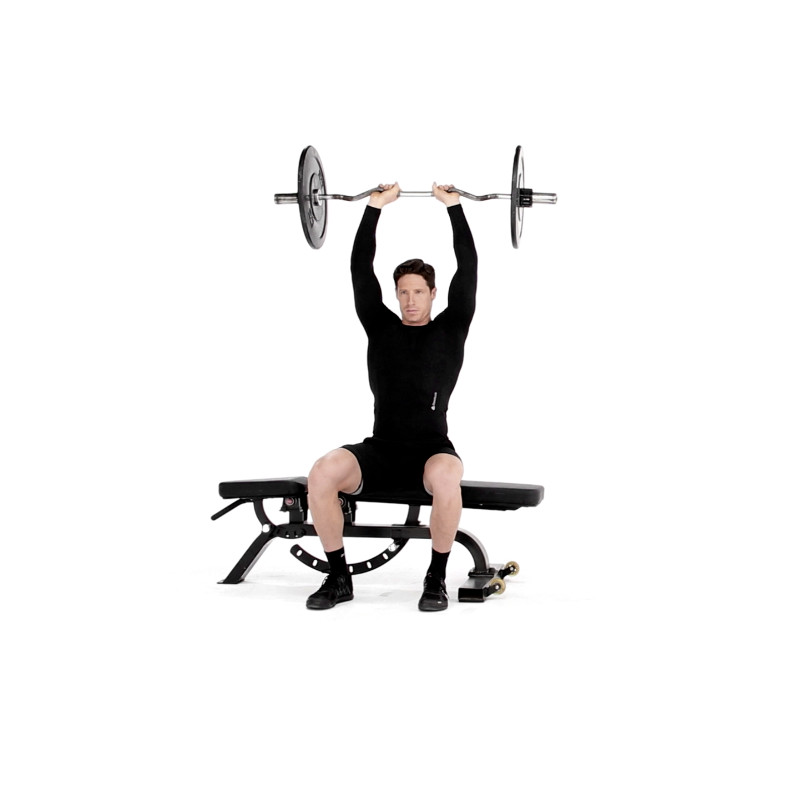
To perform the Ez Bar Overhead Triceps Extension:
- Begin by standing with your feet shoulder-width apart and holding the Ez Bar with both hands.
- Lift the bar above your head, keeping your arms straight and elbows close to your head.
- Bend your elbows and lower the bar behind your head until your forearms are parallel to the floor.
- Extend your arms and lift the bar back to the starting position.
- Repeat for desired number of reps.
Tips for Proper Form
When performing the Ez Bar Overhead Triceps Extension, it's important to maintain proper form to avoid injury and get the most out of the exercise. Here are some tips for proper form:
- Keep your elbows close to your head throughout the movement.
- Engage your core muscles to maintain stability.
- Lower the bar slowly and with control to avoid hitting the back of your neck.
- Use a weight that allows you to perform the exercise with proper form.
Variations of the Ez Bar Overhead Triceps Extension

There are several variations of the Ez Bar Overhead Triceps Extension that can be done to add variety to your workout routine:
- Standing One-Arm Overhead Triceps Extension: Perform the exercise with one arm at a time.
- Seated Overhead Triceps Extension: Perform the exercise while seated on a bench or stability ball.
- Close-Grip Overhead Triceps Extension: Hold the bar with your hands closer together for a more intense workout.
Incorporating the Ez Bar Overhead Triceps Extension into Your Workout Routine
The Ez Bar Overhead Triceps Extension can be incorporated into any arm workout routine. Here is an example of how to use the exercise in a workout:
- Warm up with five minutes of light cardio.
- Perform three sets of 12-15 reps of the Ez Bar Overhead Triceps Extension.
- Alternate with bicep curls or other arm exercises for a complete arm workout.
- Cool down with five minutes of stretching.
Benefits of the Ez Bar Overhead Triceps Extension

The Ez Bar Overhead Triceps Extension offers a variety of benefits, including:
- Targeting the triceps muscle for a toned and defined look.
- Improving overall arm strength and stability.
- Adding variety to your workout routine.
- Can be done by individuals of all fitness levels.
Conclusion
The Ez Bar Overhead Triceps Extension is a great exercise for strengthening and toning the triceps muscle. With proper form and consistency, this exercise can help you achieve your fitness goals and add variety to your arm workout routine.
Related video of Ez Bar Overhead Triceps Extension: The Ultimate Guide
When it comes to working out, there are endless ways to target specific areas of your body. One exercise that is particularly effective for toning your core and oblique muscles is the oblique crunch.

What are oblique muscles?
Your oblique muscles are located on either side of your abdomen and are responsible for rotating your torso and supporting your spine. They are crucial for maintaining good posture and overall core strength.
How do you perform oblique crunches?
To perform oblique crunches, start by lying on your back with your knees bent and your feet flat on the ground. Place your hands behind your head and lift your shoulders off the ground, engaging your core muscles. Then, twist your torso to the left and bring your right elbow towards your left knee. Return to the starting position and repeat on the other side. This is one rep.
It's important to keep your movements slow and controlled, focusing on engaging your oblique muscles throughout the exercise. You can also increase the difficulty by holding a weight or resistance band.
What are the benefits of oblique crunches?
Oblique crunches are a great way to target and strengthen your oblique muscles, which can improve your overall core strength and stability. They can also help to reduce the appearance of love handles and create a more defined waistline.
In addition, oblique crunches can improve your posture and reduce your risk of back pain by strengthening the muscles that support your spine.
Are there any precautions to take when performing oblique crunches?
As with any exercise, it's important to use proper form and technique to avoid injury. Make sure to keep your neck relaxed and avoid pulling on your head or neck with your hands.
If you have any pre-existing back or neck conditions, it's important to consult with a doctor or physical therapist before attempting oblique crunches.
How often should you do oblique crunches?
Like any exercise, consistency is key when it comes to seeing results. Aim to incorporate oblique crunches into your workout routine 2-3 times per week, with at least one day of rest in between.
Conclusion
Oblique crunches are a simple yet effective exercise for targeting and strengthening your oblique muscles. By incorporating them into your workout routine, you can improve your core strength, posture, and overall fitness.
Related video of What Is Oblique Crunches

Arnold presses are a popular exercise among bodybuilders and fitness enthusiasts. This exercise is named after Arnold Schwarzenegger, a former professional bodybuilder and actor who popularized it in his training routine. Arnold presses are a variation of the traditional shoulder press, and they target different areas of the shoulder muscles.
What Are Arnold Presses?
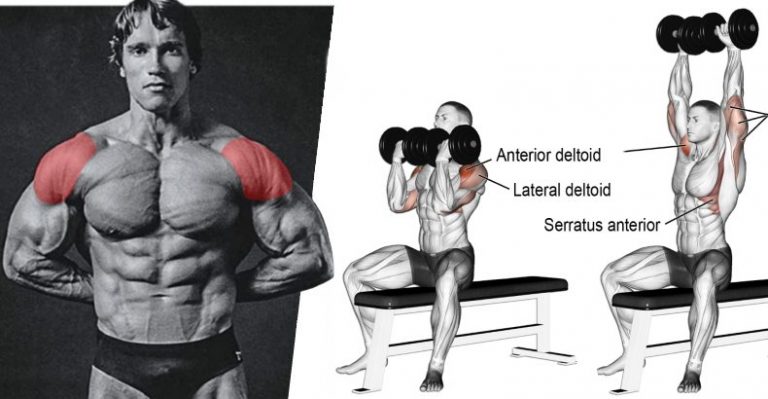
Arnold presses are performed with dumbbells and require the user to sit on a bench with a backrest. The dumbbells are held at shoulder height with palms facing the body. The user then raises the dumbbells above the head while rotating the palms to face forward. The elbows are kept close to the body throughout the movement, and the dumbbells are lowered back to the starting position.
Muscles Worked During Arnold Presses
Arnold presses target the deltoid muscles, which are located in the shoulders. The deltoid muscle is divided into three parts:
- Anterior deltoid - located on the front of the shoulder
- Medial deltoid - located in the middle of the shoulder
- Posterior deltoid - located on the back of the shoulder
Arnold presses work all three parts of the deltoid muscle, but they primarily target the medial deltoid. This muscle is responsible for lifting the arms away from the body, and it is essential for movements such as overhead pressing and lateral raises.

Benefits of Arnold Presses
Arnold presses offer several benefits for those looking to build muscle and improve their overall fitness:
- Increased shoulder strength and size
- Improved range of motion in the shoulders
- Targeted activation of the deltoid muscles
- Improved posture and shoulder health
Arnold presses are also a great exercise for those looking to switch up their shoulder routine and add variety to their workouts.
How to Incorporate Arnold Presses into Your Workout
Arnold presses can be incorporated into your shoulder routine in several ways:
- As a primary shoulder exercise - perform 3-4 sets of 8-12 reps as the main shoulder exercise in your workout
- As a secondary shoulder exercise - perform 2-3 sets of 10-15 reps after your primary shoulder exercise
- As a finisher - perform 1-2 sets of 15-20 reps at the end of your shoulder workout to fatigue the muscles
It's important to start with a weight that you can handle with proper form and gradually increase the weight as you become stronger and more comfortable with the movement.
Conclusion
Arnold presses are a popular exercise that target the deltoid muscles in the shoulders. This exercise offers several benefits for those looking to build muscle and improve their overall fitness. Incorporate Arnold presses into your shoulder routine in a way that works best for you, and gradually increase the weight as you become stronger and more comfortable with the movement.