Side Squats Muscles Worked
Side squats are a variation of the traditional squat exercise that targets different muscles in your lower body. This exercise involves moving your legs laterally, which helps to engage your glutes, quads, and inner thighs. In this article, we will discuss the muscles worked during side squats, how to perform the exercise, and some tips to help you get the most out of this movement.
Muscles Worked During Side Squats

Side squats are a great exercise for targeting your glutes, or your butt muscles. This is because the lateral movement of your legs helps to activate the gluteus medius and minimus muscles, which are often neglected during traditional squats. Additionally, side squats also work your quads, or the muscles on the front of your thighs. This is because you are still performing a squatting motion, which requires your quads to work to support your body weight.

Another muscle group that is worked during side squats is your inner thighs. This is because when you move your legs laterally, you are engaging your adductor muscles, which are located on the inside of your thighs. These muscles help to stabilize your legs and support your body during the exercise. Therefore, side squats are a great exercise for toning and strengthening your inner thighs.
How To Perform Side Squats

To perform side squats, stand with your feet shoulder-width apart and your toes pointing forward. Take a wide step to the side with your right foot, keeping your left foot in place. Squat down as far as you can, bending your right knee and keeping your left leg straight. Keep your chest up and your core engaged throughout the movement. Push through your right foot to return to the starting position, then repeat on the other side.

It's important to maintain proper form during side squats to avoid injury and get the most out of the exercise. Keep your knees in line with your toes and avoid letting them collapse inward. Additionally, make sure to keep your hips level and avoid leaning to one side or the other. You can add dumbbells or a barbell to increase the resistance of the exercise.
Tips For Getting The Most Out Of Side Squats

Here are some tips to help you get the most out of your side squats:
- Start with bodyweight squats before adding resistance to perfect your form.
- Keep your core engaged throughout the exercise to maintain stability.
- Focus on pushing through your heels to engage your glutes.
- Breathe in as you lower your body and exhale as you push back up.
- Don't let your knees collapse inward or lean to one side.
Conclusion
Side squats are a great exercise for targeting your glutes, quads, and inner thighs. By moving your legs laterally, you engage different muscles than you would during traditional squats, making this exercise a great addition to your lower body workout routine. Remember to maintain proper form and start with bodyweight squats before adding resistance to avoid injury and get the most out of the exercise.
Related video of Side Squats Muscles Worked
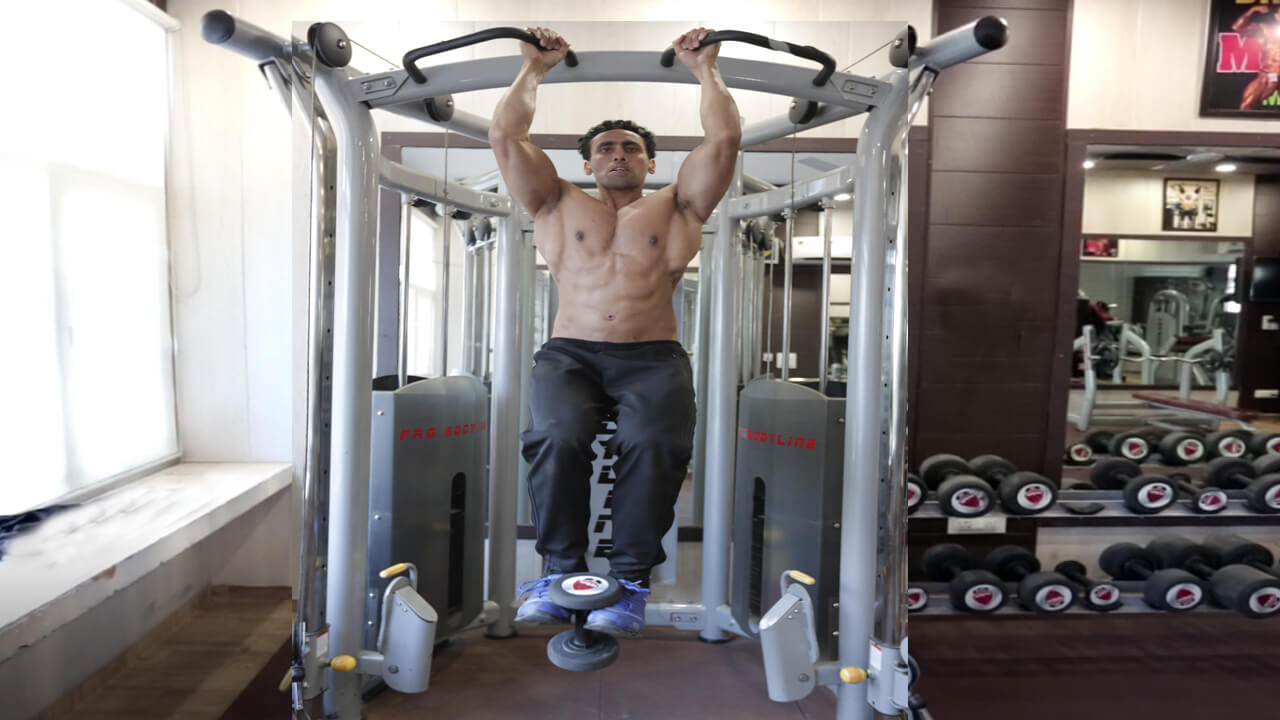
Hanging Weighted Leg Raises

Looking for a killer core workout that will leave your abs burning? Look no further than hanging weighted leg raises. This challenging exercise targets your lower abs, hip flexors, and obliques, helping you build a strong and defined midsection.
How to Do Hanging Weighted Leg Raises
To perform hanging weighted leg raises, you'll need a pull-up bar and a weight plate or dumbbell. Here's how to do it:
- Hang from the pull-up bar with your arms fully extended and your feet off the ground.
- Hold the weight plate or dumbbell between your feet, squeezing your legs together to keep it in place.
- Keeping your legs straight, raise them up until they are parallel to the floor.
- Lower your legs back down to the starting position, keeping them under control the entire time.
- Repeat for 8-12 reps.
Variations of Hanging Weighted Leg Raises

Once you've mastered the basic hanging weighted leg raise, there are several variations you can try to keep your core workouts challenging and interesting:
- Knee Raises: Instead of raising your legs straight out in front of you, bend your knees and bring them up toward your chest.
- Side Raises: Instead of raising your legs straight out in front of you, raise them out to the side to target your obliques.
- Weighted Knee Raises: Hold the weight plate or dumbbell between your knees instead of your feet.
Tips for Maximizing Your Hanging Weighted Leg Raises

Ready to take your hanging weighted leg raises to the next level? Keep these tips in mind:
- Engage your core: Throughout the exercise, focus on squeezing your abs and keeping your core tight.
- Control your movement: Don't swing or use momentum to lift your legs. Instead, focus on slow and controlled movements.
- Start with light weights: If you're new to hanging weighted leg raises, start with a light weight to ensure you can maintain proper form.
- Gradually increase weight: As you get stronger, gradually increase the weight you're using to keep the exercise challenging.
- Combine with other core exercises: Hanging weighted leg raises are just one exercise in a well-rounded core workout. Combine them with other moves like planks and crunches for a complete routine.
Incorporating Hanging Weighted Leg Raises into Your Workout

So, how often should you be doing hanging weighted leg raises? It depends on your fitness goals and overall workout routine. However, as a general guideline, aim to incorporate them into your workouts 1-2 times per week.
Here's an example of how you might incorporate hanging weighted leg raises into a full-body workout:
- Warm-up: 5-10 minutes of light cardio (e.g. jogging, jumping jacks, etc.)
- Strength training: 3 sets of hanging weighted leg raises (8-12 reps), followed by 3 sets of squats, bench presses, and rows.
- Cardio: 20-30 minutes of moderate-intensity cardio (e.g. cycling, running, etc.)
- Cool-down: 5-10 minutes of stretching
The Benefits of Hanging Weighted Leg Raises

Incorporating hanging weighted leg raises into your workout routine can offer a host of benefits, including:
- Improved core strength: Hanging weighted leg raises target your abs, hip flexors, and obliques, helping you build a strong and defined midsection.
- Better posture: By strengthening your core, you can improve your overall posture and reduce the risk of back pain or injury.
- Increased flexibility: As you perform hanging weighted leg raises, you'll be stretching your hip flexors and hamstrings, improving your overall flexibility.
- Burn calories: As with any challenging exercise, hanging weighted leg raises can help you burn calories and improve your overall fitness.
Conclusion
Hanging weighted leg raises are a challenging but effective exercise for anyone looking to build a strong and defined core. By incorporating them into your workout routine and following the tips outlined above, you can take your core workouts to the next level and achieve your fitness goals in no time.
Related video of Hanging Weighted Leg Raises: The Ultimate Core Workout
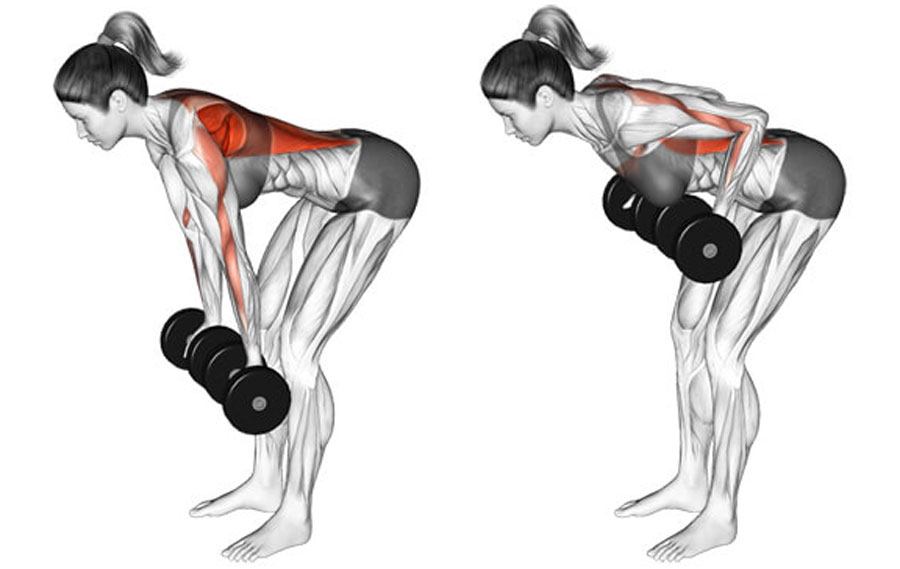
Rear Delt Dumbbell Rows

Introduction
Building strong shoulders is essential for both men and women who want to achieve a well-rounded physique. One of the most effective exercises for developing the rear deltoids is the rear delt dumbbell rows. This exercise targets the back of the shoulders, helping to improve posture and prevent injuries.
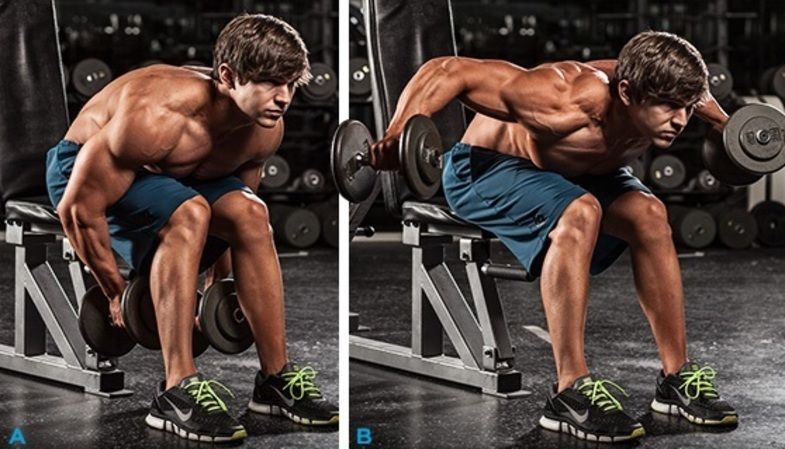
How to Perform Rear Delt Dumbbell Rows

To perform rear delt dumbbell rows:
- Stand with your feet shoulder-width apart, holding a dumbbell in each hand.
- Bend your knees slightly and hinge forward from your waist, keeping your back straight.
- Engage your shoulder blades and lift the dumbbells up to your chest, keeping your elbows close to your body.
- Lower the dumbbells back down to starting position.
- Repeat for 3 sets of 10-12 reps.
Benefits of Rear Delt Dumbbell Rows
In addition to building strong shoulders, rear delt dumbbell rows offer several other benefits:
- Improved posture: Strong rear deltoids help to pull your shoulders back, improving your posture and reducing the risk of back pain.
- Reduced risk of injury: Strengthening your shoulders can help to prevent injuries when performing daily activities, such as lifting heavy objects.
- Increased upper body strength: By targeting the back of the shoulders, rear delt dumbbell rows can help to improve overall upper body strength.
Variations of Rear Delt Dumbbell Rows

To add variety to your workout, try these variations of rear delt dumbbell rows:
- Single-arm dumbbell row: Perform the exercise with one arm at a time, alternating between sides.
- Bent-over dumbbell row: Perform the exercise while bent over at a 45-degree angle, using a heavier weight than you would for the standing version.
- Cable rear delt row: Use a cable machine instead of dumbbells to add resistance to the exercise.
Tips for Performing Rear Delt Dumbbell Rows

Follow these tips to maximize the effectiveness of rear delt dumbbell rows:
- Focus on engaging your shoulder blades throughout the exercise.
- Keep your elbows close to your body to target the rear deltoids.
- Breathe out as you lift the dumbbells and breathe in as you lower them.
- Start with a light weight and gradually increase as you build strength.
- Perform the exercise in front of a mirror to ensure proper form.
Conclusion
Rear delt dumbbell rows are an effective exercise for building strong shoulders and improving overall upper body strength. By incorporating variations and following proper form tips, you can maximize the benefits of this exercise and achieve a well-rounded physique.
Related video of Rear Delt Dumbbell Rows: How to Build Strong Shoulders
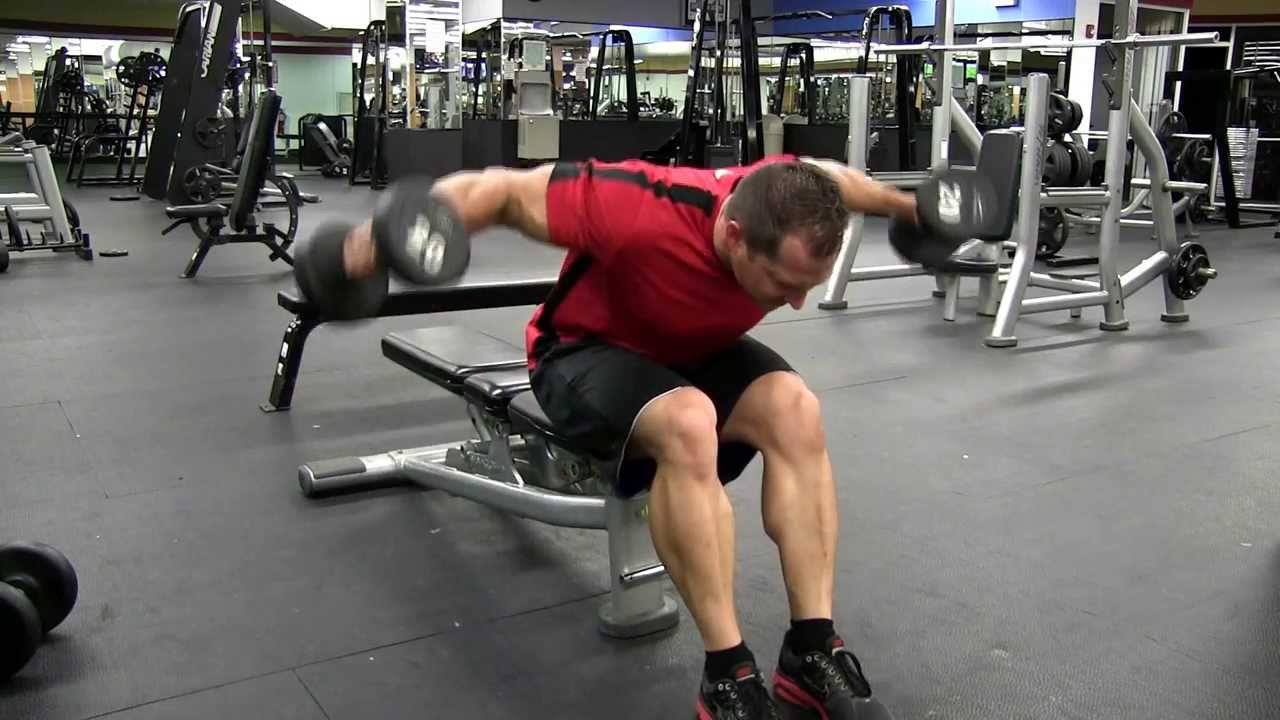
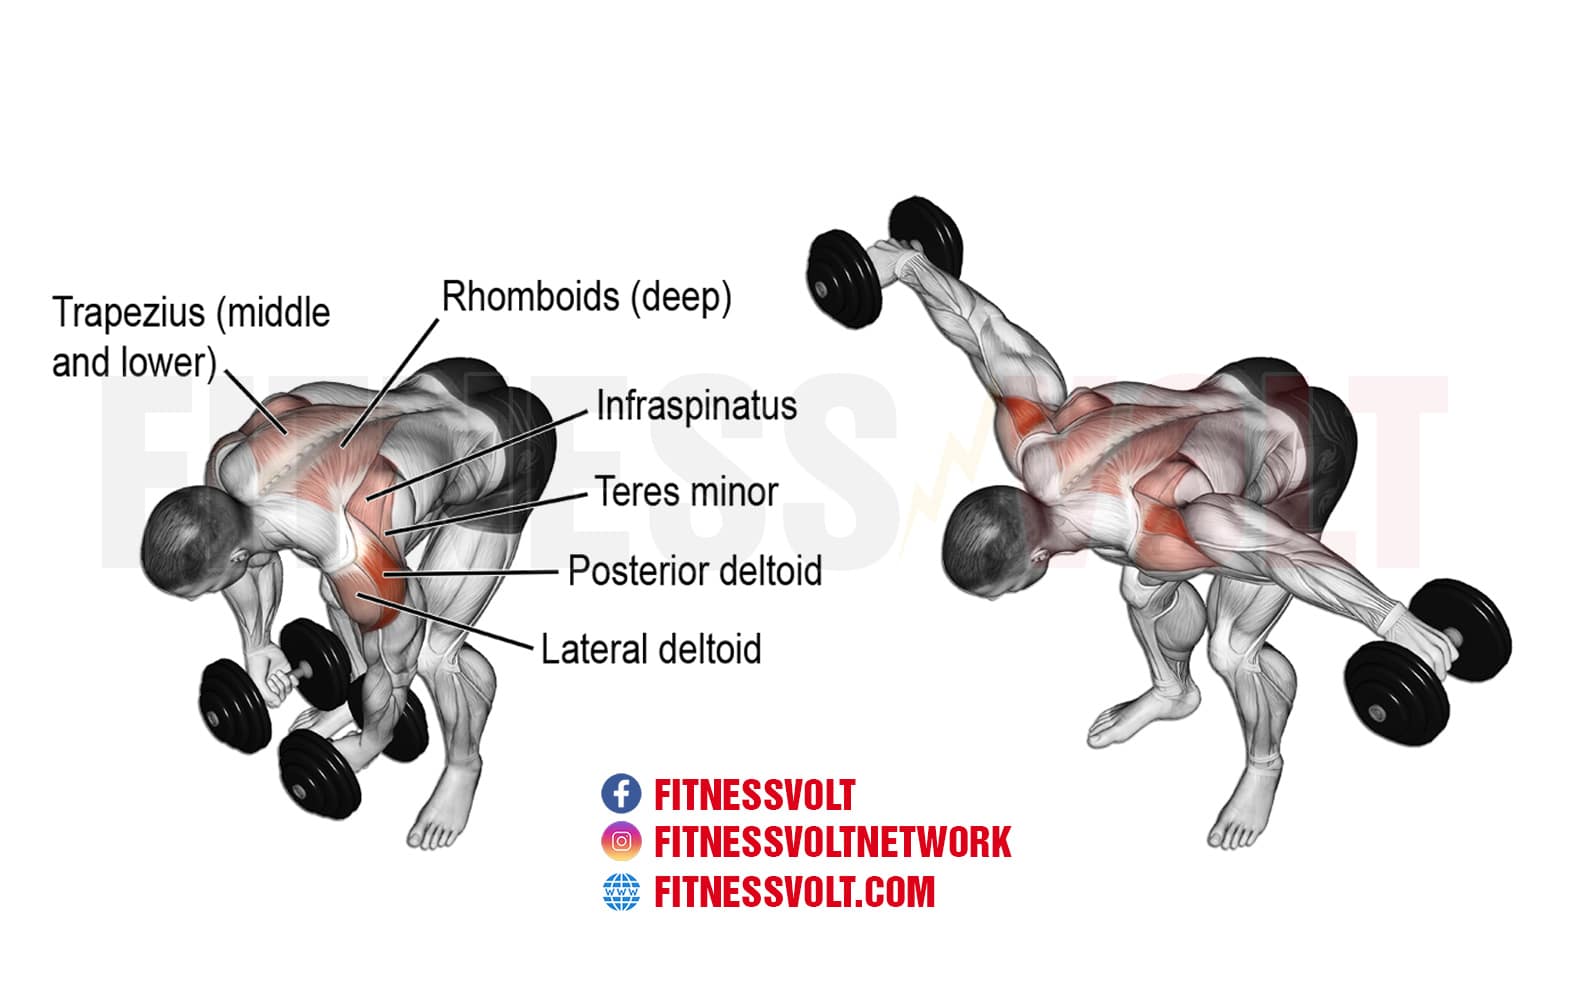
Rear Delt Fly With Dumbbells
The rear delt fly with dumbbells is an effective exercise for targeting the rear deltoid muscles, which are located at the back of the shoulders. These muscles are important for shoulder stability and posture. This exercise can be done with dumbbells and is suitable for people of all fitness levels.

How To Do The Rear Delt Fly With Dumbbells
To perform the rear delt fly with dumbbells, follow these steps:
- Stand with your feet shoulder-width apart and hold a dumbbell in each hand.
- Bend your knees slightly and hinge forward at the hips to bring your torso parallel to the floor.
- Engage your core and keep your back straight.
- Extend your arms straight down towards the floor with the dumbbells in hand.
- Slowly lift the dumbbells out to the side, keeping your elbows slightly bent, until your arms are parallel to the floor.
- Pause for a moment, then slowly lower the dumbbells back down to the starting position.
- Repeat for several repetitions.
Variations Of The Rear Delt Fly With Dumbbells
There are several variations of the rear delt fly with dumbbells that you can try to target different areas of the shoulders:
- Reverse fly: This variation involves lifting the dumbbells straight back behind you instead of out to the sides.
- Seated rear delt fly: This variation involves sitting on a bench and leaning forward to perform the exercise.
- Single-arm rear delt fly: This variation involves performing the exercise with one arm at a time.
Tips For Doing The Rear Delt Fly With Dumbbells
Here are some tips to help you perform the rear delt fly with dumbbells correctly:
- Start with light weights to avoid injury and gradually increase the weight as you become stronger.
- Keep your elbows slightly bent throughout the exercise to avoid strain on your joints.
- Focus on squeezing your shoulder blades together as you lift the dumbbells.
- Keep your core engaged and your back straight throughout the exercise.
- Breathe in as you lower the dumbbells and breathe out as you lift them.
Benefits Of The Rear Delt Fly With Dumbbells
The rear delt fly with dumbbells has several benefits:
- Strengthens the rear deltoid muscles, which are important for shoulder stability and posture.
- Improves shoulder mobility and flexibility.
- Can help prevent shoulder injuries.
- Can improve overall upper body strength.
Conclusion
The rear delt fly with dumbbells is a simple but effective exercise for targeting the rear deltoid muscles. By following the correct form and technique, you can strengthen these muscles, improve shoulder stability and posture, and prevent injuries. Remember to start with light weights and gradually increase the weight as you become stronger.
Related video of Rear Delt Fly With Dumbbells
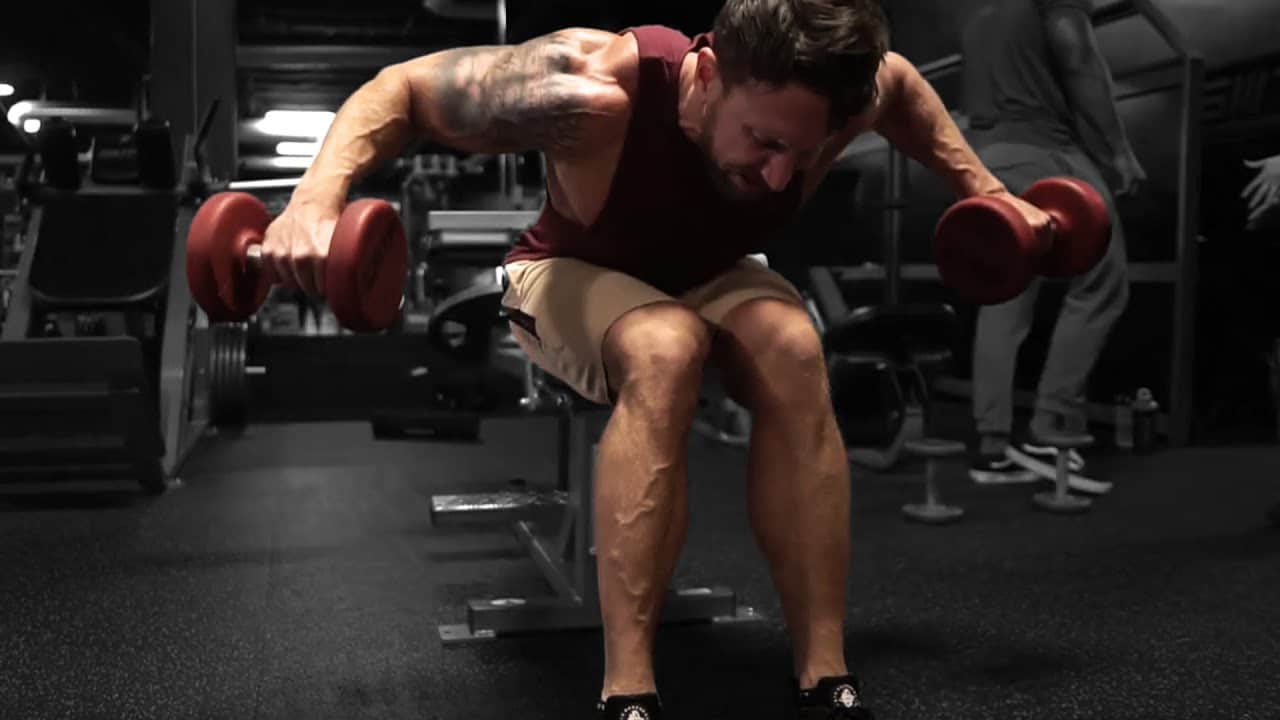
Dumbbell Bent Over Raise
The Dumbbell Bent Over Raise is an exercise that is designed to strengthen and tone the muscles in your back, shoulders, and arms. This exercise is perfect for people who are looking to build upper body strength, improve their posture, and increase their range of motion. In this article, we will provide you with a complete guide on how to perform the Dumbbell Bent Over Raise and the benefits of this exercise.
How to Perform the Dumbbell Bent Over Raise

To perform the Dumbbell Bent Over Raise, you will need a set of dumbbells. Here are the steps to follow:
- Stand with your feet shoulder-width apart and hold a dumbbell in each hand.
- Bend your knees slightly and hinge forward at your hips, keeping your back straight and your abs engaged.
- Bring the dumbbells up to your chest, with your elbows pointing out to the sides.
- Slowly raise the dumbbells up and out to the sides, keeping your elbows straight but not locked.
- Pause at the top of the movement, and then slowly lower the dumbbells back down to the starting position.
Repeat the exercise for 10-12 repetitions and 2-3 sets.
Tips for Performing the Dumbbell Bent Over Raise

Here are some tips to help you perform the Dumbbell Bent Over Raise effectively:
- Choose dumbbells that are appropriate for your fitness level.
- Keep your back straight and your core engaged throughout the exercise.
- Don't lock your elbows when lifting the dumbbells.
- Focus on raising the dumbbells with your shoulders, not your arms.
- Use a controlled motion when lifting and lowering the dumbbells.
The Benefits of Dumbbell Bent Over Raise

The Dumbbell Bent Over Raise offers several benefits, including:
- Strengthening the muscles in your back, shoulders, and arms.
- Improving your posture and reducing the risk of back pain.
- Increasing your range of motion in your shoulders.
- Helping you build upper body strength and tone your muscles.
When to Incorporate Dumbbell Bent Over Raise into Your Workout Routine
The Dumbbell Bent Over Raise is a great exercise to incorporate into your upper body workout routine. You can perform this exercise on its own or as part of a circuit. Here are some ideas on when to incorporate the Dumbbell Bent Over Raise into your workout routine:
- As part of an upper body workout
- As a warm-up exercise before performing other upper body exercises
- As part of a circuit training workout
Conclusion
The Dumbbell Bent Over Raise is a great exercise to help you build upper body strength, improve your posture, and increase your range of motion. By following the steps and tips provided in this article, you can perform this exercise effectively and safely. Incorporate the Dumbbell Bent Over Raise into your workout routine to see the benefits for yourself.